Showing posts with label Christmas. Show all posts

Wednesday, December 24, 2014

Christmas Presents


Merry Christmas Eve to everyone who celebrates it!  Even if you don't, I have a super cute present manicure to show you!  


present nails

I started out with a coat of Essie Protein Base Coat.  This really protects your nails from stains!  I then painted two coats of Essie Good as Gold on all my nails except for my ring fingers.  I painted two coats of Sinful Colors Gogo Girl on them.  When that was dry I applied one coat of Sally Hansen Dries Instantly to all my nails so the tape wouldn't pull up my base color.  

present nails

I then applied a slightly off-center cross of striping tape to each of my nails.  I wanted to create what looks like ribbons over wrapped boxes.  I painted Sinful Colors Gogo Girl over all of my gold nails, and Essie Good as Gold over my red nails.  

After painting each nail I immediately removed the striping tape with tweezers.  I made sure I remembered the order in which I put on the tape so that I wouldn't pull the piece crossed under the other piece of tape.  That can ruin your manicure.

When the manicure was dry, I took a small nail art brush and painted on the bows.  I used Nicole Glitter in My Stocking on all my nails but my ring fingers.  On my ring fingers I used the same red that I had been using, Sinful Colors Gogo Girl.  To make the red bows a little more opaque, I went over them again after the first coat had dried.

present nails

My final step before my top coat and clean-up was to apply a gold 1.5 mm stud in the middle of each bow.  I used clear polish and a dotting tool to stick them on.  I then applied two coats of Sally Hansen Dries Instantly.  

present nails

I do not own any cuticle oil, but I wanted my cuticles to look a little more moisturized for my pictures.  So I used coconut oil.  It worked super well!  That stuff is great!

Merry Christmas everyone!

Thursday, December 18, 2014

Classic Holiday


I love this manicure because it is just a really classic holiday look.  It is so classy and pretty and is really simple.  The key to a really classic Christmas manicure is gold and red:

red and gold christmas nails
Classic Christmas colors

I started out with a coat of Essie Protein Base Coat and then painted two coats of Revlon Forbidden on all my nails but my ring fingers.  I then painted two coats of Nicole Glitter in my Stocking on my ring fingers.  This is a really great glitter polish.  It has no pigments in it.  It is just red and gold glitter held together by clear polish.  The glitter is super concentrated, so it completely covers your nail in just two coats.  (I used the tin foil method to remove the glitter on these nails and it worked like a charm.  You don't need to worry about using glitter if you use that method.)

I finished off the manicure with two coats of Sally Hansen Dries Instantly.  I love how this manicure looks!  Red and gold is a great combination for the holidays!

red and gold christmas nails

Monday, December 15, 2014

Candy Cane Hearts


Whoa!  I have not blogged in so long!  I officially finished another semester today.  I am extremely happy to be done.  After my exams, as I waited for my sister to get out of her exams, I sat in the library and ate some fudge and a mini candy cane.  It was quite nice.  So, without further ado, here is a Christmassy manicure:

candy cane heart nails
Candy Cane Nails!

My cuticles are a bit of a mess.  The dry weather is taking its toll.
I started out with a coat of Essie Protein Base Coat.  I then applied two coats of Revlon Rain Forest, a dark green, glittery polish.  The white part of the candy canes is white acrylic paint that I painted on with a small nail art brush.  The red stripes are Rimmel Stiletto Red.  I used a toothpick and applied the stripes with a stippling motion.  I finished off the manicure with two coats of Sally Hansen Dries Instantly.

candy cane heart nails


candy cane heart manicure

This doesn't have much to do with nail art, but I don't know if you guys have heard of using coconut oil for skin care.  I bought a jar from Target for only a bit over $6, and was planning on using it to make a moisturizing lip scrub.  It comes in a jar like this:


It's solid, but melts really easily.  I saw people on the internet using it in lieu of lotion, so I wanted to try that out.  I have been using it instead of lotion on my face for almost a week and I am loving it!  You only need to use a teeny bit.  It absorbs really quickly and doesn't leave your face looking shiny and oily.

I have mild hormonal acne, but coconut oil is not supposed to make acne worse.  I have read that it is actually good for helping to control acne!  And, from what I have experienced so far, that is true!  I also started using it as eye makeup remover and I am never going back to using any other remover.  It didn't even leave my eyes feeling blurry.  I used my fingers to massage it over my eyes until the makeup was all broken down.  Then I used a damp cotton ball to wipe off the makeup residue.  That worked better than any other makeup remover I have used!  I would highly recommend this!  I bought the same brand that is in this picture (Spectrum).  It's a great product with a ton of uses!


Sunday, December 22, 2013

Christmas Lights

I occasionally paint my mom's nails and today I decided to take a picture of them:


I have seen many pictures of Christmas light manicures.  My mom wanted some festive nails and she suggested Christmas lights.  I'm happy with how they turned out.

The base color is two coats of Sally Hansen Hard to Get.  I painted on a coat of Sally Hansen Dries Instantly before painting the black wire just to ensure that the white and black polishes wouldn't blend (like, if the white wasn't as dry as I thought it was.)  I used a Milani black striper in Black Sketch to make the wire.  I did mess up a couple times and had some stray black lines, but I used a dotting tool in white to cover them up.

I then used a dotting tool to make green, blue, red, and yellow lights.  I dragged it a little to make the lights oval-like shapes.  I applied a coat of Sally Hansen Dries Instantly at the end.

Thursday, December 19, 2013

Christmas Wreaths

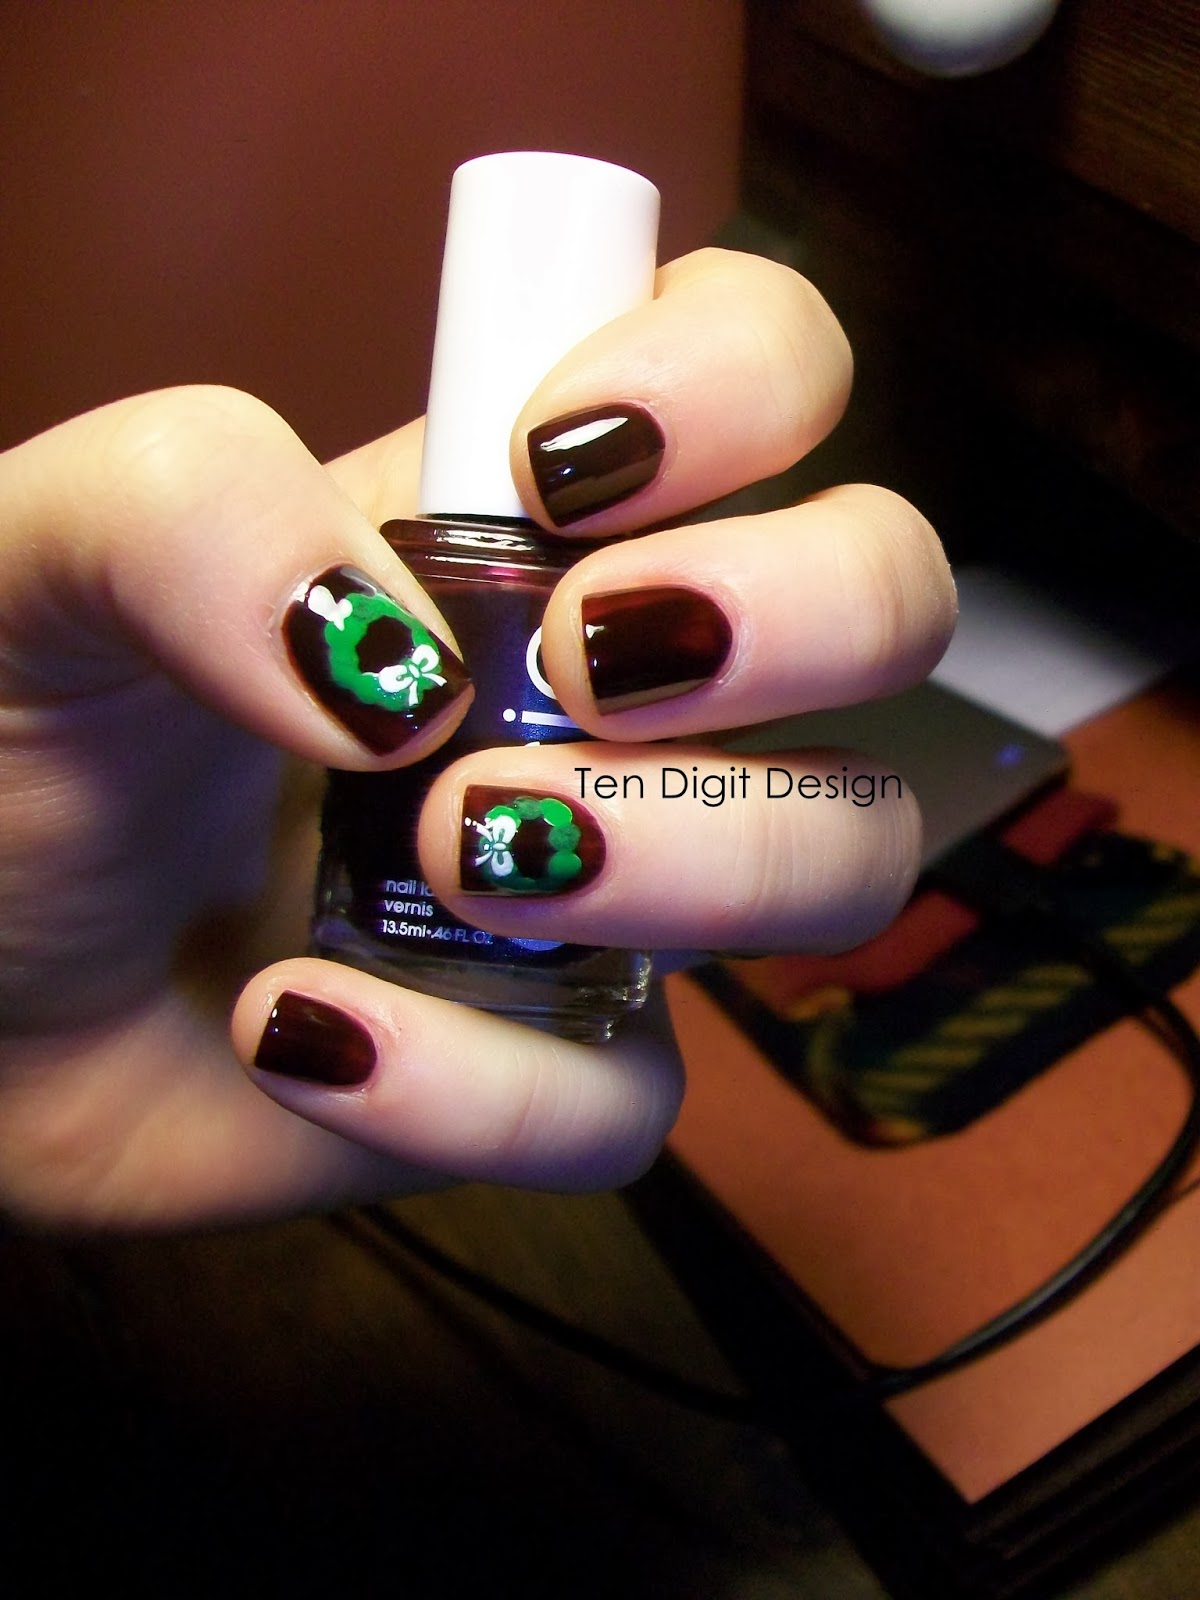
I have been looking forward to painting my nails with wreaths on them:


My base color is Essie Wicked, one of my all time favorite nail polish colors.  I used two coats of that.  Then I used a dotting tool and made rings of white dots to make the wreaths.  The reason I used white is because colors show up better on a white base.  I then dotted the color over the dry white dots.  Originally I made dark green and light green alternating dots, but, even with the white background, the dark green did not show up well against the dark red.  So, I went back over the dark green with the light green which is NYC High Line Green.  When all that was dry I applied some bow nail stickers and then put two coats of Sally Hansen Dries Instantly over everything.

Saturday, December 14, 2013

Christmas Trees

I only have one more exam for school and then I am officially done with this semester.  The exam can't come soon enough.  So, anyway, I saw this picture of Christmas tree nails on Pinterest a while ago and decided to try them out.  I did a variation of my own, though:


I started out by painting two coats of Rimmel Caramel Cupcake on all my nails.  Then I applied a coat of Sally Hansen Dries Instantly on my ring finger and thumb.  On the other fingers I applied a coat of red glitter.  Then I finished those nails off with a coat of Sally Hansen Dries Instantly.

I put masking tape on my ring finger and thumb so that I could achieve a neat triangular Christmas tree.  I painted a coat of Revlon Rain Forest for the trees and immediately removed the masking tape.  Then I stuck on some 1.5 mm gold studs from Born Pretty Store (which I shall never shop at again--I will tell you about it at the end of this post) for the stars at the tops of the trees.  I stuck them on with some Dries Instantly.  I finished those nails off with two coats of Dries Instantly.  Studs stay on your nails for much longer if you apply a suitable amount of top coat.  If I apply only one coat, they usually get scraped off more easily.  Two coats makes it almost impossible for the studs to come off, unless you are scratching at them very hard to try to remove them.

So, here's a little heads up about Born Pretty Store:
They sell great stuff for great prices, but most of their merchandise ships from Asia, so, depending on where you live, it can take a very long time to get to you if you choose free shipping (which I always do.)  Well, on October 4th I ordered some tiny hexagonal sequins for my nails.  They, apparently, shipped on October 9th.  I have still not received them, though, and my credit card was charged when they shipped.  Generally, things from Born Pretty Store take no more than one month to reach me.  I have contacted Born Pretty Store three times now to ask for another item or a refund and they have been of no help at all.  I am truly not cranky when it comes to mail mix-ups.  I am not at all annoyed that there was a problem with the package.  My complaint is that the customer service is terrible and I can't order anything else there because I do not want to risk something like that happening again.  Good thing my order was just a little over $5!  It would be awful if it was a lot more money than that!  I guess I will be sticking to Amazon for all of my nail art needs from now on.


Monday, December 9, 2013

Candy Canes

Again, sorry that I haven't posted in a while.  I have just been so busy!  I only have one more week of school to go before this semester is over.  I cannot wait!


I used two coats of Sally Hansen Hard To Get (the white polish) as my base color for all my nails.  Then, on my pointer, middle, and pinkie, I applied a coat of Sally Hansen Diamonds.  You can't really see it in the pictures, but it is a very fine, sort of iridescent glitter.  It is so pretty and reminds me of sparkling snow.  When that was still wet I applied red and green rhinestones near my cuticles and then used two coats of Sally Hansen Dries Instantly to finish them off.  

For my thumb and ring finger, I put on a coat of Dries Instantly and then, when that was dry, put on some tape.  The thick stripes were achieved with pieces of scotch tape and, for the thin stripes, I used striping tape.  I painted on Rimmel Burgundy Flirt and then immediately removed all the tape with tweezers.  A bit of red paint got under some of my tape, but I used a small nail art brush dipped in white to fix it.  I then applied two coats of Dries Instantly.  I am very happy with how these came out!