Showing posts with label glitter. Show all posts

Wednesday, July 1, 2015

The Land of the Free Because of the Brave


Hi guys!  I haven't blogged in a while.  I started a new summer job co-leading a summer activities program for kids on Monday.  I am pretty busy with it.  But I really wanted to do a good ol' patriotic manicure.  It is the Fourth of July in only three days.  I am an American, so I am going to be seeing fireworks.

My family used to always take 3-4 week camping trips in Canada every summer.  So, I was rarely in the USA during the Fourth of July.  It is cool to be here during the most American holiday.

Okay!  Here's what you came here to see:

fourth of july nails

I started out with a coat of OPI Natural Nail Base Coat.  I then painted two coats of Sinful Colors Snow Me White on my ring fingers, and two coats of Pure Ice Short Bet (a tan) on the rest of my nails.  I applied a coat of Sally Hansen Dries Instantly on the ring fingers to prep for striping tape.

I looked at pictures of camouflage print on Google.  I also watched some tutorials for camo nails.  I used the technique that Demelza's World used to create this effect.  Here's the link to her video: https://www.youtube.com/watch?v=v4K3Q9TCAXU

fourth of july nails

So, I started with my lightest colors and then went on from there.  I took a medium sized dotting tool and stippled on the blotches of colors.  I first used Essie Da Bush, a light earthy green.  I then moved on to Essie Fall in Line, the military green polish which inspired me to create this mani.  After that, I stippled on my black, Sinful Colors Black on Black.  I did the black before the brown because I wasn't sure if I was going to use brown at first.  I decided it needed it.  So, I stippled on the brown, Essie Mink Muffs, last.  I just did 3-4 blotches of each color on each nail.  Don't be afraid to overlap colors!  This creates a better effect!  It was quite easy and I am very happy and surprised with how well it came out!

fourth of july nails

I got plenty of polish on my cuticles.  That is totally fine, though!  Just clean it up at the end!  I used to avoid a mess like that at all costs, but your manicures really will turn out better if you concentrate on the art and then clean up after.

fourth of july nails


For the flag nails, I applied striping tape with my trusty curved tweezers and then painted on a generous coat of Sinful Colors Gogo Girl.  I immediately removed the tape.  When that was dry, I used navy blue acrylic paint to create the blue portion of the flag.  I used a small detail brush to do this.  When that was all dry (if you use matte acrylics, it is easy to tell when the paint's dry.  It will turn matte.) I used a detail brush to paint on some silver glitter polish (Sinful Colors Queen of Beauty) on the blue to represent the stars.

fourth of july nails

I finished off with two coats of Dries Instantly over everything.

fourth of july nails

The reason I am patriotic is not because of the government of anything like that.  No country is perfect.  I am patriotic because I respect all of the brave men and women who have fought for my freedom, died for my freedom, or sacrificed (health, family, ambitions, etc.) for my freedom.  America is a beautiful country.  There is such a diverse landscape.  In 2009 My family and I drove cross country for four weeks.  We camped at Yellowstone and Glacier National Parks.  We saw Mount Rushmore, Bighorn Canyon, and tons of other things.  It was amazing.

America would be nothing if not for the brave people who have defended and protected, and continue to defend and protect it.  I am truly grateful to them.

America is the Land of the Free BECAUSE of the Brave.

Sunday, June 14, 2015

Spring Gradient

I actually did this manicure months and months ago.  It's about time to post it.

gradient manicure

My cuticles were not in tip top shape here!  Haha!  The great thing about humid weather (like the kind of weather we are having now in the almost summer of the north east of the USA) is that is allows your cuticles to stay much nicer.

I started out with a coat of Essie Protein Base Coat (which I will never go back to after OPT's base coat) and then applied two coats of a white polish.  I then applied a coat of Sally Hansen Dries Instantly to prevent my base color being pulled up by my sponge.

gradient manicure

To the makeup sponge, I applied a stripe of L'Oreal Now You Sea Me, Pure Ice Shore Bet (a tan), and then a stripe of Essie Da Bush (an earthy green).  I stippled this onto my nails so the blue (Now You Sea Me) was at the tips of my nails.  I finished off with a coat of Essie As Gold as It Gets, which is flakes of glitter.  It is really not as exciting as it sounds.  You can see that it is barely gold at all.  I finished off the whole manicure with two coats of Sally Hansen Dries Instantly.

gradient manicure

Monday, June 8, 2015

Tan to Rosy


This is one of my favorite manicures!  I loved how feminine and pretty it is!

tan to rose gradient manicure

I started out with a coat of OPI Natural Nail Base Coat.  Then I applied two coats of Rimmel Caramel Cupcake, a tan polish.  I painted on one coat of Sally Hansen Dries Instantly after this so the sponge I planned on doing the gradient with wouldn't pull up my base color.

tan to rose gradient manicure

I then took a triangular makeup sponge and applied a stripe of Caramel Cupcake and a stripe of Sally Hansen Rockin' Hard onto the sponge.  I made the colors overlap a bit.  I then stippled that onto my nails.  I made sure to stipple quite a lot so the colors would blend.  I applied more polish to the sponge whenever I needed to.  

I immediately applied a coat of Salon perfect Cosmic Dust , a very fine holographic glitter which is absolutely mesmerizing in the sunlight, once I was done with all the sponging.  I finished off with two coats of Sally Hansen Dries Instantly.

tan to rose gradient manicure

I got Instagram today!  You can follow me!  My username is popstermargie
https://instagram.com/popstermargie/

Wednesday, June 3, 2015

Purple and Green Water Marbling


Hello again!  I am getting back into the nail art game!  I am planning on doing my cousin's nails for her confirmation.  I can't wait!  Anyway, I did my own nails yesterday.  I decided to do some water marbling.  The more you try this method, the better you get. Yesterday was my fifth time water marbling.

water marbling manicure

I started out with a coat of OPI Natural Nail Base Coat.  I then painted two coats of Sinful Colors Snow Me White on my ring fingers and thumbs.  I planned on water marbling only these fingers.  It is best to water marble over a white or a light polish so the water marbling colors will pop.  I painted two coats of Essie No More Film on the rest of my nails.

water marbling manicure

I then took masking tape and applied it all around my nails and about half way up the fingers that I was going to water marble.  This significantly reduces the amount of clean up you need to do after water marbling.  I suggest using masking tape because it is more flexible and easier to apply all around your nails.  It is also easier to remove because it sticks to itself a little less and doesn't peel into small strips, like scotch tape does.

water marbling manicure

I then started water marbling.  I used Essie No More Film and Essie Mojito Madness.  These were great polishes to use because the consistency was just right.  They spread out across the water very nicely.  If a polish is too thick, it will not spread out well.  Also, the water I used was a teeny bit warmer than room temperature.  Room temperature water is what you are supposed to use while water marbling.  The very slightly warmer water worked fine, though.

water marbling manicure

After dropping alternating drips of these two polishes onto the water, I took a toothpick and dragged it from the outer edge of the polish floating on the water into the center to create a clover shape.  I kept doing this until I saw something that I wanted on my nails.  Then I dipped the nail into the polish at the point that I wanted on my nails.  I left the nail submerged and gently blew onto the surface of the water to dry the excess polish.  I then took a toothpick and swirled it through the water to collect the excess polish.  After, I removed my finger from the water, removed the tape with small scissors and tweezers, and used acetone to clean up any polish that got onto my skin.  

I finished off with a coat of Sally Hansen Diamonds, a fine, iridescent glitter, on all of my nails, and then two coats of Sally Hansen Dries Instantly.

Tuesday, May 5, 2015

Ziplock Bag Technique


Hi!  Today's post is inspired by ohmygoshpolish from Youtube.  She does AMAZING manicures!  Around a week ago she released a video called "Zip Lock Bag - Navajo White Howlite."  In this video, she used a cool technique involving a ziplock bag!  I wanted to give it a try.  I will explain the method, but watch her video if you want to see it done!

https://www.youtube.com/watch?v=4v2hybB-Cw4


ziplock bag manicure

I started out with a coat of OPI Natural Nail Base Coat.  I then painted on two coats of Sinful Colors Snow Me White.  After that was dry, I went on to the ziplock bag technique.

ziplock bag manicure

So, you need a ziplock bag.  I used a small sandwich sized one.  I chose three polish colors, one of them my base color.  So, I used the white, Sally Hansen Pink Blink (the light pink), and Essie Angora Cardi (the dark pink).  I took a dotting tool and randomly dotted on some white (you can also just use the brush from the bottle of polish.)  You do not need to be at all neat with this because you eventually squish it all with your plastic bag.  I then immediately dotted on some of each of my pink colors.  Don't worry about them mixing.  This is totally fine.  

Right away, I grabbed my plastic bag and pressed it onto my nail on the wet polish.  I then immediately peeled it off and was left with a marbled effect.  If you ever aren't happy with a nail, just add more dots and squish the bag onto your nail again.  You can't go wrong!  

ziplock bag manicure

I wanted this to be glittery and even more girly, so I added a coat of Salon Perfect Cosmic Dust, a very fine holographic glitter which I love.  I finished off with two coats of Sally Hansen Dries Instantly.
This is what my bag looked like after I used it on all my nails:
ziplock bag manicure
the aftermath

ziplock bag manicure

I am nearly done with this semester of college.  I cannot wait for it to be over.  I am going nuts!  Is anybody graduating?  Leave a comment!  =)
   

Friday, March 13, 2015

Luck o' the Irish

So, St. Patrick's Day is soon (Tuesday), and I wanted to be festive.  I think I may have gotten better at doing festive manis sooner, so you guys can see them BEFORE the actual holiday.  Haha!

st. patty's day nails

I started out with a base coat of Sally Hansen Double Duty.  This is not good at protecting against staining.  I really need to get a new base coat.  Any suggestions?  Anyway, after applying the base coat, I applied two coats of my polishes.  I used Sally Hansen Golden-I on my thumbs and ring fingers, and I used Essie Mojito Madness on my other nails.

st. patty's day nails

I waited for that to dry, then I used a tiny nail art brush dipped in Revlon Rain Forest to paint on the stems that would be part of the rhinestone shamrocks.  I then took Double Duty and a dotting tool to apply four dark green rhinestones to my thumbs and ring fingers.  After that, I moved on to my green nails.

I used green and gold  holographic loose glitter to line the free edges of the green nails.  I used Double Duty to apply the glitter, and to pick it up with a dotting tool.  When that was done, I applied a coat of Essie As Gold as it Gets (a fine, gold glitter.  I got it because it was on sale for really cheap.  Honestly, it is NOT as gold as it gets.  It is a little disappointing, but it can look pretty over certain colors.  It is just really subtle.) on the green nails.

st. patty's day nails

I finished off with two coats of Sally Hansen Dries Instantly.

st. patty's day nails


Happy Saint Patrick's Day!  Follow me on Snapchat!  I post a lot of random stuff on there.


Friday, February 13, 2015

Valentine's Day Stamping

I have finally been festive!  I feel like I have been missing my chances to have festive nails for holidays and such.  Happy Valentine's Day!

valentine's day heart nails

I started out with a base coat of Sally Hansen Double Duty.  I then painted on two coats of Sally Hansen Pink Blink on all of my nails.  I did my thumbs a little differently:

conversation heart nails
Conversation heart!
I created a top of a heart shape near my cuticle so these nails could look a little like conversation heart candy.  If I were to do this again, I would start it farther down on my nail.

valentine's day heart nails

After letting the base color dry, I painted a coat of Bonbons pink glitter on my middle and pinky fingers.  I then stamped the rest of my nails.  On my pointers and rings, I used Bundle Monster's plate BM-317.  I used an old black polish so the images were dark (an old, goopy Sally Hansen Black Out.)  On my thumbs I used Bundle Monster's plate BM-425 to add the "I love you."  I used an old, goopy white polish so that it would be very opaque (Sally Hansen White On.)

valentine's day stamping nails
  
I painted a very fine holographic glitter (Salon Perfect Cosmic Dust) over my rings and pointers.  This is a BEAUTIFUL polish!  I included the picture above, even though it is a little blurry in spots, because you can really see the rainbow on the holographic glitter.  I finished off the manicure with two coats of Sally Hansen Dries Instantly

Remember to follow me on Snapchat at "margie-jane!"


Monday, February 9, 2015

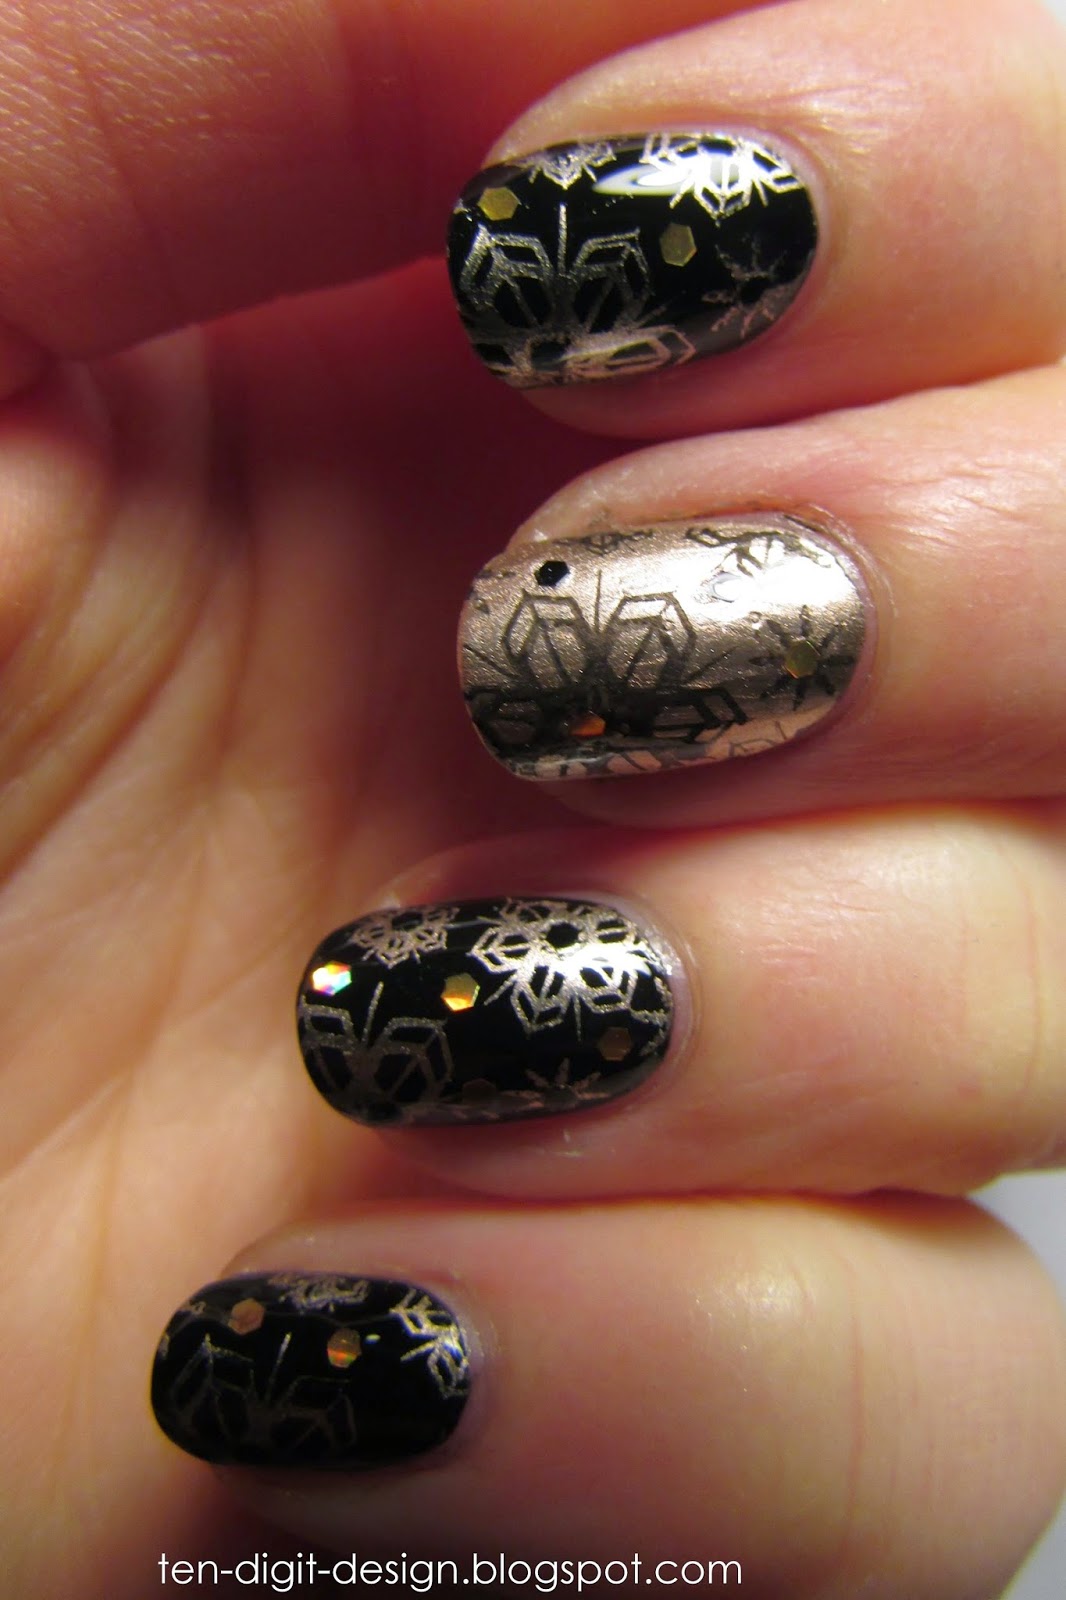
Golden Snowflakes

Hello!  I know, I have been very slow with blogging lately.  I was inspired to do these snowflake nails because I have been getting so much snow at my house.  I had my third snow day of this college semester today.

gold snowflake nails BM-323

I started out with a base coat of Sally Hansen Double Duty.  I then painted two coats of Sinful Colors Black on Black on all of my nails (the middle finger had some accidents, so I painted gold over top.  I had originally wanted everything to be uniform.)

I waited for my base to dry and then I took my Bundle Monster BM-323 stamping plate and stamped the snowflake image on all of my nails with Essie Good as Gold.  I accidentally double stamped my middle nail, so I painted a coat of the gold on it and then stamped it with the black.  

gold snowflake nails BM-323

I wanted to add a little extra sparkle, so I took my holographic black and gold loose glitters and applied it with a dotting tool dipped in Sally Hansen Double Duty.  I applied black glitter in the centers of all the gold snowflakes and gold glitter in the centers of the black snowflakes.  I also put a few random contrasting pieces of glitter on each nail (so, the nails with the black base had gold glitter placed randomly on them, and vise versa.)

I finished off with two coats of Sally Hansen Dries Instantly.

gold snowflake nails BM-323

I have a Snapchat!  I have had it for months, but I want to get in to using it more for posting random things and my nail art to my story.  Follow me if you like!  My username is margie-jane.  (My sister calls me that as a silly nickname.)  I have written the username under my social media to the right of this page and here is my personal ghost that you can point your camera at to immediately add me (without having to write in my username!!!)


Monday, December 29, 2014

New Years Nails


I titled this "New Years Nails" because glitter is involved and glitter is perfect for New Years, but this manicure can be done for any time.

copper and rose gold glitter nails


I started out with a coat of Essie Protein Base Coat and then painted two coats of  Essie Penny Talk on all my nails.  I then took Maybelline Gilded Rose (which is a gold polish with rose gold pieces of different sized glitter it in.  It is SO pretty!) and dabbed it straight from the brush onto the tips of my nails.  I then lightly stroked some polish up toward my cuticles to give the glitter a gradient effect.  It was quite easy and quick.

copper and rose gold glitter nails

I finished off the manicure with two coats of Sally Hansen Dries Instantly.

copper and rose gold glitter nails

I hope you all have a great New Year!!  I cannot believe how close 2015 is!

Tuesday, December 23, 2014

Glitter Snowflakes

Here is another snowflake manicure.  Sadly, it is raining at my house today.

glitter snowflake nails

I started out with a coat of Essie Protein Base Coat and then I applied two coats of Essie Borrowed & Blue to all my nails.  When that was dry, I used a dotting tool to put clear polish where I wanted to stick my small glitter pieces, and I used the same dotting tool to pick up the pieces of glitter to apply on my nails.  I got the glitter from Amazon.  It came in a pack of twelve colors.  All of them are holographic.  I used pink, light blue, and silver for this manicure:

nail art glitter

It took quite a while to place all the glitter.  I made snowflake shapes on all my nails except for my pinkies, which were too small.  I decided to apply three clusters of three pieces of glitter to both my pinkies.  

To make the snowflakes, I put three pieces of glitter in a triangular shape in the center of each nail and then I put three to four pieces in a line radiating out from the center.  I made six of these, since all snowflakes have six points.  I then added a piece of glitter on each side of the radiating lines, near the tips, to give them the crystalline, feathered-out points.  

I actually did not know how I was going to make the flakes, so I winged it.  This is not a science.  If you try this, make the snowflakes however you want to!

After I completed placing the glitter on each nail, I applied a coat of Salon Perfect Cosmic Dust, a very fine, holographic glitter.  These nails are SPARKLY!

glitter snowflake nails

I finished off with two coats of Sally Hansen Dries Instantly.

glitter snowflake nails

Monday, December 22, 2014

Dainty Snowflakes

I have been on a roll with wintry/Christmassy nails!  Here's a manicure I did a few days ago:

stamped snowflake nails

I started out with a coat of Essie Protein Base Coat.  I then painted two coats of Sinful Colors Snow Me White on all my nails.  After that I began stamping.  I used the two single snowflake images from Bundle Monster's plate BM-319.  I stamped on different colored snowflakes until I was happy with the effect.  
The shimmery darker blue is Essie Blue Rhapsody, the peach is Essie Haute as Hello, and, though you can't see it in the pictures, I also stamped on light blue snowflakes with Essie Borrowed & Blue.  The gray dots I added with a small dotting tool are Sinful Colors Cool Gray.  

stamped snow flake nails
There is a light blue flake in the lower left side of this nail.

I finished off the manicure with a coat of Sally Hansen Diamonds to add sparkle and shimmer, and then I applied two coats of Sally Hansen Dries Instantly.

stamped snow flake nails

It is snowing at my house right now!  I love it!  It isn't really sticking, but it looks so pretty!

Thursday, December 18, 2014

Classic Holiday


I love this manicure because it is just a really classic holiday look.  It is so classy and pretty and is really simple.  The key to a really classic Christmas manicure is gold and red:

red and gold christmas nails
Classic Christmas colors

I started out with a coat of Essie Protein Base Coat and then painted two coats of Revlon Forbidden on all my nails but my ring fingers.  I then painted two coats of Nicole Glitter in my Stocking on my ring fingers.  This is a really great glitter polish.  It has no pigments in it.  It is just red and gold glitter held together by clear polish.  The glitter is super concentrated, so it completely covers your nail in just two coats.  (I used the tin foil method to remove the glitter on these nails and it worked like a charm.  You don't need to worry about using glitter if you use that method.)

I finished off the manicure with two coats of Sally Hansen Dries Instantly.  I love how this manicure looks!  Red and gold is a great combination for the holidays!

red and gold christmas nails

Saturday, September 27, 2014

Perfect Polka Dots and Chevrons!

Hello!  Once again, it took me forever to blog!  I am now around 1/4 of the way through this semester! It has been crazy!  Happy fall!  Fall is my favorite season!

Before starting this manicure I searched "how to polka dot nails" on Google and found this picture:


I have always struggled with getting even polka dots on my nails, but following these steps made it super easy!  My other trick is to make sure you use a small dotting tool instead of a larger one.  I used one that was smaller than I thought I wanted, but the dots turned out much better this way!


I started out applying a coat of Essie Protein Base Coat to all of my nails.  I then painted on two coats of Sinful Colors Snow Me White.  Once that was dry, I took my small dotting tool and Sinful Colors Black on Black and followed that picture tutorial to create perfect polka dots on my pointer, pinkie, and thumb nails (and all of my nails on the other hand.)


I then waited for that to dry and put one coat of Sally Hansen Dries Instantly on my middle and ring fingernails so the chevron tape I was going to use wouldn't pull up my base color.  I then applied three strips of chevron tape to those nails and painted a coat of Sinful Colors Black on Black over top.  I then immediately removed the tape and was left with perfect chevron stripes.  I painted a coat of Salon Perfect Cosmic Dust (a fine, holographic glitter which I LOVE) over all of my nails once everything was dry.  I finished off with two coats of Sally Hansen Dries Instantly.

  
Something I am really loving about having rounded nail tips is that my manicures last longer!  When I had squared tips, the polish would chip off of the corners in a couple days.  My nails are weak, so the corners of my nails would also often break off.  The rounded shape is really working out for me!  Don't be afraid to experiment with different lengths and shapes!  You can always trim your nails shorter, grow them out again, or reshape them!!  The change you make to them will not be permanent!