Showing posts with label tape. Show all posts

Friday, June 19, 2015

Classic French Tips

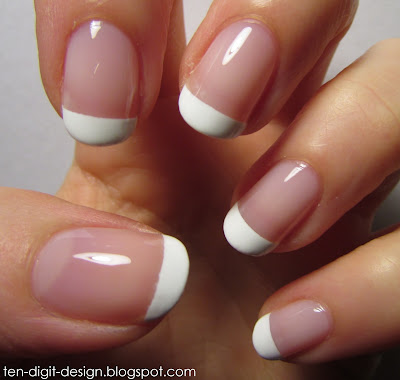
A manicure that is sure to go with absolutely anything is the french tip.  I absolutely love french tip manicures.  They are so classy and elegant.  Whenever I have a french tip mani, I can't stop looking at my nails.  A while ago I did a basic french tip manicure on my nails.  French tip manicures can also be spruced up with different colors, glitter, rhinestones, studs, and whatever else you want!  Here's my version of a classic french tip:

french tips

I started out with a coat of OPI Natural Nail Base Coat and then applied two coats of Pure Ice Satin Ribbon, a very light pink sheer polish (the typical pink used in french manicures).  I then applied a coat of Sally Hansen Dries Instantly because I planned on using french tip guide stickers to create perfect tips (you can also use striping tape, scotch tape, any other type of tape, or just do it freehand).  

french tips

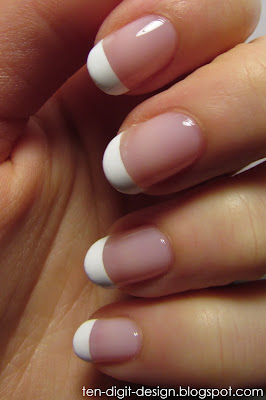
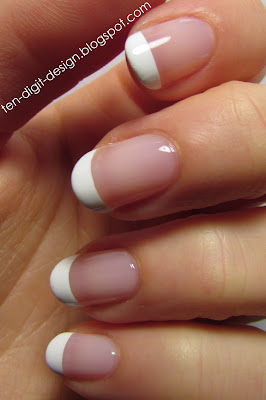
I applied my french tip guides and then used Sinful Colors Snow Me White for the french tips.  I removed the tape right away and then applied two coats of Sally Hansen Dries Instantly.

french tips

Here's something interesting:  I have read that the french tip is actually American.  A Hollywood makeup artist invented it because it went with any outfit a woman would be changing into.

french tips


Sunday, February 22, 2015

Gradient Zigzags

Color combinations can really make a manicure.  Even if your nails are painted just a couple basic colors, it can look SUPER cool if the colors go well together.  I am not too great at finding interesting color combinations, but this manicure's colors made me really happy.

gradient nails with zigzags

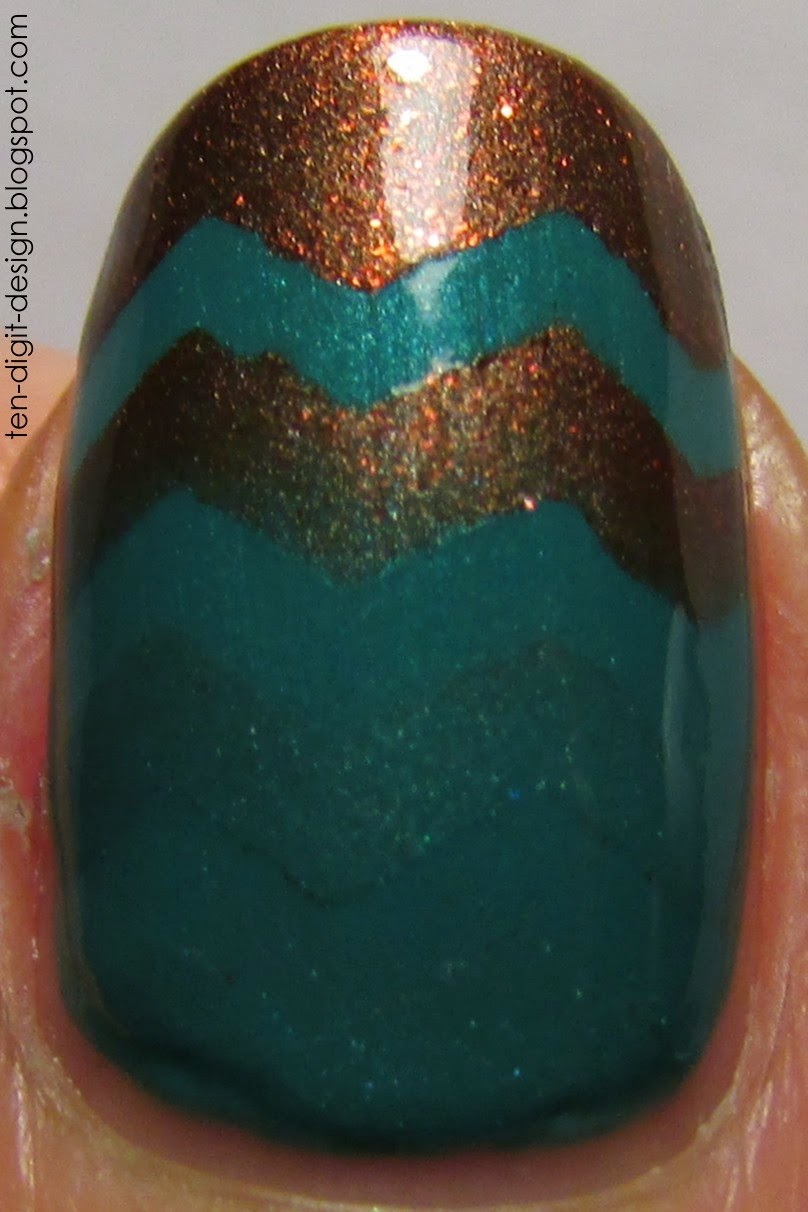
I started out with a base coat of Sally Hansen Double Duty.  I then painted on two coats of Sally Hansen Jazzy Jade (the teal color.)  After that, I painted a coat of Sally Hansen Dries Instantly over everything to get them ready for tape and sponging.  I took a makeup sponge and applied Sally Hansen Jazzy Jade and Sally Hansen Kinetic Copper (which is a magnetic polish that is also super pretty without the magnetic effect) and painted them onto the sponge so they overlapped in the middle.  

zigzag gradient nails

I then rolled the sponge over all of my nails, except for my ring fingers and thumbs.  For those nails, I took some zigzag tape (which I got from Amazon) and applied three strips across each nail.  I stuck the tape on the back of my hand before applying it to my nails so that it would be gentler on the polish.  I always try to minimize the chance of tape removing my base color.  That is THE WORST!  I then used the same sponge and rolled it over these nails until I got my desired gradient.  I removed the tape after doing each nail.  I always reapply a good amount of polish to the sponge in between each nail.

gradient zigzag nails

I decided to stick a holographic, mirrored star sticker on my ring finger.  The points were sharp, so I trimmed them a teeny bit with small scissors.  I then applied two coats of Dries Instantly over everything.  Gradients dry super fast, so you don't really need to wait to apply your top coat.  I applied three coats of top coat on my ring finger to make the star not stick out as much.

Follow me on Snapchat!

Saturday, October 4, 2014

Burgundy French Tips


So, another week has gone by.  I was inspired to do this manicure a while ago when I was looking in a Nordstrom catalog.  I wasn't interested in any of the items being advertised, but one model had dark red french tips and I thought they looked AMAZING!  So, I finally got around to recreating that manicure:

red french tips

I started out with a coat of Essie Protein Base Coat.  I then painted on one coat of Sally Hansen Innocent Nude, which is a sheer peach-ish color.  When that had dried I painted on a coat of Sally Hansen Dries Instantly so my tape wouldn't pull up my base color.  I took ten french tip guides and stuck them on the back of my hand so they wouldn't be too sticky on my nails (this is pretty important because it is SUPER frustrating when a sticker is too sticky and gets completely stuck to your polish and then ruins the entire painted nail when you pull it up.)

I then applied those to my nails near the tips.  I made sure that I applied them so that entire tip of each nail would be painted red.  I then painted on a coat of Rimmel Burgundy Flirt (which I LOVE-- it is the perfect blood red) and then immediately removed the french tip guides from each nail.  I finished off the manicure with two coats of Dries Instantly.

I love this manicure because it looks super classy and elegant and clean.  This actually lasted for a week on my nails before I took it off!

red french tips

Saturday, September 27, 2014

Perfect Polka Dots and Chevrons!

Hello!  Once again, it took me forever to blog!  I am now around 1/4 of the way through this semester! It has been crazy!  Happy fall!  Fall is my favorite season!

Before starting this manicure I searched "how to polka dot nails" on Google and found this picture:


I have always struggled with getting even polka dots on my nails, but following these steps made it super easy!  My other trick is to make sure you use a small dotting tool instead of a larger one.  I used one that was smaller than I thought I wanted, but the dots turned out much better this way!


I started out applying a coat of Essie Protein Base Coat to all of my nails.  I then painted on two coats of Sinful Colors Snow Me White.  Once that was dry, I took my small dotting tool and Sinful Colors Black on Black and followed that picture tutorial to create perfect polka dots on my pointer, pinkie, and thumb nails (and all of my nails on the other hand.)


I then waited for that to dry and put one coat of Sally Hansen Dries Instantly on my middle and ring fingernails so the chevron tape I was going to use wouldn't pull up my base color.  I then applied three strips of chevron tape to those nails and painted a coat of Sinful Colors Black on Black over top.  I then immediately removed the tape and was left with perfect chevron stripes.  I painted a coat of Salon Perfect Cosmic Dust (a fine, holographic glitter which I LOVE) over all of my nails once everything was dry.  I finished off with two coats of Sally Hansen Dries Instantly.

  
Something I am really loving about having rounded nail tips is that my manicures last longer!  When I had squared tips, the polish would chip off of the corners in a couple days.  My nails are weak, so the corners of my nails would also often break off.  The rounded shape is really working out for me!  Don't be afraid to experiment with different lengths and shapes!  You can always trim your nails shorter, grow them out again, or reshape them!!  The change you make to them will not be permanent!

Friday, September 19, 2014

Vintage Half Moon Mani!!!!

Hi Guys!  Once again, I went FOREVER without blogging.  I am now 1/5 of the way through this semester.  Haha!  Counting down the days!  I did a manicure last week and haven't posted it yet, but I did another manicure today and I am so so so excited about how it came out!  I rounded my nail tips today and then decided to do a manicure that looks better with rounded tips!  I remembered how much I had always wanted to create a vintage half moon mani!  So, I did it!  Here it is:


So, half moon manicures are actually from the 1930s and '40s!  I LOVE vintage stuff!  I have many more pictures of my manicure down below.  I was just so super excited about how it came out!  Here is an old advertisement for nail polish:


Now, on to the tutorial!

I started out with a base coat of Essie Protein Base Coat (this really keeps my nails from staining).  I then painted on two coats of Essie Oui Madame (I LOVE that name!  It is a sheer, pearly color) on all of my nails.  After that was dry I painted on a coat of Sally Hansen Dries Instantly so the tape wouldn't pull up my base color.  

Another thing you can do as a precaution before applying tape (that you are planning to remove) is to stick the tape to the back of your hand to take off a little of the stickiness.  I applied half of a hole reinforcement to each of my nails near the cuticle and a french tip guide (you can use a curved or straight strip of tape too) to each of my nail tips.  I made them cover the entire tip of my nail without leaving any nail showing beyond them because I wanted to keep the entire tips the white color.  

Don't apply these like you would if you were going to paint French tips on your nails (unless you have really long nails).  It is easy to do that because of being so used to applying them that way.  You want to cover the whole tip.

I then painted on a coat of Rimmel Stiletto Red in between the two pieces of tape on each nail.  As soon as I painted each nail, I quickly removed the tape.  I cleaned up the sides of my nail beds with a nail art brush dipped in acetone.  If any red polish went under the tape I took the brush dipped in acetone and lightly dabbed at the messy edges to remove the teeny jagged bits of red polish.  Just don't dab the brush too many times in one spot or your base color might come off too.  I finished off the manicure with two coats of Dries Instantly.

I have this really old makeup kit that I found in my grandma's antique shop.  I decided to use this as a prop for my photos.  Enjoy!


Vintage pics!


Monday, August 25, 2014

Peachy Triangles

I am back!  I got home from Florida yesterday.  I had a great time!  So, I have been planning this manicure since I was still in Florida and have been super excited to get to do my nails again.  I finally got the chance and I am super happy that my bare nails grew out nicely while I was in Florida.

I started out with a coat of Essie Protein Base Coat and then painted on two coats of Essie Haute as Hello.  That polish takes a long time to dry, for some reason.  I then applied one coat of Sally Hansen Dries Instantly so the tape wouldn't pull up my base color.  

Before starting the manicure I had cut ten squares of scotch tape.  I applied a corner of one to each of my nails so I would be left with peach triangles at the tips after applying my next color.  The polish that I painted over top of everything is Sinful Colors Cool Gray.  This is a very opaque color, so it completely hid the peach.  After painting the gray on each nail I removed the tape.  

After that was all dry I used a silver striper (Salon Perfect Silver Plated) to line the place where the two colors met.  I was planning on doing that all along, but after taping I actually needed to do that to make the manicure look cleaner.  Not all the lines were completely clean, but the silver polish over that hid the messy bits perfectly.  
I finished off with two coats of Dries Instantly.


Thursday, August 7, 2014

Summery Hearts

I have finally had some inspiration for nail art. I was in a bit of a rut when it came to thinking of ideas for nail art, but today I was really in the mood and ideas were coming to me! Yay! Before I show you what I have done, I want to tell you a teeny bit about nail files again. A few posts ago I told you about my nail care routine and I showed you that "Ruby Stone" crystal nail file. Well, that thing turned out to not be so great. It was so "gentle" on my nails that it didn't really do anything and the texture just gave me chills. So, I got a super nice crystal nail file from Amazon! It is by OPI and it was only a little over $5. It works wonderfully! All the nail art girls online rave about these types of crystal or glass files and I really know why now! It is gentle on the nails, but it also files very quickly! It doesn't leave other layers of nail sticking out where you just filed and it leaves your nails nice and smooth at the edges, instead of sharp.
Okay! On with the manicure!
I started with a coat of Essie Protein Base Coat and then painted on two coats of Sinful Colors Snow Me White, which is the best white polish I have used. I then applied one coat of Sally Hansen Dries Instantly to all my nails because I was going to be taping and sponging. Before I even started the manicure, I took masking tape and cut out hearts to stick to my nails. Here is what I used to create the hearts:
So, when the top coat had dried, I applied two small hearts made out of masking tape to my ring fingers and one large heart to my thumbs. I chose to use masking tape because it is thick and I figured it would be easy to grab with tweezers when I needed to remove it from my nails. I used a square of tape with a heart shape cut out of it on both my pointers so I could achieve a small colorful heart on those nails. Here is what my gradient sponge looked like:
The teal is Sally Hansen Jazzy Jade; the tan is Rimmel Caramel Cupcake; and the coral is Sally Hansen Coral Reef. On my middles and pinkies I did plain gradients. After I sponged over the other nails, though, I used my tweezers to remove the masking tape hearts. This was very easy because they didn't completely adhere to my nails, so the edges were easy to grip with tweezers. It didn't matter that they were not totally stuck to my nails because you do not use a sweeping motion when sponging; you use a stippling, dabbing motion. Also, the paint is contained in the sponge and is not runny, so nothing could seep underneath the tape. After removing all the tape, I applied two coats of Dries Instantly to finish off the manicure.

Friday, May 16, 2014

Music Video

I was a bit bored one day, so I decided to watch a music video on Youtube. I watched Katy Perry's "Dark Horse" video, which is quite bizarre, as are most music videos. Then I saw this:
I paused the video and stared at these nails for a bit. I loved them! So, I decided I had to recreate them!
I started out with two coats of Essie Protein Base Coat. I have been having issues with peeling nails, and I finally pinned down that I think I have only been having them as long as I have been using Sally Hansen Double Duty. Don't hold me to that because I may be wrong, but I am experimenting. I had hated Essie Protein Base Coat last time I used it because it had been hard to apply polishes over it. They streaked a lot. This time, though, that did not happen at all. I have no clue why. Now I am reevaluating it. It worked really well this time. I don't know what happened the other few times I used it. So, anyway, after the base coat, I applied two coats of Sally Hansen Golden-I. When that was dry I painted on a coat of Sally Hansen Dries Instantly because I had been planning on using tape as guides to make the blue triangles. I ended up freehanding the blue (Covergirl Out of the Blue), though. I used the brush from the bottle to apply it. I got some on the sides of my fingers around my nails, but a nail art brush dipped in acetone corrected that problem. If I messed up with the blue on my actual nail, I would take a brush dipped in acetone and gently brush it on the nail to remove the blue and NOT the gold with it. That works really well, especially if you have many layers of polish under the color you want to remove. Just don't go over the same spot too many times, because that will start to remove the base color too. If that happens, as it did to me on my right hand, just take some of your base color and dab it on the bare patch. The top coat will smooth everything out at the end. I finished off with two coats of Dries Instantly.

Sunday, May 4, 2014

Three Musketeers

My sister, my best friend, and I have always joked that we are the Three Musketeers.  My sister is Porthos, I am Aramis, and my best friend is Athos.  Today I was inspired to create a Three Musketeers manicure:


I started out with a base coat of Sally Hansen Double Duty.  Then I painted two coats of Rimmel Blue Eyed Girl on my ring fingers, thumbs and pointer fingers.  On my pinkies and middle fingers, I applied two coats of Sally Hansen Hard to Get (the white.)  When that was dry, I put a coat of Sally Hansen Dries Instantly on all of my nails.
 

When all that was dry, I took a toothpick dipped in Sally Hansen Celeb City (silver) and carefully drew on the script on my pointers and ring fingers.  I had to use a stippling motion at times.  Make sure you don't push when you do this, so you don't leave gouges in your base color.  My pointer says, "tous pour un," which is French for "all for one."  My ring fingers says, "un pour tous," which means "one for all."
 

I used a striping brush dipped in the same silver polish to make the three crossed swords on my thumbs.  I then used a dotting tool to make the handles.  For the crosses, I cut thin pieces of scotch tape and crossed them on my nails and painted Rimmel Blue Eyed girl over top.  I didn't feel like writing in script on my right hand, so all four fingers on my right hand have the crosses.  These crosses are similar to the ones that would be on the Musketeers' uniforms, which were blue.  I didn't make the crosses as fancy as they would have been because I wanted it to look neat.  I finished off with two coats of Sally Hansen Dries Instantly.  All for one!  And one for all!!

Saturday, April 26, 2014

Pink and Yellow Color Blocking

For Easter, my very nice parents bought me some nail polish!  Haha!  The colors I used today are two of my new polishes:


I started out with a coat of Sally Hansen Double Duty.  I then painted two coats of Sinful Colors Unicorn (the light yellow) on all of my nails.  After that, I applied a coat of Sally Hansen Dries Instantly (I also got that for Easter!) so the tape wouldn't pull up my base color.  I then stuck on triangular pieces of tape horizontally across my nails and painted on a coat of Sally Hansen Rockin' Hard.  I used tweezers and my fingers to remove the tape immediately after painting on Rockin' Hard.  I had difficulties doing this today, for some reason, so the lines are not all as crisp as I would like them to be.  Acetone helped me to fix up my major mistakes and issues, though.  I finished off with two coats of Dries Instantly.

I just want to take a moment to thank all of you for being interested enough in this blog that you keep coming back and looking!  I never expected anybody to ever look at this blog!  You guys don't know how excited I get when I see that people from all over the world have viewed it!!  Thank you all so much!!!  =) 

Monday, March 31, 2014

Earthy with Triangles

Okay guys, I am sure you can notice that I am not the most creative person when it comes to titles.  I am the same way with college essays.  Haha!  So, I actually have a few manicures piled up so I can blog even when I am too busy to paint my nails, which hasn't really been happening lately. =)  I was planning on posting this one later, but I love it so much and am super excited about it.  I currently have this on my nails:


I started out with a base coat of Sally Hansen Double Duty.  I then painted two coats of each color onto my nails.  On my ring fingers and thumbs I used Essie Mink Muffs; on my pointers I used Sally Hansen Espresso; Essie Da Bush (I LOVE that name!) on my middle fingers; and Essie Borrowed & Blue on my pinkies.  I love earthy color combinations.  Color combinations can really make a manicure interesting, even if the designs aren't too complicated.  I really like simple, striking manicures.

After putting on all of my colors, I applied a coat of Seche Vite so the tape wouldn't pull up my color.  For the little triangles at my cuticles, I used Essie Wicked (one of my favorite polishes.)  To create the triangles, I took two thin strips of scotch tape and overlapped the ends so they formed a narrow "V" shape.  I then put the hollow of the "V" where I wanted the dark red triangles to be.  Once I painted on my color, I quickly removed the tape.  To finish off the manicure, I applied two coats of Sally Hansen Dries Instantly.  There are a lot of bubbles in the manicure because I need a new bottle of Dries Instantly.  Mine is really thick and gloopy.  It is too bad that you can only use half of the bottle before throwing it out.  I am loving the length of my nails at the moment.  I can't have them too long because then they drive me crazy.  I have been putting up with them well this time, though.  =)   I hope you like this manicure!  


Friday, February 14, 2014

Homemade Valentines

Happy Valentine's Day!  I got over two feet of snow yesterday and last night and I am currently having my second snow day in a row!  My nails came out a little less neat than I expected, but the effect totally reminded me of paper Valentine hearts made by kids!


Before I painted anything on my nails, I took ten squares of masking tape, pressed them on the back of my hand to take off some of the stickiness, folded them in half, cut out a half heart shape, and then unfolded them.  This created a heart shaped hole in the centers that I used as my heart stencils.  This was a lot harder to do than I expected.  Later I realized that it may have been easier if I had folded the tape with the sticky side out.  Haha!  Oh well.  Here is roughly what each piece of tape looked like:


For my manicure, I started out with one coat of Sally Hansen Double Duty, which I was happy with for my last manicure.  (That manicure lasted for five days without chips!!)  Then I painted on two coats of Sally Hansen Coral Reef as my base color.  After that was all dry, I applied a coat of Sally Hansen Dries Instantly so the tape wouldn't pull up my base color.  When that was dry, I applied the heart stencils.  I painted over them with Confetti Cherries Jubilee on my pinky and middle fingers and thumbs.  On my ring and pointer fingers, I painted the heart with Nicole Glitter in my Stocking.  The glitter hearts worked well, but the thinner polish leaked under the tape, even when I thought it was pressed down nicely.  I cleaned up the edges of the reddish hearts by lightly sweeping them with a nail art brush in acetone.  Doing this works because the acetone cannot take off all the other layers of polish underneath because you are not sweeping with force and going over the spots repeatedly.  I actually sort of like the rougher effect since it looks like homemade Valentine's Day cards!  I finished off the manicure with two coats of Dries Instantly.  


Sunday, February 9, 2014

Squigglies and Gems

Today I bought some more scissors that cut fun patterns.  So, I decided to do a Valentine's Day-like manicure.  (The only reason I say "Valentine's Day" is because of the colors):


I started out with one coat of Sally Hansen Double Duty Base & Top Coat on all of my nails.  I don't know how this will do with preventing stains, but it didn't take too long to dry and it was very easy to apply polish over it.  (So, it is much cheaper and already better than that Essie Protein base coat.)  After the base coat was dry, I applied two coats of an L.A. Colors polish (the light pink) on my ring fingers and thumbs and two coats of China Glaze Designer Satin on all of my other nails.  I then applied light pink rhinestones on my pointers, middles, and pinkies.  I stuck them on with a dots of Sally Hansen Dries Instantly.  To finish them off, I applied two coats of Sally Hansen Dries Instantly.

For my thumbs and ring fingers, I applied one coat of Dries Instantly so the tape wouldn't pull up my base color.  Then I applied the tape that I cut with my squiggly scissors where I wanted my light pink base color to show through.  I then painted over the tape with China Glaze Designer Satin and immediately removed the tape.  I finished off these nails with two coats of Dries Instantly.

Sunday, February 2, 2014

Zigzag and Dots

A couple nights ago I was watching TV when a nail art idea suddenly came to me.  The idea turned into this:


Before I even started painting my nails, I took scotch tape and cut strips of it down the middle with a pair of zigzag scissors.
Then I applied two coats of Rimmel Caramel Cupcake to my nails.  (No, I did not apply a base coat.
Mostly because I didn't feel like spending even more time waiting for stuff to dry and also because this nude color doesn't stain.)  When that was dry, I applied a coat of Seche Vite so the tape wouldn't lift up my base color.  I then applied the tape where I wanted the tan to stay.
I used Milani Sail Away as my second color and I removed each piece of tape immediately after painting on the blue.  The Seche Vite was GREAT for taping over!  The base color did not lift up anywhere!  This top coat is living up to my expectations!
After all the taping, painting, and removing tape, I took a dotting tool and put a dot of the opposite color paint in between zigzags, if that makes any sense (look at the pictures and you'll get it.)  I love this because it looks like the two halves are stuck together like puzzle pieces!  I didn't need to dot on any white because the polishes I used are very opaque.
When everything was dry, I painted on two coats of Seche Vite.