Showing posts with label holiday. Show all posts

Wednesday, July 1, 2015

The Land of the Free Because of the Brave


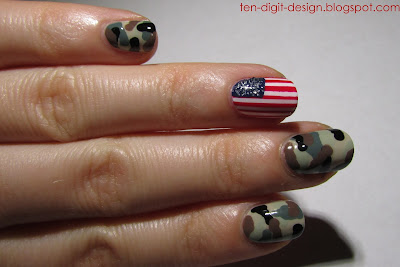
Hi guys!  I haven't blogged in a while.  I started a new summer job co-leading a summer activities program for kids on Monday.  I am pretty busy with it.  But I really wanted to do a good ol' patriotic manicure.  It is the Fourth of July in only three days.  I am an American, so I am going to be seeing fireworks.

My family used to always take 3-4 week camping trips in Canada every summer.  So, I was rarely in the USA during the Fourth of July.  It is cool to be here during the most American holiday.

Okay!  Here's what you came here to see:

fourth of july nails

I started out with a coat of OPI Natural Nail Base Coat.  I then painted two coats of Sinful Colors Snow Me White on my ring fingers, and two coats of Pure Ice Short Bet (a tan) on the rest of my nails.  I applied a coat of Sally Hansen Dries Instantly on the ring fingers to prep for striping tape.

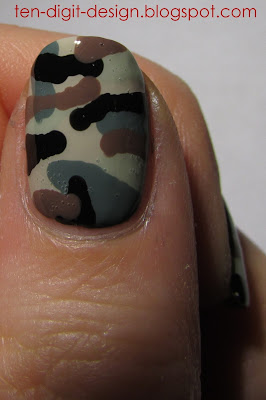
I looked at pictures of camouflage print on Google.  I also watched some tutorials for camo nails.  I used the technique that Demelza's World used to create this effect.  Here's the link to her video: https://www.youtube.com/watch?v=v4K3Q9TCAXU

fourth of july nails

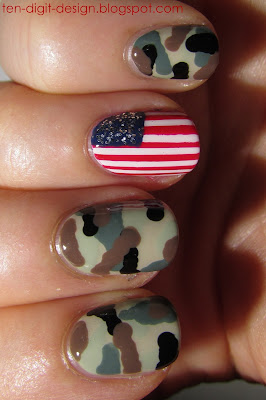
So, I started with my lightest colors and then went on from there.  I took a medium sized dotting tool and stippled on the blotches of colors.  I first used Essie Da Bush, a light earthy green.  I then moved on to Essie Fall in Line, the military green polish which inspired me to create this mani.  After that, I stippled on my black, Sinful Colors Black on Black.  I did the black before the brown because I wasn't sure if I was going to use brown at first.  I decided it needed it.  So, I stippled on the brown, Essie Mink Muffs, last.  I just did 3-4 blotches of each color on each nail.  Don't be afraid to overlap colors!  This creates a better effect!  It was quite easy and I am very happy and surprised with how well it came out!

fourth of july nails

I got plenty of polish on my cuticles.  That is totally fine, though!  Just clean it up at the end!  I used to avoid a mess like that at all costs, but your manicures really will turn out better if you concentrate on the art and then clean up after.

fourth of july nails


For the flag nails, I applied striping tape with my trusty curved tweezers and then painted on a generous coat of Sinful Colors Gogo Girl.  I immediately removed the tape.  When that was dry, I used navy blue acrylic paint to create the blue portion of the flag.  I used a small detail brush to do this.  When that was all dry (if you use matte acrylics, it is easy to tell when the paint's dry.  It will turn matte.) I used a detail brush to paint on some silver glitter polish (Sinful Colors Queen of Beauty) on the blue to represent the stars.

fourth of july nails

I finished off with two coats of Dries Instantly over everything.

fourth of july nails

The reason I am patriotic is not because of the government of anything like that.  No country is perfect.  I am patriotic because I respect all of the brave men and women who have fought for my freedom, died for my freedom, or sacrificed (health, family, ambitions, etc.) for my freedom.  America is a beautiful country.  There is such a diverse landscape.  In 2009 My family and I drove cross country for four weeks.  We camped at Yellowstone and Glacier National Parks.  We saw Mount Rushmore, Bighorn Canyon, and tons of other things.  It was amazing.

America would be nothing if not for the brave people who have defended and protected, and continue to defend and protect it.  I am truly grateful to them.

America is the Land of the Free BECAUSE of the Brave.

Friday, March 13, 2015

Luck o' the Irish

So, St. Patrick's Day is soon (Tuesday), and I wanted to be festive.  I think I may have gotten better at doing festive manis sooner, so you guys can see them BEFORE the actual holiday.  Haha!

st. patty's day nails

I started out with a base coat of Sally Hansen Double Duty.  This is not good at protecting against staining.  I really need to get a new base coat.  Any suggestions?  Anyway, after applying the base coat, I applied two coats of my polishes.  I used Sally Hansen Golden-I on my thumbs and ring fingers, and I used Essie Mojito Madness on my other nails.

st. patty's day nails

I waited for that to dry, then I used a tiny nail art brush dipped in Revlon Rain Forest to paint on the stems that would be part of the rhinestone shamrocks.  I then took Double Duty and a dotting tool to apply four dark green rhinestones to my thumbs and ring fingers.  After that, I moved on to my green nails.

I used green and gold  holographic loose glitter to line the free edges of the green nails.  I used Double Duty to apply the glitter, and to pick it up with a dotting tool.  When that was done, I applied a coat of Essie As Gold as it Gets (a fine, gold glitter.  I got it because it was on sale for really cheap.  Honestly, it is NOT as gold as it gets.  It is a little disappointing, but it can look pretty over certain colors.  It is just really subtle.) on the green nails.

st. patty's day nails

I finished off with two coats of Sally Hansen Dries Instantly.

st. patty's day nails


Happy Saint Patrick's Day!  Follow me on Snapchat!  I post a lot of random stuff on there.


Tuesday, March 3, 2015

International Women's Day Nails!!

Well, I had been doing well with blogging.  Oh, well.  I am super excited about this manicure today!!  March 8th is International Women's Day!  I will be away this weekend with my two best women (my sister and my best friend), so I won't have time to do a mani then.  I decided to do it a little early!

My inspiration:  Rosie the Riveter


rosie the riveter nails

I started out with a coat of Sally Hansen Double Duty.  The I painted two coats of polish on all my nails.  On my thumbs I used Sally Hansen Pink Blink; on my ring fingers I used Sinful Colors Gogo Girl; and on the rest of my nails I used Avon Sunshine.  I then applied a coat of Sally Hansen Dries Instantly on the yellow nails to get them ready for tape.  

On my thumbs I took a bunch of earthy polishes to represent skin tones and then dotted those on to form a female sign.  I used a couple different sized dotting tools to do this.

female sign nails

Then I moved on to my ring fingers.  I used white acrylic paint and a dotting tool to make my polka dots, like on Rosie's bandanna.  

rosie the riveter nails

I then applied corners of squares of masking tape near my cuticles on the yellow nails and then painted over that with Sally Hansen Thinking of Blue.  These are supposed to be Rosie's blue shirt.  I used yellow because it matches the background of the Rosie the Riveter poster.  

rosie the riveter nails

Anyway, after the blue dried, I mixed gray and white acrylic paint together to make a lighter gray.  I then took a small detail brush and outlined the collars of the shirt and painted on the lapels and buttons and line showing where the shirt comes together.  I used gray acrylic paint and a dotting tool to add Rosie's lapel pin.

I finished off with two coats of Sally Hansen Dries Instantly.  

HAPPY INTERNATIONAL WOMEN'S DAY!  BE PROUD TO BE A WOMAN!!

You can follow me on Snapchat if you want!


Friday, February 13, 2015

Valentine's Day Stamping

I have finally been festive!  I feel like I have been missing my chances to have festive nails for holidays and such.  Happy Valentine's Day!

valentine's day heart nails

I started out with a base coat of Sally Hansen Double Duty.  I then painted on two coats of Sally Hansen Pink Blink on all of my nails.  I did my thumbs a little differently:

conversation heart nails
Conversation heart!
I created a top of a heart shape near my cuticle so these nails could look a little like conversation heart candy.  If I were to do this again, I would start it farther down on my nail.

valentine's day heart nails

After letting the base color dry, I painted a coat of Bonbons pink glitter on my middle and pinky fingers.  I then stamped the rest of my nails.  On my pointers and rings, I used Bundle Monster's plate BM-317.  I used an old black polish so the images were dark (an old, goopy Sally Hansen Black Out.)  On my thumbs I used Bundle Monster's plate BM-425 to add the "I love you."  I used an old, goopy white polish so that it would be very opaque (Sally Hansen White On.)

valentine's day stamping nails
  
I painted a very fine holographic glitter (Salon Perfect Cosmic Dust) over my rings and pointers.  This is a BEAUTIFUL polish!  I included the picture above, even though it is a little blurry in spots, because you can really see the rainbow on the holographic glitter.  I finished off the manicure with two coats of Sally Hansen Dries Instantly

Remember to follow me on Snapchat at "margie-jane!"


Monday, December 29, 2014

New Years Nails


I titled this "New Years Nails" because glitter is involved and glitter is perfect for New Years, but this manicure can be done for any time.

copper and rose gold glitter nails


I started out with a coat of Essie Protein Base Coat and then painted two coats of  Essie Penny Talk on all my nails.  I then took Maybelline Gilded Rose (which is a gold polish with rose gold pieces of different sized glitter it in.  It is SO pretty!) and dabbed it straight from the brush onto the tips of my nails.  I then lightly stroked some polish up toward my cuticles to give the glitter a gradient effect.  It was quite easy and quick.

copper and rose gold glitter nails

I finished off the manicure with two coats of Sally Hansen Dries Instantly.

copper and rose gold glitter nails

I hope you all have a great New Year!!  I cannot believe how close 2015 is!

Wednesday, December 24, 2014

Christmas Presents


Merry Christmas Eve to everyone who celebrates it!  Even if you don't, I have a super cute present manicure to show you!  


present nails

I started out with a coat of Essie Protein Base Coat.  This really protects your nails from stains!  I then painted two coats of Essie Good as Gold on all my nails except for my ring fingers.  I painted two coats of Sinful Colors Gogo Girl on them.  When that was dry I applied one coat of Sally Hansen Dries Instantly to all my nails so the tape wouldn't pull up my base color.  

present nails

I then applied a slightly off-center cross of striping tape to each of my nails.  I wanted to create what looks like ribbons over wrapped boxes.  I painted Sinful Colors Gogo Girl over all of my gold nails, and Essie Good as Gold over my red nails.  

After painting each nail I immediately removed the striping tape with tweezers.  I made sure I remembered the order in which I put on the tape so that I wouldn't pull the piece crossed under the other piece of tape.  That can ruin your manicure.

When the manicure was dry, I took a small nail art brush and painted on the bows.  I used Nicole Glitter in My Stocking on all my nails but my ring fingers.  On my ring fingers I used the same red that I had been using, Sinful Colors Gogo Girl.  To make the red bows a little more opaque, I went over them again after the first coat had dried.

present nails

My final step before my top coat and clean-up was to apply a gold 1.5 mm stud in the middle of each bow.  I used clear polish and a dotting tool to stick them on.  I then applied two coats of Sally Hansen Dries Instantly.  

present nails

I do not own any cuticle oil, but I wanted my cuticles to look a little more moisturized for my pictures.  So I used coconut oil.  It worked super well!  That stuff is great!

Merry Christmas everyone!

Thursday, December 18, 2014

Classic Holiday


I love this manicure because it is just a really classic holiday look.  It is so classy and pretty and is really simple.  The key to a really classic Christmas manicure is gold and red:

red and gold christmas nails
Classic Christmas colors

I started out with a coat of Essie Protein Base Coat and then painted two coats of Revlon Forbidden on all my nails but my ring fingers.  I then painted two coats of Nicole Glitter in my Stocking on my ring fingers.  This is a really great glitter polish.  It has no pigments in it.  It is just red and gold glitter held together by clear polish.  The glitter is super concentrated, so it completely covers your nail in just two coats.  (I used the tin foil method to remove the glitter on these nails and it worked like a charm.  You don't need to worry about using glitter if you use that method.)

I finished off the manicure with two coats of Sally Hansen Dries Instantly.  I love how this manicure looks!  Red and gold is a great combination for the holidays!

red and gold christmas nails

Monday, December 15, 2014

Candy Cane Hearts


Whoa!  I have not blogged in so long!  I officially finished another semester today.  I am extremely happy to be done.  After my exams, as I waited for my sister to get out of her exams, I sat in the library and ate some fudge and a mini candy cane.  It was quite nice.  So, without further ado, here is a Christmassy manicure:

candy cane heart nails
Candy Cane Nails!

My cuticles are a bit of a mess.  The dry weather is taking its toll.
I started out with a coat of Essie Protein Base Coat.  I then applied two coats of Revlon Rain Forest, a dark green, glittery polish.  The white part of the candy canes is white acrylic paint that I painted on with a small nail art brush.  The red stripes are Rimmel Stiletto Red.  I used a toothpick and applied the stripes with a stippling motion.  I finished off the manicure with two coats of Sally Hansen Dries Instantly.

candy cane heart nails


candy cane heart manicure

This doesn't have much to do with nail art, but I don't know if you guys have heard of using coconut oil for skin care.  I bought a jar from Target for only a bit over $6, and was planning on using it to make a moisturizing lip scrub.  It comes in a jar like this:


It's solid, but melts really easily.  I saw people on the internet using it in lieu of lotion, so I wanted to try that out.  I have been using it instead of lotion on my face for almost a week and I am loving it!  You only need to use a teeny bit.  It absorbs really quickly and doesn't leave your face looking shiny and oily.

I have mild hormonal acne, but coconut oil is not supposed to make acne worse.  I have read that it is actually good for helping to control acne!  And, from what I have experienced so far, that is true!  I also started using it as eye makeup remover and I am never going back to using any other remover.  It didn't even leave my eyes feeling blurry.  I used my fingers to massage it over my eyes until the makeup was all broken down.  Then I used a damp cotton ball to wipe off the makeup residue.  That worked better than any other makeup remover I have used!  I would highly recommend this!  I bought the same brand that is in this picture (Spectrum).  It's a great product with a ton of uses!


Monday, November 10, 2014

Veterans' Day French Tips


I have been wanting to do this manicure for a long time now, and I thought it was a very fitting time for it since it is Veterans' Day in the United States tomorrow.  

patriotic french tips
Veterans' Day french tips
 I started out with a coat of Essie Protein Base Coat.  I then painted on two coats of Revlon Pale Cashmere on all my nails and finished that off with a coat of Sally Hansen Dries Instantly to avoid pulling up my base color with the tape.  When that was all dry, I applied french tip guides on all my nails.  I made sure that I stuck them all to the back of my hand first to make them a little less sticky.  

I then created a red, white, and blue french tip pattern and immediately removed the tape.  The red is Rimmel Stiletto Red, the white is Sinful Colors Snow Me White, and the blue is Sinful Colors Into the Blue.  I finished off this manicure with two coats of Sally Hansen Dries Instantly.

patriotic french tips

Thank you to all of the men and women who have served America in such a noble, significant way.  I am patriotic because of you.  

Wednesday, October 29, 2014

Houndstooth Halloween


So, as promised, here is my Halloween post!  I actually did a manicure four days ago and then decided to add to it.  Here's what I applied four days ago:

sally hansen salon effects check it out

These are Sally Hansen Salon Effects Real Nail Polish Strips.  The pattern is "Check It Out," which is just a houndstooth pattern.  The strips have held up super well over the past few days.  The trick with these is to make absolutely certain that you do not put them too close to your cuticles and that you run the smooth side of the nail file thing that comes with them all over the surface of the strips to make sure they are secured to your nails.  If bits near your cuticles are sticking up, they will continue to stick up more when they dry.  Then they will start flaking off.  

This time I was super careful and they have not been peeling up!  I actually only used one set (instead of both sets that come in a package) because my nails are small and I can cut them in half and use the excess on my nails on my opposite hand.  You cannot save extra strips because they dry out and are then useless.  So, if your nails are small enough, you can get two manicures out of one package!  

sally hansen salon effects check it out


So, anyway, I applied these to my bare nails and then finished them off with two coats of Sally Hansen Dries Instantly.  I wrapped the tips to try to make them last longer.  ("Wrapping the tips" just means running the nail polish brush along the free edge of your nails to seal everything in.)

So, on to the Halloween part!  I decided to use two techniques that I had never used before.  I first used the dry brush technique to rough up the look of the houndstooth.  This means that I made sure that the nail polish brush had almost nothing on it before streaking it over my nails.  You can see what I mean here:

houndstooth halloween nails

I first used Sinful Colors Snow Me White and then applied some Sinful Colors Black on Black.  After this, I taped up my fingers (as you can see above) so I wouldn't make as much of a mess on my hands.  I used the blood spatter technique (which I have been wanting to do ever since The Nailasaurus did her "Dexter" nails: http://www.thenailasaurus.com/2013/09/31DC2013-dexter-splatter-nail-art.html)

I took a regular straw and two different shades of red.  Here is my straw before and after:


I put down a paper towel to make sure I didn't get paint anywhere and then took my first red polish (Rimmel Burgundy Flirt) and used the brush from it to paint a glob onto the end of half of a straw.  I then would position the straw a few inches above my nail and blow out hard.  It was quite difficult and I figured out why.  That polish was rather thick.  The thicker the polish, the harder it is to do this.   I ended up sticking the actual straw into the bottle of polish to make sure I got a lot in it.  I managed to get some spatters on my nails with this polish, but I then used another red (Essie Wicked--a very dark red) and the other section of my straw to add to the spatters.

This polish was thinner, so was much easier to blow.  I just used the nail polish brush to apply some polish to the end.  If you try this and are having a hard time, it could be because of the thickness of your polish.  

If I were to do this again, I would not have added any extra black on my base.  the black makes it harder to see the red.  Also, I would prefer to do it over a white base.  I want to try that some time.  White would make the red really stand out.  I removed the tape on my fingers and used acetone and Q-tips and a nail art brush to clean up everything.  Cleanup took a while.  I then applied two coats of Sally Hansen Dries Instantly.

 So, without further ado, here is my finished product:

houndstooth halloween nails

houndstooth halloween nails

grungy blood spatter nails

grungy blood spatter nails

grungy blood spatter nails


Happy Halloween!

Thursday, July 3, 2014

"Three Cheers...

...for the red, white, and blue!" =) I am desperately trying to make my titles a little more interesting instead of complete labels! Haha! I have been planning my Independence Day manicure. Here it is!
I love manicures that don't just have the same thing on every nail! I am trying to get better at mixing it up a bit! I started out with a coat of Essie Protein Base Coat and then applied two coats of each color. On my middles and pinkies, I applied Sally Hansen Thinking of Blue; on my thumbs, pointers, and rings I applied Sally Hansen Hard to Get (a white.) When the polish was still wet, I immediately applied two holographic star sequins to both my middle fingers. I applied a coat of Sally Hansen Dries Instantly to my thumbs to get them ready to sponge, and to my pointers and rings to get them ready for striping tape. I then took some silver and light blue glitter polish and did a slight glitter gradient on my pinkies. I have never done that before, so it didn't come out great, but I am happy with it. Next, I painted stripes of red (Rimmel Stiletto Red), white, and blue on a makeup sponge and stippled that on my thumbs. I then cut twenty pieces of striping tape and applied five to both of my pointer and ring fingers. I made sure the tape was pressed down at the sides of my fingers so the red polish wouldn't go underneath the tape. I then painted on a coat of Rimmel Stiletto Red on all four of those fingers. Before painting the next finger I would remove the striping tape from the one that I just painted. To finish off the manicure, I painted two coats of Dries Instantly on all of my nails, except for my middles on which I applied three coats so the corners of the stars would not stick out as much. Happy Independence Day to the Americans!

Thursday, May 22, 2014

Memorial Day Water Marbling

I wanted to do a nice, patriotic design for Memorial Day, so I decided I would try my hand at water marbling again. I have only done it once before, and not for years. I started out with a coat of Essie Protein Base Coat and then painted two coats of Sally Hansen Hard to Get (white) on all of my nails. For the nails that I didn't want to water marble, I used a dotting tool to apply some Dally Hansen Double Duty to stick my red, silver, and blue loose glitter to. I just made diagonal rows of the glitter. I will now try to explain how to water marble, but you can also watch videos on Youtube about how to do it. It is time consuming, but not too difficult: You will need a plastic (preferably disposable) cup of room temperature water. The temperature of the water affects how the polish reacts to the water. You will also need scotch tape and a toothpick. Oh! And at least two different colors of polish. I have heard that the newer and runnier the polish, the better. The polish I used today wasn't super new and thin, but I got it to work. Just don't use super old polish. I used the scotch tape to cover a lot of the tip of my finger so the clean-up process would be a lot easier. I then unscrewed all of my polishes so that I could work fast. Speed is something you will need, but still be careful. I then began holding the brushes around an inch or two above the surface of the water and dripping the polish onto the surface. It should spread out. I only put three drops on--a drop of each color (red, white, and blue.) You can do more, though. (I dripped the next color in the center of the previous spread out color.) I then quickly took my toothpick and made lines and swirls in the polish to make an interesting pattern. I am not too great at this. Then I put the nail that I wanted the marbling on face down in the spot of the pattern that I wanted to be on my nail.
I held it in there for a few seconds and then began gently blowing on the surface of the water to quickly dry the remaining polish. I left my finger in the water and then took the toothpick and swirled it in the dry polish on top of the water to pick it up and remove it from the water. I finally took my water marbled nail out of the water and carefully removed all the tape. I then used a flat nail art brush dipped in acetone to clean up the excess polish on my finger. There was barely any, since I used tape. Oh! Don't try to dry the nail off! It will air dry! I repeated this for four of my nails. (The blue is Sinful Colors Into the Blue and the red is Rimmel Stiletto Red.
I finished off this manicure by applying two coats of Sally Hansen Dries Instantly. Something that can go wrong is the polish dripping off your brush and settling in a blob at the bottom of the cup. If this happens, just adjust the distance you are holding the brush above the surface of the water. You may need to drip it higher or lower. Just experiment. I am no expert at this technique and I ended up with five blobs of polish at the bottom of my cup. Also, sometimes the polish does not spread out on the water. It sits in a small circle on top of the water. If this happens, just blow on it so it will dry and then swirl a toothpick around it to wrap it up and remove it. I may have had some of these problems because some of my polish was a little thick. I did get it to work, though. The hardest part for me is dragging in a neat design and placing my finger in the right spot. One of my nails on my right and is super boring because I misplaced my finger. (Haha! That sounds super weird!) I hope I explained this so you guys can understand, at least, some of it!