Monday, December 30, 2013

Bird Tracks in the Snow

I do not have any snow where I live right now, but I am hoping for some soon!  I love snow!  So, anyway, I also love how little bird tracks look when they are imprinted in snow.  They are just so adorable.  I decided to paint some bird tracks on my nails:


I started out with two coats of Sally Hansen Hard To Get as my base color.  When that was dry I took a toothpick to make the bird tracks.  I would draw a line first and then make the two little toes coming out on either side of the middle of the line.  I used two different shades of gray for the tracks.  The brownish-gray is Essie Chinchilly and the other one is Sinful Colors Cool Gray.  I finished off with two coats of Sally Hansen Dries Instantly.

Thursday, December 26, 2013

Sponging, Stamping, and NEW CAMERA!

I am super excited to be using a better camera now!  I'm still not an expert hand photographer, but I will continue to get better with practice.  I am super excited about sponging, so I decided to do another sponging manicure today:


My base color is two coats of Rimmel English Rose.  When that was dry, I applied a coat of Sally Hansen Dries Instantly to my nails so that my sponge wouldn't pick up my base polish.  I put a line of Rimmel English Rose and a line of Milani Rapid Orchid on a cosmetic sponge.  I put on the lighter color first and then slightly overlapped it with the darker color.  Then I sponged the two colors on to my nails.  I had to reapply polish on the sponge after every couple of nails that I sponged.  When I was happy with the gradient and opaqueness of the new color, I allowed that to dry.  (Oh!  By the way, you can reuse a triangular makeup sponge many times.  I simply cut off the end that I use after I am done sponging all of my nails.)

I wanted to do some stamping too.  I used Bundle Monster Plate BM404.  The white polish is Sally Hansen White On, a polish that I use exclusively for stamping because it is old and very thick.  I applied two coats of Dries Instantly to finish off my manicure.

Wednesday, December 25, 2013

Nail Stamping Tutorial

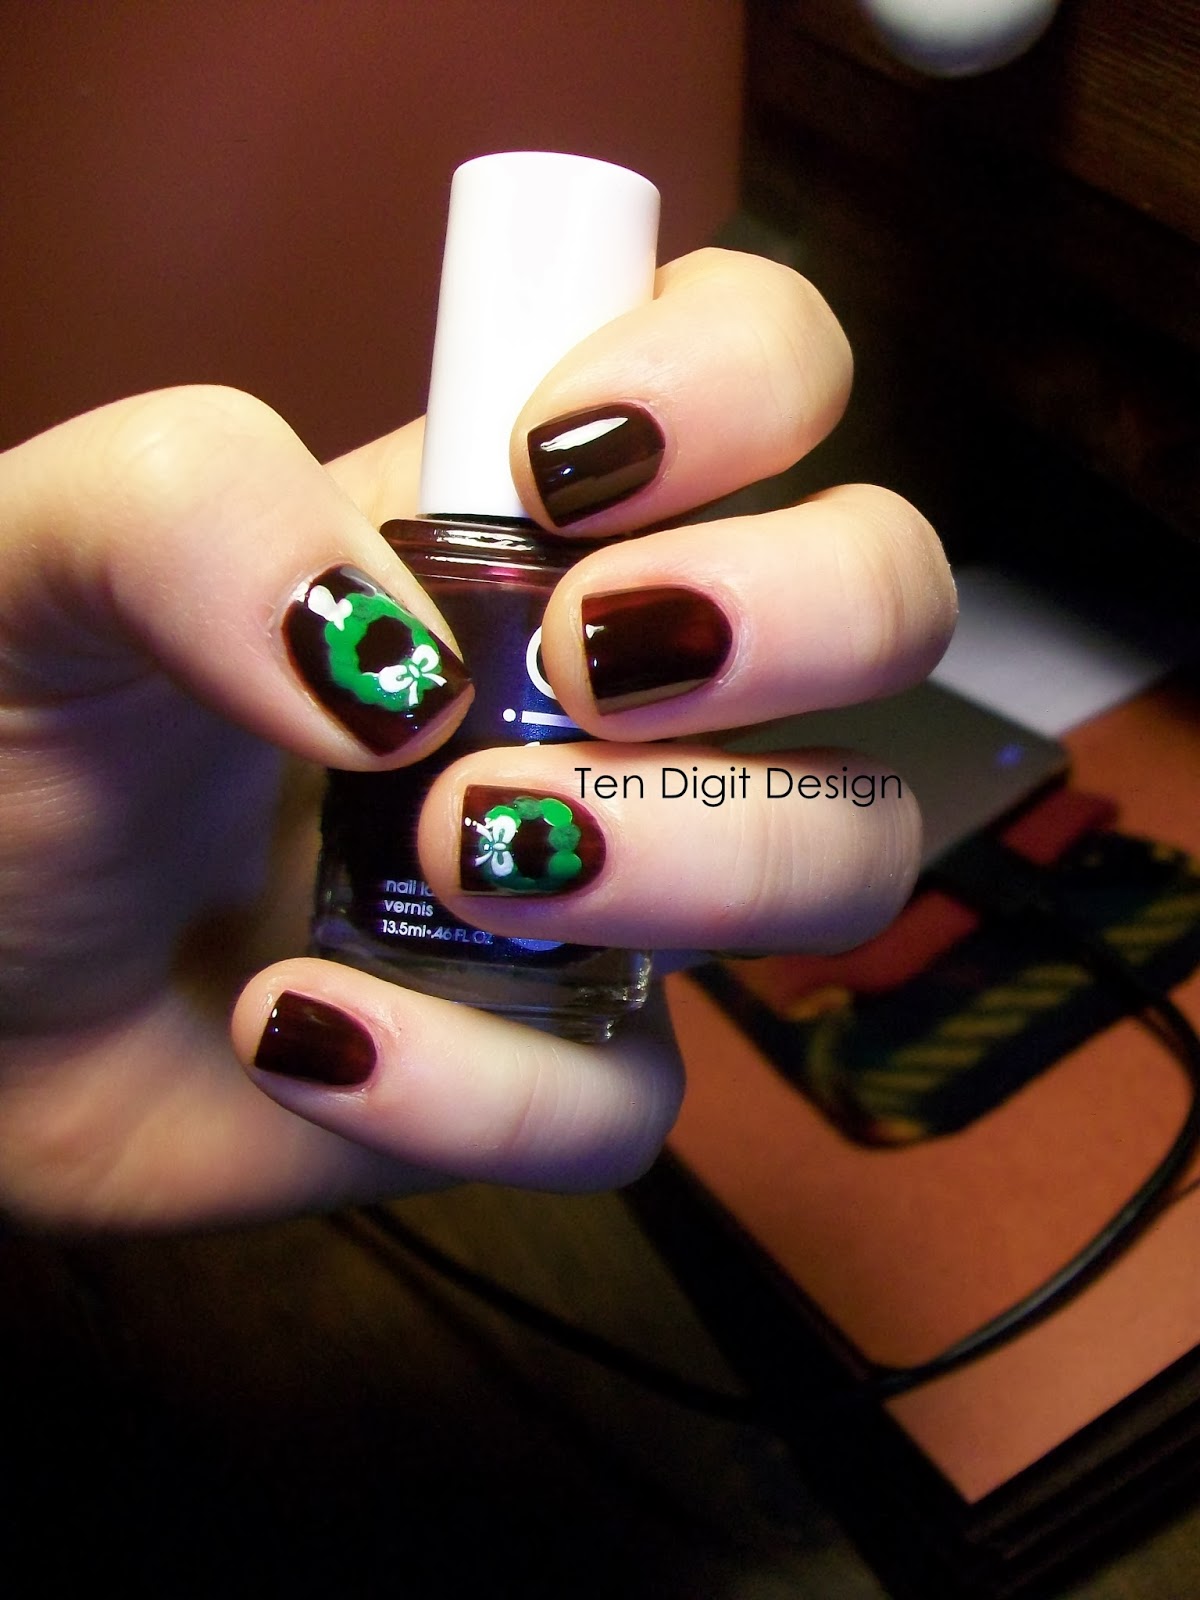
MERRY CHRISTMAS!  I am having a wonderful day and I decided to do my post about how to stamp your nails today.  I got a super nice camera (a Canon Power Shot SX500 IS), so I will finally be able to take nicer pictures for this blog!  My next post will have better pictures!  So, on to the tutorial:

Here is what you will need to stamp with:


You need polish, of course.  The thicker and more opaque the polish, the better.  Then you need a stamping plate, obviously.  You will need a special rubber stamper.  There are all sorts of them.  I got mine in a stamping kit.  You will also need a scraper.  My set came with a metal scraper to scrape off the excess polish from the plate.  Konad, a popular nail stamping company (their plates are expensive, so I only have two Konad plates) sells a metal scraper, too.  The problem with metal scrapers is that they can scratch your image plates!  Many people, myself included, prefer to use plastic.  I use an old gift card and it works perfectly.  It can't scratch the plates, either.

So, you need to put some polish onto the plate:


It is best to put polish on just one side of the image.  The indentations of the image are extremely shallow, so you only need a little polish.  You don't need to waste much!

Next, you scrape the polish, with your scraper, into the image so you are left with polish only in the image:


Once you have scraped, you need to work fast because a layer of polish that thin dries very quickly.  Take your stamper and press or roll it over the image to pick up the paint:


You should be left with the image on your stamper.  Quickly roll that on to your nail before it dries.
To clean the plates and stamper, you can use nail polish remover or pure acetone.  I prefer pure acetone because it cleans the plates so much easier.  It can leave an iridescent sheen on the plates, but that is not permanent.  It is just residue that can be rubbed off, and it won't affect your stamping at all.

Keep in mind that mastering stamping can take a while.  I have greatly improved over the time that I have been doing it, but I am still not perfect at it.  When you do it yourself, you find techniques that work best for you.  Different images can be easier or harder to stamp with and some polishes do not work well.  Konad and other brands sell special stamping polishes.  I do not own any of them, though.  The only way to get better at stamping is to keep playing around and trying it out.

If you have any questions, feel free to leave a comment below.  Anybody can leave a comment because I have it set so you can comment under "anonymous" if you do not have a Gmail account or other accounts.  I hope this was helpful!


Tuesday, December 24, 2013

Trees in the Snow

I saw this really cool picture on Pinterest and decided to try to recreate the manicure because I realized that I had the same stamping plate that the girl had used in the design:


For my recreation, I just put the trees on my ring fingers and thumbs to cut down on the time it would take to complete the manicure.  I started out with two coats of Sinful Colors Cool Gray on all of my nails.  On the fingers that I wouldn't be sponging and stamping, I applied a coat of Sally Hansen Diamonds, a fine glitter.  Then I put on one coat of Sally Hansen Dries Instantly.  I also put a coat of Dries Instantly on the nails that I would be sponging so avoid taking off the gray polish with the sponge.

When that was all dry I put some gray and white polish on my makeup sponge like this:


There is actually a line of white polish underneath the gray polish (Sally Hansen Hard to Get.)  It is touching the gray polish.  I found out how to successfully sponge nails!  You need some of your base color on the sponge too, so the new color you are sponging on seems to blend with the base color.  I used a stippling motion to sponge on the polish.  I was so excited to see that it actually worked for me this time!  A few months ago I attempted to sponge my nails, but it did not turn out very well.

When the sponged polish was dry, I stamped on trees from Bundle Monster's plate BM407.  I used Sally Hansen Black Out as my stamping color.  On my left hand, which is the hand I post on my blog most of the time, I accidentally stamped the trees crooked.  I just pretend that they are blowing in the wind.  Haha!  I stamped better on my right hand:


I applied two coats of Dries Instantly over the stamped nails.  After the manicure was complete, I used acetone to clean up all the polish around my nails.  I am very excited by this manicure.  Pinezoe.com is where the picture on Pinterest came from.  She is a very talented nail blogger!

I hope you all have a very Merry Christmas!  I cannot believe it is tomorrow!  My next blog post will be a series of pictures showing exactly how to stamp your nails.  

Pinezoe's nail picture is here:  http://www.pinterest.com/pin/421368108857517435/  


Sunday, December 22, 2013

Christmas Lights

I occasionally paint my mom's nails and today I decided to take a picture of them:


I have seen many pictures of Christmas light manicures.  My mom wanted some festive nails and she suggested Christmas lights.  I'm happy with how they turned out.

The base color is two coats of Sally Hansen Hard to Get.  I painted on a coat of Sally Hansen Dries Instantly before painting the black wire just to ensure that the white and black polishes wouldn't blend (like, if the white wasn't as dry as I thought it was.)  I used a Milani black striper in Black Sketch to make the wire.  I did mess up a couple times and had some stray black lines, but I used a dotting tool in white to cover them up.

I then used a dotting tool to make green, blue, red, and yellow lights.  I dragged it a little to make the lights oval-like shapes.  I applied a coat of Sally Hansen Dries Instantly at the end.

Thursday, December 19, 2013

Christmas Wreaths

I have been looking forward to painting my nails with wreaths on them:


My base color is Essie Wicked, one of my all time favorite nail polish colors.  I used two coats of that.  Then I used a dotting tool and made rings of white dots to make the wreaths.  The reason I used white is because colors show up better on a white base.  I then dotted the color over the dry white dots.  Originally I made dark green and light green alternating dots, but, even with the white background, the dark green did not show up well against the dark red.  So, I went back over the dark green with the light green which is NYC High Line Green.  When all that was dry I applied some bow nail stickers and then put two coats of Sally Hansen Dries Instantly over everything.

Saturday, December 14, 2013

Christmas Trees

I only have one more exam for school and then I am officially done with this semester.  The exam can't come soon enough.  So, anyway, I saw this picture of Christmas tree nails on Pinterest a while ago and decided to try them out.  I did a variation of my own, though:


I started out by painting two coats of Rimmel Caramel Cupcake on all my nails.  Then I applied a coat of Sally Hansen Dries Instantly on my ring finger and thumb.  On the other fingers I applied a coat of red glitter.  Then I finished those nails off with a coat of Sally Hansen Dries Instantly.

I put masking tape on my ring finger and thumb so that I could achieve a neat triangular Christmas tree.  I painted a coat of Revlon Rain Forest for the trees and immediately removed the masking tape.  Then I stuck on some 1.5 mm gold studs from Born Pretty Store (which I shall never shop at again--I will tell you about it at the end of this post) for the stars at the tops of the trees.  I stuck them on with some Dries Instantly.  I finished those nails off with two coats of Dries Instantly.  Studs stay on your nails for much longer if you apply a suitable amount of top coat.  If I apply only one coat, they usually get scraped off more easily.  Two coats makes it almost impossible for the studs to come off, unless you are scratching at them very hard to try to remove them.

So, here's a little heads up about Born Pretty Store:
They sell great stuff for great prices, but most of their merchandise ships from Asia, so, depending on where you live, it can take a very long time to get to you if you choose free shipping (which I always do.)  Well, on October 4th I ordered some tiny hexagonal sequins for my nails.  They, apparently, shipped on October 9th.  I have still not received them, though, and my credit card was charged when they shipped.  Generally, things from Born Pretty Store take no more than one month to reach me.  I have contacted Born Pretty Store three times now to ask for another item or a refund and they have been of no help at all.  I am truly not cranky when it comes to mail mix-ups.  I am not at all annoyed that there was a problem with the package.  My complaint is that the customer service is terrible and I can't order anything else there because I do not want to risk something like that happening again.  Good thing my order was just a little over $5!  It would be awful if it was a lot more money than that!  I guess I will be sticking to Amazon for all of my nail art needs from now on.


Monday, December 9, 2013

Candy Canes

Again, sorry that I haven't posted in a while.  I have just been so busy!  I only have one more week of school to go before this semester is over.  I cannot wait!


I used two coats of Sally Hansen Hard To Get (the white polish) as my base color for all my nails.  Then, on my pointer, middle, and pinkie, I applied a coat of Sally Hansen Diamonds.  You can't really see it in the pictures, but it is a very fine, sort of iridescent glitter.  It is so pretty and reminds me of sparkling snow.  When that was still wet I applied red and green rhinestones near my cuticles and then used two coats of Sally Hansen Dries Instantly to finish them off.  

For my thumb and ring finger, I put on a coat of Dries Instantly and then, when that was dry, put on some tape.  The thick stripes were achieved with pieces of scotch tape and, for the thin stripes, I used striping tape.  I painted on Rimmel Burgundy Flirt and then immediately removed all the tape with tweezers.  A bit of red paint got under some of my tape, but I used a small nail art brush dipped in white to fix it.  I then applied two coats of Dries Instantly.  I am very happy with how these came out!

Sunday, December 1, 2013

Winter Snowflake Nails

I was super excited to paint my nails for Thanksgiving, but, last minute, I worked all day on the day before Thanksgiving and then I went away on Thanksgiving day and didn't get back home until today.  So, there was no time to do a manicure.  I am really excited about today's mani, though.  I have been looking forward to using Bundle Monster's snowflake image for a long time:


My base color is two coats of Sally Hansen Thinking of Blue.  I used Bundle Monster plate BM323 to stamp with.  My stamping color is Sally Hansen White On.  That polish is actually pretty old, so it got very gloopy.  That's why it works so well to stamp with.  On my ring finger and thumb I used a couple 1.5 mm silver studs from Born Pretty Store.  I used two coats of Sally Hansen Dries Instantly as my top coat.