Sunday, February 22, 2015

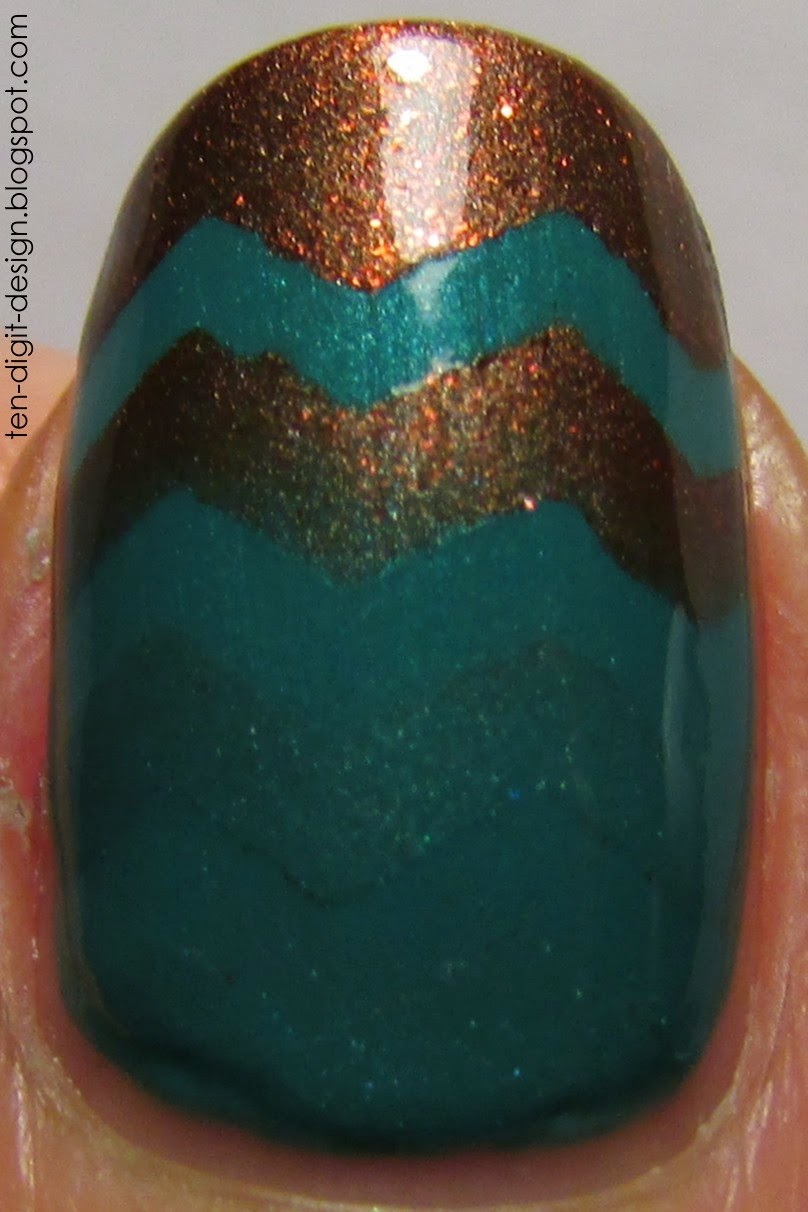
Gradient Zigzags

Color combinations can really make a manicure.  Even if your nails are painted just a couple basic colors, it can look SUPER cool if the colors go well together.  I am not too great at finding interesting color combinations, but this manicure's colors made me really happy.

gradient nails with zigzags

I started out with a base coat of Sally Hansen Double Duty.  I then painted on two coats of Sally Hansen Jazzy Jade (the teal color.)  After that, I painted a coat of Sally Hansen Dries Instantly over everything to get them ready for tape and sponging.  I took a makeup sponge and applied Sally Hansen Jazzy Jade and Sally Hansen Kinetic Copper (which is a magnetic polish that is also super pretty without the magnetic effect) and painted them onto the sponge so they overlapped in the middle.  

zigzag gradient nails

I then rolled the sponge over all of my nails, except for my ring fingers and thumbs.  For those nails, I took some zigzag tape (which I got from Amazon) and applied three strips across each nail.  I stuck the tape on the back of my hand before applying it to my nails so that it would be gentler on the polish.  I always try to minimize the chance of tape removing my base color.  That is THE WORST!  I then used the same sponge and rolled it over these nails until I got my desired gradient.  I removed the tape after doing each nail.  I always reapply a good amount of polish to the sponge in between each nail.

gradient zigzag nails

I decided to stick a holographic, mirrored star sticker on my ring finger.  The points were sharp, so I trimmed them a teeny bit with small scissors.  I then applied two coats of Dries Instantly over everything.  Gradients dry super fast, so you don't really need to wait to apply your top coat.  I applied three coats of top coat on my ring finger to make the star not stick out as much.

Follow me on Snapchat!

Friday, February 20, 2015

Water Decals Again!


I had only ever used nail tattoos (water decals) once before.  That was last fall.  I blogged about it.  I actually forgot exactly how to apply them, so I referred to that post before getting started today (http://ten-digit-design.blogspot.com/2014/09/nail-tattoos.html).  

nail tattoos

I started out with a base coat of Sally Hansen Double Duty.  I then painted two coats of polish on each nail.  On my thumbs and ring fingers (my accent nails) I used Sinful Colors Snow Me White.  I used Essie Loophole on the rest of the nails.  I then used tweezers to apply the tiny mirrored stickers on the silver nails.

nail tattoos

Before I even started painting my nails, I cut out pieces from the small sheets of nail tattoos I got from Walmart ("Heart 2 Art" brand).  I cut them so they were roughly the shape of my nails.  When I was ready to apply them, I filled a shot glass with water and then used tweezers to pick one up and dip it into the water for a couple seconds.  I then gently pressed the tattoo over my nail for ten seconds and then carefully slid off the paper backing.  

nail tattoos

There was a bit of excess tattoo at the end of some of the nails, so I took a nail buffing file and lightly filed the end of the nail with the non-abrasive side until I could easily pull off the excess.  I used my tweezers and gently pressed them along my cuticles to break off any excess there.  Acetone on a nail art brush can help you to remove the tiny bits that may be left over.  I'd suggest getting as much off as you can before resorting to the acetone because it melts the excess tattoo and creates a sticky residue. 

nail tattoos

To minimize cleanup, try to cut the tattoos as close to your nail shape as you can.  You can see on my ring finger that I accidentally wrinkled the tattoo while applying it.  You need to be very careful when sliding off the backing.  It isn't as noticeable in person, though.  Once you get the hang of these, they're actually a breeze to apply and clean up.  I would definitely recommend trying them out!  They are a lot of fun! 

I finished off with two coats of Sally Hansen Dries Instantly.
Follow me on Snapchat!

Monday, February 16, 2015

OPI's I'm Not Really a Waitress

I was so super excited because for Valentine's Day my mom and dad got me my first OPI polish.  I have been hearing about and seeing OPI for years, but as a college student I try not to buy higher end drugstore polishes (because of the prices.  I really only buy Essie when I find a great sale.)  I decided to swatch it for you.  It is called I'm Not Really a Waitress.  I absolutely LOVE the name!  The name alone sometimes makes me want to buy certain polishes.  Do you know what I mean?


opi i'm not really a waitress
   
I applied a base coat of Sally Hansen Double Duty and then applied two coats of the polish.  It was already very opaque after the first coat.  It's a deep red color with some shimmer in it.  I finished off with two coats of Sally Hansen Dries Instantly.

opi i'm not really a waitress

opi i'm not really a waitress

This color is just so classy and elegant and suitable for any time of the year!  (In my opinion, any color is okay for any time of the year.  Paint you nails whatever color makes you happy!)  

I made some adjustments to my settings on Snapchat.  I made it so if you add me, you will be able to see my stories.  Haha!  After telling you guys about my account, I forgot to go to my setting to see if you'd actually be able to see anything from me.  Now it should be all set.  I have been posting on there a lot.  It would be SO fun if you guys followed me!  I post pics of nail art related things and other random stuff.


Friday, February 13, 2015

Valentine's Day Stamping

I have finally been festive!  I feel like I have been missing my chances to have festive nails for holidays and such.  Happy Valentine's Day!

valentine's day heart nails

I started out with a base coat of Sally Hansen Double Duty.  I then painted on two coats of Sally Hansen Pink Blink on all of my nails.  I did my thumbs a little differently:

conversation heart nails
Conversation heart!
I created a top of a heart shape near my cuticle so these nails could look a little like conversation heart candy.  If I were to do this again, I would start it farther down on my nail.

valentine's day heart nails

After letting the base color dry, I painted a coat of Bonbons pink glitter on my middle and pinky fingers.  I then stamped the rest of my nails.  On my pointers and rings, I used Bundle Monster's plate BM-317.  I used an old black polish so the images were dark (an old, goopy Sally Hansen Black Out.)  On my thumbs I used Bundle Monster's plate BM-425 to add the "I love you."  I used an old, goopy white polish so that it would be very opaque (Sally Hansen White On.)

valentine's day stamping nails
  
I painted a very fine holographic glitter (Salon Perfect Cosmic Dust) over my rings and pointers.  This is a BEAUTIFUL polish!  I included the picture above, even though it is a little blurry in spots, because you can really see the rainbow on the holographic glitter.  I finished off the manicure with two coats of Sally Hansen Dries Instantly

Remember to follow me on Snapchat at "margie-jane!"


Monday, February 9, 2015

Golden Snowflakes

Hello!  I know, I have been very slow with blogging lately.  I was inspired to do these snowflake nails because I have been getting so much snow at my house.  I had my third snow day of this college semester today.

gold snowflake nails BM-323

I started out with a base coat of Sally Hansen Double Duty.  I then painted two coats of Sinful Colors Black on Black on all of my nails (the middle finger had some accidents, so I painted gold over top.  I had originally wanted everything to be uniform.)

I waited for my base to dry and then I took my Bundle Monster BM-323 stamping plate and stamped the snowflake image on all of my nails with Essie Good as Gold.  I accidentally double stamped my middle nail, so I painted a coat of the gold on it and then stamped it with the black.  

gold snowflake nails BM-323

I wanted to add a little extra sparkle, so I took my holographic black and gold loose glitters and applied it with a dotting tool dipped in Sally Hansen Double Duty.  I applied black glitter in the centers of all the gold snowflakes and gold glitter in the centers of the black snowflakes.  I also put a few random contrasting pieces of glitter on each nail (so, the nails with the black base had gold glitter placed randomly on them, and vise versa.)

I finished off with two coats of Sally Hansen Dries Instantly.

gold snowflake nails BM-323

I have a Snapchat!  I have had it for months, but I want to get in to using it more for posting random things and my nail art to my story.  Follow me if you like!  My username is margie-jane.  (My sister calls me that as a silly nickname.)  I have written the username under my social media to the right of this page and here is my personal ghost that you can point your camera at to immediately add me (without having to write in my username!!!)