Showing posts with label Rimmel Stiletto Red. Show all posts

Monday, December 15, 2014

Candy Cane Hearts


Whoa!  I have not blogged in so long!  I officially finished another semester today.  I am extremely happy to be done.  After my exams, as I waited for my sister to get out of her exams, I sat in the library and ate some fudge and a mini candy cane.  It was quite nice.  So, without further ado, here is a Christmassy manicure:

candy cane heart nails
Candy Cane Nails!

My cuticles are a bit of a mess.  The dry weather is taking its toll.
I started out with a coat of Essie Protein Base Coat.  I then applied two coats of Revlon Rain Forest, a dark green, glittery polish.  The white part of the candy canes is white acrylic paint that I painted on with a small nail art brush.  The red stripes are Rimmel Stiletto Red.  I used a toothpick and applied the stripes with a stippling motion.  I finished off the manicure with two coats of Sally Hansen Dries Instantly.

candy cane heart nails


candy cane heart manicure

This doesn't have much to do with nail art, but I don't know if you guys have heard of using coconut oil for skin care.  I bought a jar from Target for only a bit over $6, and was planning on using it to make a moisturizing lip scrub.  It comes in a jar like this:


It's solid, but melts really easily.  I saw people on the internet using it in lieu of lotion, so I wanted to try that out.  I have been using it instead of lotion on my face for almost a week and I am loving it!  You only need to use a teeny bit.  It absorbs really quickly and doesn't leave your face looking shiny and oily.

I have mild hormonal acne, but coconut oil is not supposed to make acne worse.  I have read that it is actually good for helping to control acne!  And, from what I have experienced so far, that is true!  I also started using it as eye makeup remover and I am never going back to using any other remover.  It didn't even leave my eyes feeling blurry.  I used my fingers to massage it over my eyes until the makeup was all broken down.  Then I used a damp cotton ball to wipe off the makeup residue.  That worked better than any other makeup remover I have used!  I would highly recommend this!  I bought the same brand that is in this picture (Spectrum).  It's a great product with a ton of uses!


Monday, November 10, 2014

Veterans' Day French Tips


I have been wanting to do this manicure for a long time now, and I thought it was a very fitting time for it since it is Veterans' Day in the United States tomorrow.  

patriotic french tips
Veterans' Day french tips
 I started out with a coat of Essie Protein Base Coat.  I then painted on two coats of Revlon Pale Cashmere on all my nails and finished that off with a coat of Sally Hansen Dries Instantly to avoid pulling up my base color with the tape.  When that was all dry, I applied french tip guides on all my nails.  I made sure that I stuck them all to the back of my hand first to make them a little less sticky.  

I then created a red, white, and blue french tip pattern and immediately removed the tape.  The red is Rimmel Stiletto Red, the white is Sinful Colors Snow Me White, and the blue is Sinful Colors Into the Blue.  I finished off this manicure with two coats of Sally Hansen Dries Instantly.

patriotic french tips

Thank you to all of the men and women who have served America in such a noble, significant way.  I am patriotic because of you.  

Friday, September 19, 2014

Vintage Half Moon Mani!!!!

Hi Guys!  Once again, I went FOREVER without blogging.  I am now 1/5 of the way through this semester.  Haha!  Counting down the days!  I did a manicure last week and haven't posted it yet, but I did another manicure today and I am so so so excited about how it came out!  I rounded my nail tips today and then decided to do a manicure that looks better with rounded tips!  I remembered how much I had always wanted to create a vintage half moon mani!  So, I did it!  Here it is:


So, half moon manicures are actually from the 1930s and '40s!  I LOVE vintage stuff!  I have many more pictures of my manicure down below.  I was just so super excited about how it came out!  Here is an old advertisement for nail polish:


Now, on to the tutorial!

I started out with a base coat of Essie Protein Base Coat (this really keeps my nails from staining).  I then painted on two coats of Essie Oui Madame (I LOVE that name!  It is a sheer, pearly color) on all of my nails.  After that was dry I painted on a coat of Sally Hansen Dries Instantly so the tape wouldn't pull up my base color.  

Another thing you can do as a precaution before applying tape (that you are planning to remove) is to stick the tape to the back of your hand to take off a little of the stickiness.  I applied half of a hole reinforcement to each of my nails near the cuticle and a french tip guide (you can use a curved or straight strip of tape too) to each of my nail tips.  I made them cover the entire tip of my nail without leaving any nail showing beyond them because I wanted to keep the entire tips the white color.  

Don't apply these like you would if you were going to paint French tips on your nails (unless you have really long nails).  It is easy to do that because of being so used to applying them that way.  You want to cover the whole tip.

I then painted on a coat of Rimmel Stiletto Red in between the two pieces of tape on each nail.  As soon as I painted each nail, I quickly removed the tape.  I cleaned up the sides of my nail beds with a nail art brush dipped in acetone.  If any red polish went under the tape I took the brush dipped in acetone and lightly dabbed at the messy edges to remove the teeny jagged bits of red polish.  Just don't dab the brush too many times in one spot or your base color might come off too.  I finished off the manicure with two coats of Dries Instantly.

I have this really old makeup kit that I found in my grandma's antique shop.  I decided to use this as a prop for my photos.  Enjoy!


Vintage pics!


Thursday, July 3, 2014

"Three Cheers...

...for the red, white, and blue!" =) I am desperately trying to make my titles a little more interesting instead of complete labels! Haha! I have been planning my Independence Day manicure. Here it is!
I love manicures that don't just have the same thing on every nail! I am trying to get better at mixing it up a bit! I started out with a coat of Essie Protein Base Coat and then applied two coats of each color. On my middles and pinkies, I applied Sally Hansen Thinking of Blue; on my thumbs, pointers, and rings I applied Sally Hansen Hard to Get (a white.) When the polish was still wet, I immediately applied two holographic star sequins to both my middle fingers. I applied a coat of Sally Hansen Dries Instantly to my thumbs to get them ready to sponge, and to my pointers and rings to get them ready for striping tape. I then took some silver and light blue glitter polish and did a slight glitter gradient on my pinkies. I have never done that before, so it didn't come out great, but I am happy with it. Next, I painted stripes of red (Rimmel Stiletto Red), white, and blue on a makeup sponge and stippled that on my thumbs. I then cut twenty pieces of striping tape and applied five to both of my pointer and ring fingers. I made sure the tape was pressed down at the sides of my fingers so the red polish wouldn't go underneath the tape. I then painted on a coat of Rimmel Stiletto Red on all four of those fingers. Before painting the next finger I would remove the striping tape from the one that I just painted. To finish off the manicure, I painted two coats of Dries Instantly on all of my nails, except for my middles on which I applied three coats so the corners of the stars would not stick out as much. Happy Independence Day to the Americans!

Saturday, May 31, 2014

Tropical Gradient

I couldn't wait to do my nails any longer. I am also really in the mood to blog, so I couldn't even put this post off any longer (I did it yesterday)! Haha!
I started out with a coat of Essie Protein Base Coat. I then applied two coats of Sally Hansen Hard to Get, a white polish. After that was dry, I applied a coat of Sally Hansen Dries Instantly so the stippling motion of the sponge wouldn't pick up my base color. I then took a makeup sponge and painted on five different colors. I overlapped each one slightly so they would blend into each other. I had to reapply the polish to the sponge multiple times. Starting at the cuticle, the colors I used were Revlon Dreamer, Essie Borrowed & Blue, Avon Sunshine, NYC Spring Street, and Rimmel Stiletto Red.
I stippled on the color until I was happy with how vibrant it was. I then applied a coat of Sally Hansen Diamonds, a very fine, iridescent glitter, over top so I could have a subtle sparkly effect. (I LOVE this polish! It isn't even hard to get off because the glitter is so fine!) After sponging, I didn't wait very long to apply it because if it smudged the manicure, it would just blend the gradient together even more. I then took a while to clean up my fingers with a Q-tip dipped in acetone and then a nail art brush dipped in acetone to clean up closer to my nails. Then I applied two coats of Dries Instantly. I cut off the painted end of the makeup sponge with a large pair of scissors so I can get many uses out of the same sponge.

Thursday, May 22, 2014

Memorial Day Water Marbling

I wanted to do a nice, patriotic design for Memorial Day, so I decided I would try my hand at water marbling again. I have only done it once before, and not for years. I started out with a coat of Essie Protein Base Coat and then painted two coats of Sally Hansen Hard to Get (white) on all of my nails. For the nails that I didn't want to water marble, I used a dotting tool to apply some Dally Hansen Double Duty to stick my red, silver, and blue loose glitter to. I just made diagonal rows of the glitter. I will now try to explain how to water marble, but you can also watch videos on Youtube about how to do it. It is time consuming, but not too difficult: You will need a plastic (preferably disposable) cup of room temperature water. The temperature of the water affects how the polish reacts to the water. You will also need scotch tape and a toothpick. Oh! And at least two different colors of polish. I have heard that the newer and runnier the polish, the better. The polish I used today wasn't super new and thin, but I got it to work. Just don't use super old polish. I used the scotch tape to cover a lot of the tip of my finger so the clean-up process would be a lot easier. I then unscrewed all of my polishes so that I could work fast. Speed is something you will need, but still be careful. I then began holding the brushes around an inch or two above the surface of the water and dripping the polish onto the surface. It should spread out. I only put three drops on--a drop of each color (red, white, and blue.) You can do more, though. (I dripped the next color in the center of the previous spread out color.) I then quickly took my toothpick and made lines and swirls in the polish to make an interesting pattern. I am not too great at this. Then I put the nail that I wanted the marbling on face down in the spot of the pattern that I wanted to be on my nail.
I held it in there for a few seconds and then began gently blowing on the surface of the water to quickly dry the remaining polish. I left my finger in the water and then took the toothpick and swirled it in the dry polish on top of the water to pick it up and remove it from the water. I finally took my water marbled nail out of the water and carefully removed all the tape. I then used a flat nail art brush dipped in acetone to clean up the excess polish on my finger. There was barely any, since I used tape. Oh! Don't try to dry the nail off! It will air dry! I repeated this for four of my nails. (The blue is Sinful Colors Into the Blue and the red is Rimmel Stiletto Red.
I finished off this manicure by applying two coats of Sally Hansen Dries Instantly. Something that can go wrong is the polish dripping off your brush and settling in a blob at the bottom of the cup. If this happens, just adjust the distance you are holding the brush above the surface of the water. You may need to drip it higher or lower. Just experiment. I am no expert at this technique and I ended up with five blobs of polish at the bottom of my cup. Also, sometimes the polish does not spread out on the water. It sits in a small circle on top of the water. If this happens, just blow on it so it will dry and then swirl a toothpick around it to wrap it up and remove it. I may have had some of these problems because some of my polish was a little thick. I did get it to work, though. The hardest part for me is dragging in a neat design and placing my finger in the right spot. One of my nails on my right and is super boring because I misplaced my finger. (Haha! That sounds super weird!) I hope I explained this so you guys can understand, at least, some of it!

Sunday, April 6, 2014

Negative Space Star Trek

So, once again, I have let my inner Trekkie out.  I have been wanting to do another Star Trek manicure and have been meaning to try negative space nails.  So, I decided to combine these two ideas.


I started out with a base coat of Sally Hansen Double Duty.  Then I painted two coats of each color on my nails.  On my ring fingers and thumbs I used Sally Hansen Black Out; on my pointers, Covergirl Out of the Blue; my middle fingers, Rimmel Stiletto Red; and Avon Sunshine on my pinkies. 

Once that was dry, I took a small, flat nail art brush and dipped it in acetone and dabbed and stroked off the black polish to create the Star Trek insignia.  (That is what a negative space design is.  Part of your nail will not have color on it.)  This took a while because I had to go over the same spots over and over, but it wasn't as hard as I thought it would be.  I don't know how well nail polish remover works for this.  Acetone works wonderfully.  I had to repeatedly dip my brush in acetone and wipe it off on a paper towel every few strokes to avoid the build up of too much black polish on it.  I created the insignia the same way I would have drawn it with polish.  I made an upside down "V" shape and then drew a diagonal line from the left side to the middle of the right side and then dabbed off the center.


When all that was done, I took some hexagonal, holographic gold glitter (I got a set of 12 colors from Amazon for $7.  The pieces are a little less than one millimeter in diameter.) and applied a line of it around two thirds down each colored nail.  I used Sally Hansen Double Duty to do this because it doesn't dry as fast as a fast drying top coat, allowing you more time to place the glitter.  I applied the dots of Double Duty and picked up the glitter with a small dotting tool.  I also applied a piece of glitter in the center of each insignia.  The lines of glitter remind me of Kirk's uniform in the Original Series.  He has a stripe of gold at his cuffs.  
To finish off the manicure, I applied two coats of Seche Vite.  I am really not happy with this top coat.  It dries super fast and is really shiny, but it does shrink my manicures and the second day I had this manicure, it chipped a little.  Dries Instantly doesn't chip for days!  (I have run out, though.)  Lots of girls say this is a great top coat, so maybe I really do have a bad bottle.  Have any of you tried it?  What do you think of it?      

Thursday, November 14, 2013

Star Trek Nails II

Sorry I have not posted for a while!  Since I am nearing the end of a semester, school has been crazy.  I have not gotten around to doing my nails again, so this manicure was actually one I did a while ago:


I used Rimmel Stiletto Red as my base color and then painted on the silver Star Trek insignias with Icing Metal Head.  I think I used a dotting tool to create them.  I then used a black striper (Milani Black Sketch) to create the details.  The symbols in these insignias are for engineering in "Star Trek: The Original Series."  I used Sally Hansen Dries Instantly as my top coat.

So, a couple days ago I ordered the 2013 collection of Bundle Monster nail stamping plates.  I am super excited for them to come!  I just have their 2012 collection and this 2013 collection seems ever better!  I love the new designs!

Friday, October 18, 2013

Patriotic Nails

This design is actually from this past Fourth of July.  I know it is a little off season, but you can be patriotic any time, right?  =)


On all my nails but my ring fingers, I first painted on two coats of Sally Hansen White On.  I then applied a coat of Sally Hansen Dries Instantly.  When that was dry I put on a few pieces of striping tape and painted over with Rimmel Stiletto Red and then immediately removed the tape.  After all that was dry I put on a coat of Dries Instantly.  For my ring finger I painted on Rimmel Blue Eyed Girl.  I then put on rows of 1.5 mm silver studs from Born Pretty Store.  I finished that off with a couple coats of Dries Instantly.  This manicure is modeled after The Nailasaurus's Fourth of July nail art, which this link will bring you to:  http://www.thenailasaurus.com/2013/07/independence-day-nail-art.html

Saturday, October 12, 2013

Star Trek Uniform Shirts

I am a bit of a Trekkie, so I really enjoy creating Star Trek nail art.  I saw a picture on Pinterest and really liked the design, so I recreated it on my nails:


I painted 2 coats of base color on all my nails.  On my thumbs I painted Sally Hansen Black Out; on my index fingers I painted Avon Sunshine; on my middle fingers I painted Covergirl Out of the Blue; and on my ring fingers and pinkies I painted Rimmel Stiletto Red.  After all that was dry I painted on a coat of Sally Hansen Dries Instantly and then put strips of masking tape a little away from the tips of my nails so that I could achieve a clean black tip.

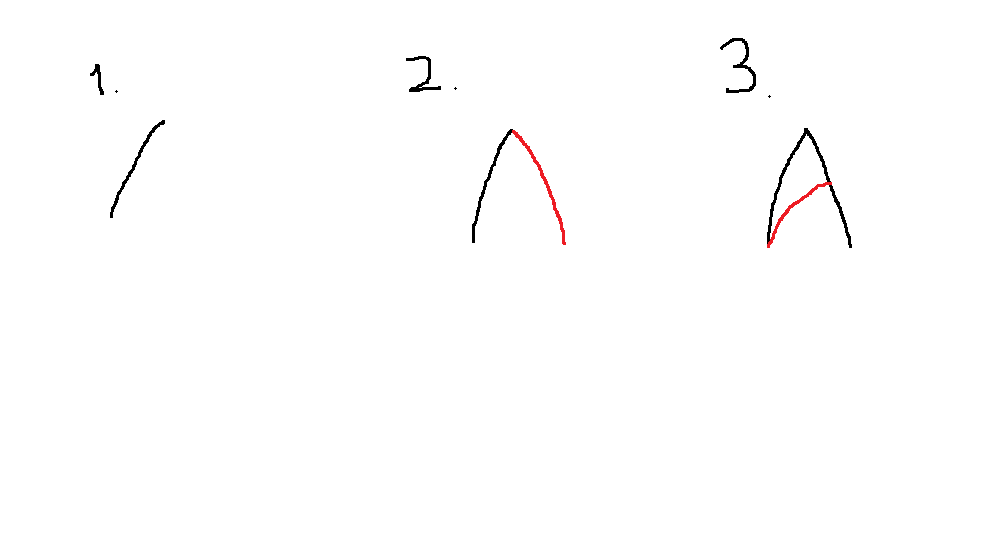
As soon as I painted on the black, I removed the tape.  Then I used a small nail art brush and painted on the black at my cuticles, which is supposed to look like the collars of the Star Trek uniform shirts.  (I used Black Out for all black details.)  After painting on the black details I cleaned up around my nails with a nail art brush dipped in acetone.  Then I used a nail art brush dipped in Sally Hansen Pumping Iron to add the Star Trek insignias.  Here's the easiest way to draw these:


After step 3, fill in the center with your color.  I have made Star Trek insignias on my nails multiple times now and this is the easiest way, in my opinion, to go about it.  I finished off this manicure with two coats of Sally Hansen Dries Instantly, which is my favorite top coat, as you have probably noticed.  I have been through many bottles of it.  "Live long and prosper."  ; )