Showing posts with label Sally Hansen Black Out. Show all posts

Friday, August 29, 2014

"Sherlock" Nails

Hi!  I have been wanting to do this for a long time and I finally just went for it!  I love the BBC show "Sherlock" because it is super clever and fun!  So, the design I attempted didn't come out as nicely as I was hoping, but from a distance it looks better.  Anyway, here's what I was going for:


This is what my final product was:


Obviously, I had issues creating the design from the wallpaper.  I needed to make it simpler, but it looks messy up close.  I did get a compliment on the nails, though, so I guess I am just scrutinizing them too closely and thinking like a perfectionist.  From a distance they look a bit better.  So, anyway, on to how I created these:

I started out with a coat of Essie Protein Base Coat.  I then painted on two coats of Revlon Pale Cashmere.  This is a GORGEOUS polish!  It is a semi-sheer, light beige polish and it looks so elegant, feminine, and clean.  I would love to wear it alone.  After that dried I took a small detail brush and attempted the wallpaper design with Sally Hansen Black Out.  I used a toothpick to make the little details inside the curved lines.  After all that (which took a maddeningly long time) I used the same detail brush in Avon Sunshine to draw on the spray paint smiley face.  I finished off with two coats of Sally Hansen Dries Instantly.  

If you ever want to create a Sherlock wallpaper design, it would be cool to put a matte top coat on top of everything!  To be honest, I was planning on that, but I really wanted to be done with this manicure, especially since it was not coming out the way I wanted it to.  In the end, though, I am happy with it because it does remind me of "Sherlock" and it looks better when I am not scrutinizing all the details.  


Sunday, July 6, 2014

Summer Cabin Moonrise

Yesterday I just felt like doing my nails. I had been wanting to try making crescent moons, but after making one on my ring finger, I thought the manicure looked a bit plain. I have so many nail art brushes, but none of them are super fine, so I had decided to cut some bristles off of one to make it a really nice detail brush:
Since I had this "new" detail brush, I decided to put it to good use:
So, here's how I did this: I first applied a coat of Essie Protein Base Coat and then painted two coats of Rimmel Burgundy Flirt on all of my nails. Then I applied a coat of Sally Hansen Dries Instantly because I was going to sponge on a gradient. For my gradient I used Rimmel Burgundy Flirt and Milani Rapid Orchid. I put a stripe of each next to each other on a makeup sponge and stippled it onto my nails so that the darker color (Milani Rapid Orchid) would be toward the tips of my nails. I then took a dotting tool and made a large white dot on my ring finger. After I let that dry for a while I took the dotting tool again and put a drip of each of the red colors side by side on a piece of paper. I mixed them together a bit in the center with the dotting tool and then put a dot of the color to the right side of the white circle to create a crescent moon. I made sure the bit of the dot with more light red was toward the cuticle side of my nail so it would be able to blend in with the gradient base better.
After making the crescent moon, I thought the rest of the manicure looked too plain, so the idea of painting some silhouettes came to me. I took my small detail brush and some Sally Hansen Black Out and painted a house on my middle finger and a spruce tree on my pinkie. The black silhouettes were hard to see, so I took the same detail brush and Sally Hansen Golden-I and outlined the silhouettes. I am extremely pleased with the result. The gradient looks like a late evening summer sky. The moon has just come up and the tree and cabin are lit from behind by the dying sun. I finished off the manicure with two coats of Dries Instantly. OH! If you didn't know, I also have a Facebook page for Ten Digit Design! Just search Ten Digit Design on Facebook and it should come up! =)

Thursday, May 8, 2014

Outer Space Nails

A while ago I did my mom's nails for her.  It was "space week" at the preschool/daycare she works at, so we thought it would be great for her to have space themed nails.  Kids really do notice nails.  I know they always notice and appreciate mine, especially if they have studs or gems on them.


I started out with two coats of Sally Hansen Black Out.  I then used a dotting tool dipped in Sally Hansen Hard to Get to make random dots and star-shaped things for the stars.  If I was to do this again, I would put a few less stars on.  You really can put them on sparingly.  After that was dry, I applied a coat of Sally Hansen Diamonds, which is a super fine, iridescent glitter.  It is so pretty and I really like it!  The glitter is so fine that it is no problem taking it off!  I finished off with two coats of Sally Hansen Dries Instantly.

Sunday, April 6, 2014

Negative Space Star Trek

So, once again, I have let my inner Trekkie out.  I have been wanting to do another Star Trek manicure and have been meaning to try negative space nails.  So, I decided to combine these two ideas.


I started out with a base coat of Sally Hansen Double Duty.  Then I painted two coats of each color on my nails.  On my ring fingers and thumbs I used Sally Hansen Black Out; on my pointers, Covergirl Out of the Blue; my middle fingers, Rimmel Stiletto Red; and Avon Sunshine on my pinkies. 

Once that was dry, I took a small, flat nail art brush and dipped it in acetone and dabbed and stroked off the black polish to create the Star Trek insignia.  (That is what a negative space design is.  Part of your nail will not have color on it.)  This took a while because I had to go over the same spots over and over, but it wasn't as hard as I thought it would be.  I don't know how well nail polish remover works for this.  Acetone works wonderfully.  I had to repeatedly dip my brush in acetone and wipe it off on a paper towel every few strokes to avoid the build up of too much black polish on it.  I created the insignia the same way I would have drawn it with polish.  I made an upside down "V" shape and then drew a diagonal line from the left side to the middle of the right side and then dabbed off the center.


When all that was done, I took some hexagonal, holographic gold glitter (I got a set of 12 colors from Amazon for $7.  The pieces are a little less than one millimeter in diameter.) and applied a line of it around two thirds down each colored nail.  I used Sally Hansen Double Duty to do this because it doesn't dry as fast as a fast drying top coat, allowing you more time to place the glitter.  I applied the dots of Double Duty and picked up the glitter with a small dotting tool.  I also applied a piece of glitter in the center of each insignia.  The lines of glitter remind me of Kirk's uniform in the Original Series.  He has a stripe of gold at his cuffs.  
To finish off the manicure, I applied two coats of Seche Vite.  I am really not happy with this top coat.  It dries super fast and is really shiny, but it does shrink my manicures and the second day I had this manicure, it chipped a little.  Dries Instantly doesn't chip for days!  (I have run out, though.)  Lots of girls say this is a great top coat, so maybe I really do have a bad bottle.  Have any of you tried it?  What do you think of it?      

Sunday, March 23, 2014

Galaxy and Earth Nails

I have always LOVED the galaxy nails that The Nailasaurus has created.  She has created multiple galaxy manicures, and I decided to try it out on my best friend.  I loosely followed The Nailasaurus's tutorial (http://www.thenailasaurus.com/2013/07/galaxy-nail-art-tutorial.html).  I also loved a picture I saw on Pinterest of an amazing earth manicure (http://media2.onsugar.com/files/2013/03/12/6/1844/18445232/9f3f8c9ce83394b9_DSCN8471ala.jpg).  So, here is what I created on my friend's nails:


My friend started out by painting two coats of Sally Hansen Black Out on all of her nails.  Then she applied a coat of Sally Hansen Dries Instantly.  After that, I did the detailing.  I painted a blue partial earth shape on the tips of her ring fingernails using a flat nail art brush with Essie Borrowed & Blue.  (The trick to putting paint on another brush is to make sure the new brush is saturated in the paint, just like the brush that comes in the bottle is.  This will help you to avoid smudging the polish underneath and will help you to get a smooth, non-streaky covering of polish.)   Then I began the galaxies on all her other nails.  To create the galaxies, I used many colors and sponged them on using tiny pieces of sponge that I held in tweezers:

 Above are all of the polishes I used for this manicure.
I used a different piece of sponge for each color and I made sure I dabbed the sponge on a paper before applying it to her nails to avoid sponging on too much paint.  After making all of the galaxies, I used a dotting tool to dot on differently shaped stars with Sally Hansen Celeb City.  After the blue earths were dry, I mixed together a little green and white polish to make an even lighter green.  I then applied light blotches using a small nail art brush.  I just winged the shapes of the continents and it came out fine.  At the end, my friend suggested that I put some glitter over the black above the earths, so I carefully applied Sally Hansen Diamonds.  To finish off the manicure, I applied two coats of Sally Hansen Dries Instantly.

Monday, January 20, 2014

Stamping Half Moons

I start another semester of college tomorrow, so I wanted to do a manicure before things get crazy.  ; )  I have been fairly busy lately, so that is why I haven't done a post since my slipper pattern nails.  I did do my nails once, but they didn't come out well, so I decided not to post them.  So, I have been wanting to do this manicure for a while and I finally got around to it:


I started out with two coats of Sally Hansen Celeb City, which is a really great, inexpensive, sparkly silver polish.  I then applied a coat of Sally Hansen Dries Instantly so that the hole reinforcers wouldn't pull up my base color.  Once that was dry, I cut some hole reinforcers in half and applied them where I wanted my half moons.  I then stamped on a pattern from Bundle Monster's plate BM 404.  My stamping color was Sally Hansen Black Out.  The stamping didn't come out as well as I had hoped (I have not been having much success with stamping lately, for some reason), so I wanted something else to make the half moons stand out better.  I decided to use a small nail art brush to freehand on the green stripes.  The green polish is an L.A. Colors polish.  I finished off the manicure with a coat of Sally Hansen Dries Instantly.  

I have been lacking ideas for manicures lately!  I have been wanting to do pretty, dainty manicures, but I can not think of any to do!  Any time you guys have any ideas, comments, questions, or suggestions, feel free to leave a response in the comments box!  Anyone can leave a comment because you can comment under "anonymous" if you want to!     

Tuesday, December 24, 2013

Trees in the Snow

I saw this really cool picture on Pinterest and decided to try to recreate the manicure because I realized that I had the same stamping plate that the girl had used in the design:


For my recreation, I just put the trees on my ring fingers and thumbs to cut down on the time it would take to complete the manicure.  I started out with two coats of Sinful Colors Cool Gray on all of my nails.  On the fingers that I wouldn't be sponging and stamping, I applied a coat of Sally Hansen Diamonds, a fine glitter.  Then I put on one coat of Sally Hansen Dries Instantly.  I also put a coat of Dries Instantly on the nails that I would be sponging so avoid taking off the gray polish with the sponge.

When that was all dry I put some gray and white polish on my makeup sponge like this:


There is actually a line of white polish underneath the gray polish (Sally Hansen Hard to Get.)  It is touching the gray polish.  I found out how to successfully sponge nails!  You need some of your base color on the sponge too, so the new color you are sponging on seems to blend with the base color.  I used a stippling motion to sponge on the polish.  I was so excited to see that it actually worked for me this time!  A few months ago I attempted to sponge my nails, but it did not turn out very well.

When the sponged polish was dry, I stamped on trees from Bundle Monster's plate BM407.  I used Sally Hansen Black Out as my stamping color.  On my left hand, which is the hand I post on my blog most of the time, I accidentally stamped the trees crooked.  I just pretend that they are blowing in the wind.  Haha!  I stamped better on my right hand:


I applied two coats of Dries Instantly over the stamped nails.  After the manicure was complete, I used acetone to clean up all the polish around my nails.  I am very excited by this manicure.  Pinezoe.com is where the picture on Pinterest came from.  She is a very talented nail blogger!

I hope you all have a very Merry Christmas!  I cannot believe it is tomorrow!  My next blog post will be a series of pictures showing exactly how to stamp your nails.  

Pinezoe's nail picture is here:  http://www.pinterest.com/pin/421368108857517435/  


Tuesday, November 19, 2013

Barbed Wire

I am still impatiently waiting for my 2013 Bundle Monster plates to come, so I felt like stamping my nails today:


I used two coats of Sally Hansen Black Out as my base color.  When that was dry I used Sally Hansen Penny Talk to stamp on the barbed wire.  This image is from Bundle Monster's plate BM-323.  The best polishes to stamp with are highly pigmented and of a thick consistency.  Chromes work very well, too.  If you have any old polishes that are a little too thick to paint your nails with, consider saving them and trying to stamp with them.  Thicker polishes stamp beautifully.  I applied a thick coat of Sally Hansen Dries Instantly to seal in the manicure.

Saturday, October 12, 2013

Star Trek Uniform Shirts

I am a bit of a Trekkie, so I really enjoy creating Star Trek nail art.  I saw a picture on Pinterest and really liked the design, so I recreated it on my nails:


I painted 2 coats of base color on all my nails.  On my thumbs I painted Sally Hansen Black Out; on my index fingers I painted Avon Sunshine; on my middle fingers I painted Covergirl Out of the Blue; and on my ring fingers and pinkies I painted Rimmel Stiletto Red.  After all that was dry I painted on a coat of Sally Hansen Dries Instantly and then put strips of masking tape a little away from the tips of my nails so that I could achieve a clean black tip.

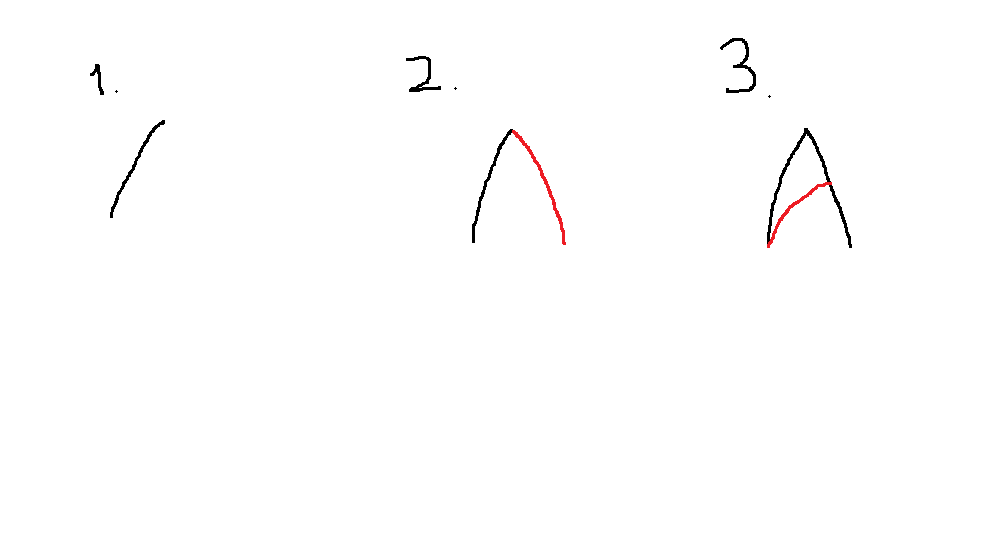
As soon as I painted on the black, I removed the tape.  Then I used a small nail art brush and painted on the black at my cuticles, which is supposed to look like the collars of the Star Trek uniform shirts.  (I used Black Out for all black details.)  After painting on the black details I cleaned up around my nails with a nail art brush dipped in acetone.  Then I used a nail art brush dipped in Sally Hansen Pumping Iron to add the Star Trek insignias.  Here's the easiest way to draw these:


After step 3, fill in the center with your color.  I have made Star Trek insignias on my nails multiple times now and this is the easiest way, in my opinion, to go about it.  I finished off this manicure with two coats of Sally Hansen Dries Instantly, which is my favorite top coat, as you have probably noticed.  I have been through many bottles of it.  "Live long and prosper."  ; )  

Monday, August 5, 2013

I Just Created a Blog!

For a long time now I have been enjoying visiting other people's nail art blogs, so I suddenly decided to create my own!  I am very new to blogging, so it will take me a little while to figure everything out, but I wanted to make a first post to test everything out!

A few days ago I created a Scotch tape manicure:


The base color I used was Rimmel London 60 Seconds in Caramel Cupcake.  Then I applied Scotch tape where I did not want to paint any of my black.  The black that I painted over top was Sally Hansen Hard as Nails Xtreme Wear in Black Out.  For my top coat I used Sally Hansen Dries Instantly.

I thought of this design one night as I was trying to sleep and, luckily, it turned out just the way I was picturing it!  I hope you enjoy!