Showing posts with label stamping. Show all posts

Tuesday, June 23, 2015

Asia Inspired


So, I had nail stickers and a stamping plate that were Asian themed, so I decided to put them to good use and do an Asian themed mani!  I am really liking how it turned out!

asian themed nail art

I started out with a coat of OPI Natural Nail Base Coat.  I then applied two coats of each base color.  I used Sinful Colors Snow Me White on my thumbs and ring fingers; Sinful Colors Black on Black on my pointers and pinkies; and Sinful Colors Gogo Girl on my middle fingers.

asian inspired manicure

I then applied nail stickers to my thumb and middle fingernails.  I stamped my pointer and ring fingers with Bundle Monster's plate BM-405.  I used an old black and an old white polish to do this.  The thicker the polish, the better it will be for stamping.  So, don't throw out your gloopy polishes!  They may be good for stamping!

asian inspired manicure

I finished off with two coats of Sally Hansen Dries Instantly.

Saturday, May 9, 2015

Monochrome Nautical

I am super excited about this manicure!  I did it yesterday and couldn't wait any longer to show it to you!

nautical manicure

I started out with a coat of OPI Natural Nail Base Coat.  (This base coat is working out really well for me!  My nails have not been staining at all and it dries sooo fast!)  I then painted all of my nails with two coats of Sinful Colors Snow Me White.

nautical manicure

I waited for that to dry and then applied a coat of Sally Hansen Dries Instantly to my pointers, middles, and pinkies in preparation for the striping tape.  I then took white and black acrylic paints and used a dotting tool to dot on the top of the anchor near my cuticle on my ring finger.  I took a small detail brush and painted on the anchor (first the vertical line, then the curved lines, one by one, then the horizontal bar.)  A couple spots were messy, so I took my white acrylic paint and neatened up the edges.  Then I dotted on a smaller white dot in the center of the black one to make the hoop at the top of the anchor.

nautical nails

I then moved on to the thumb.  I decided to stamp on an image from Bundle Monster's BM-401 image plate.  I chose the tentacles.  I used Sinful Colors Black on Black to stamp with.  

nautical nails

I cut a ton of strips of striping tape when I waited for various stages of the manicure to be dry.  I applied them to my pointers, middles, and pinkies with tweezers and then painted over those nails with Sinful Colors Black on Black.  I immediately removed the tape after painting each nail, waited for the black to dry, and then applied two coats of Sally Hansen Dries Instantly to all of my nails. 

Friday, February 13, 2015

Valentine's Day Stamping

I have finally been festive!  I feel like I have been missing my chances to have festive nails for holidays and such.  Happy Valentine's Day!

valentine's day heart nails

I started out with a base coat of Sally Hansen Double Duty.  I then painted on two coats of Sally Hansen Pink Blink on all of my nails.  I did my thumbs a little differently:

conversation heart nails
Conversation heart!
I created a top of a heart shape near my cuticle so these nails could look a little like conversation heart candy.  If I were to do this again, I would start it farther down on my nail.

valentine's day heart nails

After letting the base color dry, I painted a coat of Bonbons pink glitter on my middle and pinky fingers.  I then stamped the rest of my nails.  On my pointers and rings, I used Bundle Monster's plate BM-317.  I used an old black polish so the images were dark (an old, goopy Sally Hansen Black Out.)  On my thumbs I used Bundle Monster's plate BM-425 to add the "I love you."  I used an old, goopy white polish so that it would be very opaque (Sally Hansen White On.)

valentine's day stamping nails
  
I painted a very fine holographic glitter (Salon Perfect Cosmic Dust) over my rings and pointers.  This is a BEAUTIFUL polish!  I included the picture above, even though it is a little blurry in spots, because you can really see the rainbow on the holographic glitter.  I finished off the manicure with two coats of Sally Hansen Dries Instantly

Remember to follow me on Snapchat at "margie-jane!"


Monday, February 9, 2015

Golden Snowflakes

Hello!  I know, I have been very slow with blogging lately.  I was inspired to do these snowflake nails because I have been getting so much snow at my house.  I had my third snow day of this college semester today.

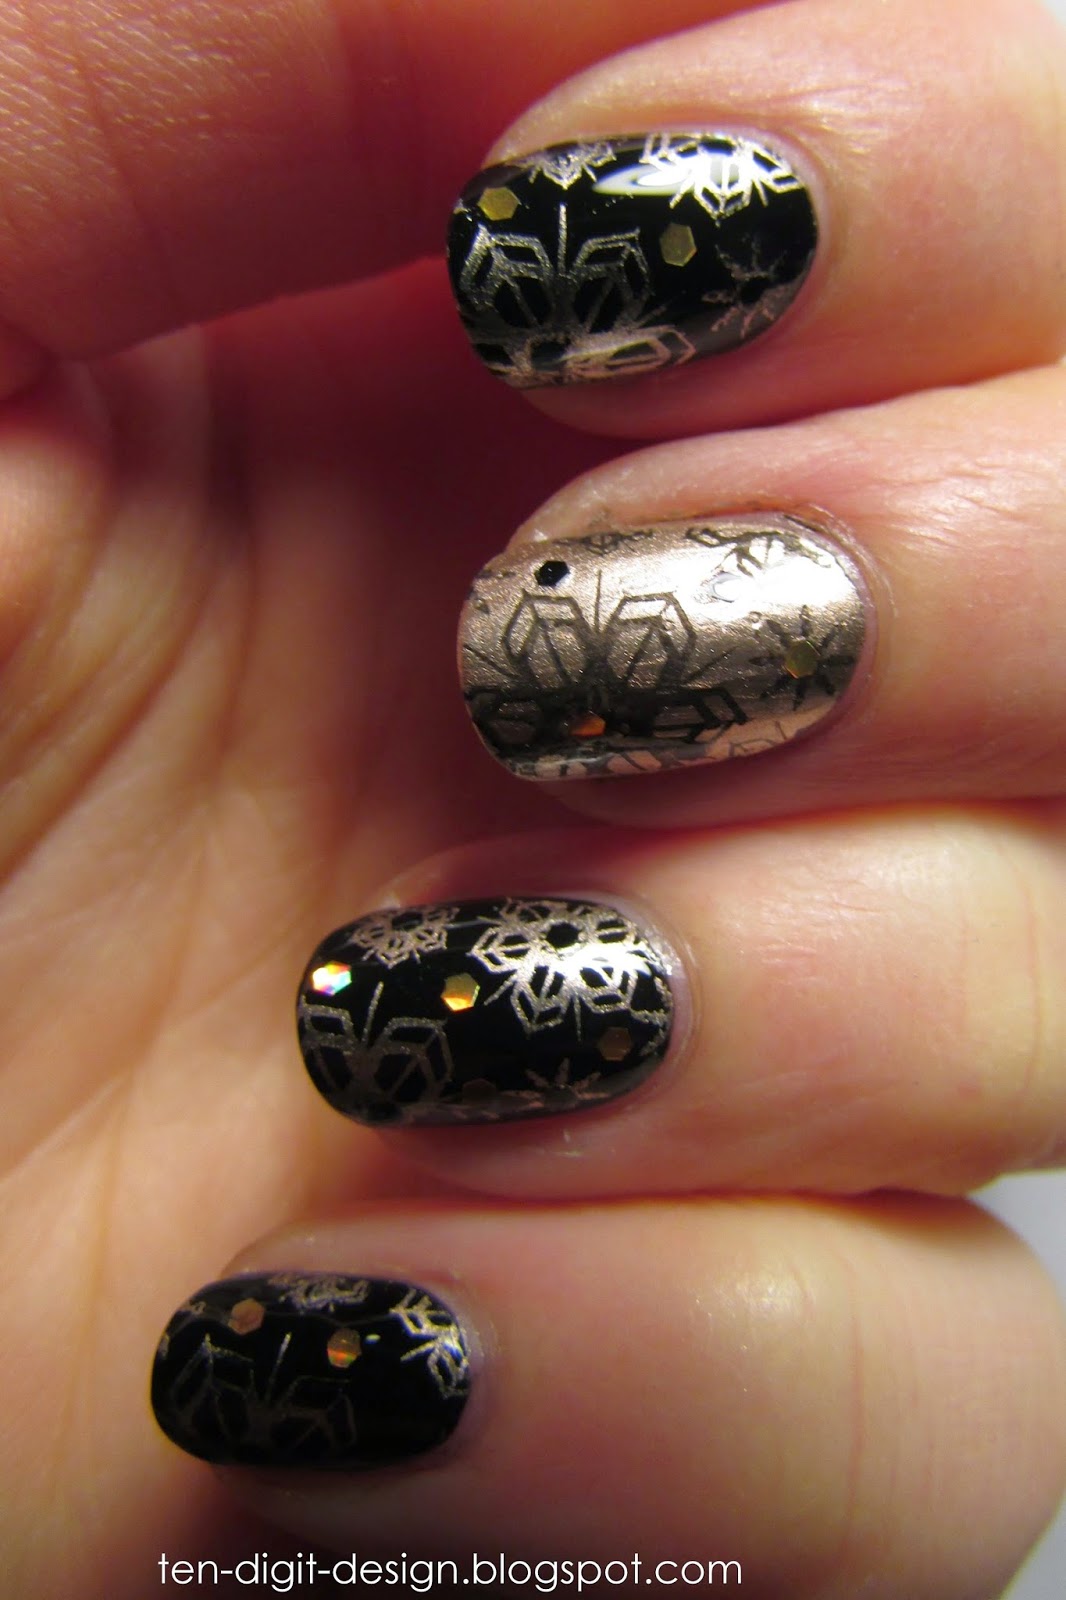
gold snowflake nails BM-323

I started out with a base coat of Sally Hansen Double Duty.  I then painted two coats of Sinful Colors Black on Black on all of my nails (the middle finger had some accidents, so I painted gold over top.  I had originally wanted everything to be uniform.)

I waited for my base to dry and then I took my Bundle Monster BM-323 stamping plate and stamped the snowflake image on all of my nails with Essie Good as Gold.  I accidentally double stamped my middle nail, so I painted a coat of the gold on it and then stamped it with the black.  

gold snowflake nails BM-323

I wanted to add a little extra sparkle, so I took my holographic black and gold loose glitters and applied it with a dotting tool dipped in Sally Hansen Double Duty.  I applied black glitter in the centers of all the gold snowflakes and gold glitter in the centers of the black snowflakes.  I also put a few random contrasting pieces of glitter on each nail (so, the nails with the black base had gold glitter placed randomly on them, and vise versa.)

I finished off with two coats of Sally Hansen Dries Instantly.

gold snowflake nails BM-323

I have a Snapchat!  I have had it for months, but I want to get in to using it more for posting random things and my nail art to my story.  Follow me if you like!  My username is margie-jane.  (My sister calls me that as a silly nickname.)  I have written the username under my social media to the right of this page and here is my personal ghost that you can point your camera at to immediately add me (without having to write in my username!!!)


Monday, December 22, 2014

Dainty Snowflakes

I have been on a roll with wintry/Christmassy nails!  Here's a manicure I did a few days ago:

stamped snowflake nails

I started out with a coat of Essie Protein Base Coat.  I then painted two coats of Sinful Colors Snow Me White on all my nails.  After that I began stamping.  I used the two single snowflake images from Bundle Monster's plate BM-319.  I stamped on different colored snowflakes until I was happy with the effect.  
The shimmery darker blue is Essie Blue Rhapsody, the peach is Essie Haute as Hello, and, though you can't see it in the pictures, I also stamped on light blue snowflakes with Essie Borrowed & Blue.  The gray dots I added with a small dotting tool are Sinful Colors Cool Gray.  

stamped snow flake nails
There is a light blue flake in the lower left side of this nail.

I finished off the manicure with a coat of Sally Hansen Diamonds to add sparkle and shimmer, and then I applied two coats of Sally Hansen Dries Instantly.

stamped snow flake nails

It is snowing at my house right now!  I love it!  It isn't really sticking, but it looks so pretty!

Wednesday, June 18, 2014

Techie Nails!

I am excited about this manicure! I knew I would get back into the mode soon enough! I have been wanting to use the binary code image from one of my stamping plates since I got them a while ago!
I used so many polishes for this manicure! I started out with a base coat of Essie Protein Base Coat. I used two coats of all of my base colors. On my thumbs I painted NYC High Line Green; on my pointers I did a gradient, but my base color was Revlon Dreamer; on my middle and ring fingers I painted Sally Hansen Black Out; and on my pinkies I painted Sally Hansen Celeb City. After that, I got ready to do a gradient on my pointers by applying a coat of Sally Hansen Dries Instantly so I could avoid removing my base color with the sponge. I then got down to stamping on my other nails. On my pinkies I used Bundle Monster plate BM-422. The polish I stamped with was Sally Hansen Black Out. On my ring and middle fingers I used Bundle Monster plate BM-415. I stamped with Sally Hansen White On. On my thumbs I used plate BM415 again and used Essie Penny Talk. On those nails I then applied two coats of Dries Instantly.
For the pointers I created a gradient. I wanted it to be light in the centers and fade into darker blue at the tips and near my cuticles. So, I applied a stripe of Revlon Dreamer in the center of a makeup sponge, and then put stripes of Sinful Colors Rain Storm on either side of that line, and then put stripes of Sally Hansen Thinking of Blue on either sides of those lines. I then used a stippling motion to apply it to my pointer nails. When that was dry, I used Essie Borrowed & Blue and the same image I used on my pinkies (from BM-422). I finished those nails off with two coats of Dries Instantly, as well.

Thursday, March 27, 2014

Maroon Paisley

This didn't turn out as neatly as I had wanted, but I still like the effect:


I started out with a base coat of Sally Hansen Double Duty.  Then I applied two coats of Rimmel Caramel Cupcake.  After that, I stamped on the paisley pattern from Bundle Monster's plate BM-315 with Essie Wicked as my color.  I made sure to not stamp on the paint the same on each nail because I wanted the paisley designs to be facing different ways.  It smudged a little when I stamped, but it looks okay, I think.  I then applied a coat of Sally Hansen Dries Instantly and then a coat of NYC Matte Me Crazy for the matte effect.

If any of you have any suggestions or comments for me, feel free to leave a comment!  I would love to hear from you!  Suggestions on ways to make this blog more interesting to you would be greatly appreciated!  And any time you have nail art ideas or questions, leave a comment!  =)  

Wednesday, March 19, 2014

Sea Creature Inspired

There was a sale at Walmart for two Sally Hansen Hard as Nails Xtreme Wear polishes for $5!  I bought two polishes that I thought would go great together.  I wanted to do a mermaid design, or something oceany.  It turned out to look a bit like fish scales:


I started out with a base of Sally Hansen Double Duty (I can't compare this to other base coats--except for that Essie one--because I haven't tried any others.  This definitely prevents staining better than using no base coat, though!)  I then painted on two coats of Sally Hansen Jazzy Jade (one of my new polishes.  I don't usually buy shimmery polishes, but this one is only slightly shimmery and I love the aqua color!)  Then I used the diamond pattern on Bundle Monster plate BM-315.  My stamping color is Essie Go Overboard.

After that was dry, I dabbed on a coat of Sally Hansen Sea-ing Stars (my other new polish.)  This is a very pretty, blue tinted glitter polish with teeny and slightly bigger than teeny iridescent glitter.  I dabbed it on to avoid smudging my stamped pattern and because I wanted to make sure I had enough glitter pieces on my nails.  (This one has pretty fine glitter, so you don't really NEED to pat this on.  That's the technique for large glitter.)  I then applied 1.5 mm half pearls onto the wet glitter polish on my ring fingers and thumbs.  I finished off the manicure with two coats of Sally Hansen Dries Instantly.

Monday, January 20, 2014

Stamping Half Moons

I start another semester of college tomorrow, so I wanted to do a manicure before things get crazy.  ; )  I have been fairly busy lately, so that is why I haven't done a post since my slipper pattern nails.  I did do my nails once, but they didn't come out well, so I decided not to post them.  So, I have been wanting to do this manicure for a while and I finally got around to it:


I started out with two coats of Sally Hansen Celeb City, which is a really great, inexpensive, sparkly silver polish.  I then applied a coat of Sally Hansen Dries Instantly so that the hole reinforcers wouldn't pull up my base color.  Once that was dry, I cut some hole reinforcers in half and applied them where I wanted my half moons.  I then stamped on a pattern from Bundle Monster's plate BM 404.  My stamping color was Sally Hansen Black Out.  The stamping didn't come out as well as I had hoped (I have not been having much success with stamping lately, for some reason), so I wanted something else to make the half moons stand out better.  I decided to use a small nail art brush to freehand on the green stripes.  The green polish is an L.A. Colors polish.  I finished off the manicure with a coat of Sally Hansen Dries Instantly.  

I have been lacking ideas for manicures lately!  I have been wanting to do pretty, dainty manicures, but I can not think of any to do!  Any time you guys have any ideas, comments, questions, or suggestions, feel free to leave a response in the comments box!  Anyone can leave a comment because you can comment under "anonymous" if you want to!     

Thursday, January 9, 2014

Vintage Lace


I started out with two coats of Milani Rapid Orchid, which is actually a very dark reddish-purple, though it even looks almost black in person.  When that was dry, I stamped on a lace pattern that I found on Bundle Monster's Plate BM323.  I used Sally Hansen White On as my stamping color.  I finished off the manicure with two coats of Sally Hansen Dries Instantly.

So, the story behind my "vintage lace" is simply that the lace did not come out like I hoped it would.  I wanted it to look crisp and clean, but, for some reason, I was just having a hard time with stamping.  So, I am using my imagination and pretending that the lace is supposed to be old, tattered lace.  Haha!  If I think of it that way, I don't think the manicure looks messed up!

I did use my new Konad stamper, but it was definitely not the new stamper that made my stamping not come out so well.  My conclusion is that the generic stamper that I had always used is just as good as the Konad one that I bought.

Thursday, December 26, 2013

Sponging, Stamping, and NEW CAMERA!

I am super excited to be using a better camera now!  I'm still not an expert hand photographer, but I will continue to get better with practice.  I am super excited about sponging, so I decided to do another sponging manicure today:


My base color is two coats of Rimmel English Rose.  When that was dry, I applied a coat of Sally Hansen Dries Instantly to my nails so that my sponge wouldn't pick up my base polish.  I put a line of Rimmel English Rose and a line of Milani Rapid Orchid on a cosmetic sponge.  I put on the lighter color first and then slightly overlapped it with the darker color.  Then I sponged the two colors on to my nails.  I had to reapply polish on the sponge after every couple of nails that I sponged.  When I was happy with the gradient and opaqueness of the new color, I allowed that to dry.  (Oh!  By the way, you can reuse a triangular makeup sponge many times.  I simply cut off the end that I use after I am done sponging all of my nails.)

I wanted to do some stamping too.  I used Bundle Monster Plate BM404.  The white polish is Sally Hansen White On, a polish that I use exclusively for stamping because it is old and very thick.  I applied two coats of Dries Instantly to finish off my manicure.

Wednesday, December 25, 2013

Nail Stamping Tutorial

MERRY CHRISTMAS!  I am having a wonderful day and I decided to do my post about how to stamp your nails today.  I got a super nice camera (a Canon Power Shot SX500 IS), so I will finally be able to take nicer pictures for this blog!  My next post will have better pictures!  So, on to the tutorial:

Here is what you will need to stamp with:


You need polish, of course.  The thicker and more opaque the polish, the better.  Then you need a stamping plate, obviously.  You will need a special rubber stamper.  There are all sorts of them.  I got mine in a stamping kit.  You will also need a scraper.  My set came with a metal scraper to scrape off the excess polish from the plate.  Konad, a popular nail stamping company (their plates are expensive, so I only have two Konad plates) sells a metal scraper, too.  The problem with metal scrapers is that they can scratch your image plates!  Many people, myself included, prefer to use plastic.  I use an old gift card and it works perfectly.  It can't scratch the plates, either.

So, you need to put some polish onto the plate:


It is best to put polish on just one side of the image.  The indentations of the image are extremely shallow, so you only need a little polish.  You don't need to waste much!

Next, you scrape the polish, with your scraper, into the image so you are left with polish only in the image:


Once you have scraped, you need to work fast because a layer of polish that thin dries very quickly.  Take your stamper and press or roll it over the image to pick up the paint:


You should be left with the image on your stamper.  Quickly roll that on to your nail before it dries.
To clean the plates and stamper, you can use nail polish remover or pure acetone.  I prefer pure acetone because it cleans the plates so much easier.  It can leave an iridescent sheen on the plates, but that is not permanent.  It is just residue that can be rubbed off, and it won't affect your stamping at all.

Keep in mind that mastering stamping can take a while.  I have greatly improved over the time that I have been doing it, but I am still not perfect at it.  When you do it yourself, you find techniques that work best for you.  Different images can be easier or harder to stamp with and some polishes do not work well.  Konad and other brands sell special stamping polishes.  I do not own any of them, though.  The only way to get better at stamping is to keep playing around and trying it out.

If you have any questions, feel free to leave a comment below.  Anybody can leave a comment because I have it set so you can comment under "anonymous" if you do not have a Gmail account or other accounts.  I hope this was helpful!


Tuesday, December 24, 2013

Trees in the Snow

I saw this really cool picture on Pinterest and decided to try to recreate the manicure because I realized that I had the same stamping plate that the girl had used in the design:


For my recreation, I just put the trees on my ring fingers and thumbs to cut down on the time it would take to complete the manicure.  I started out with two coats of Sinful Colors Cool Gray on all of my nails.  On the fingers that I wouldn't be sponging and stamping, I applied a coat of Sally Hansen Diamonds, a fine glitter.  Then I put on one coat of Sally Hansen Dries Instantly.  I also put a coat of Dries Instantly on the nails that I would be sponging so avoid taking off the gray polish with the sponge.

When that was all dry I put some gray and white polish on my makeup sponge like this:


There is actually a line of white polish underneath the gray polish (Sally Hansen Hard to Get.)  It is touching the gray polish.  I found out how to successfully sponge nails!  You need some of your base color on the sponge too, so the new color you are sponging on seems to blend with the base color.  I used a stippling motion to sponge on the polish.  I was so excited to see that it actually worked for me this time!  A few months ago I attempted to sponge my nails, but it did not turn out very well.

When the sponged polish was dry, I stamped on trees from Bundle Monster's plate BM407.  I used Sally Hansen Black Out as my stamping color.  On my left hand, which is the hand I post on my blog most of the time, I accidentally stamped the trees crooked.  I just pretend that they are blowing in the wind.  Haha!  I stamped better on my right hand:


I applied two coats of Dries Instantly over the stamped nails.  After the manicure was complete, I used acetone to clean up all the polish around my nails.  I am very excited by this manicure.  Pinezoe.com is where the picture on Pinterest came from.  She is a very talented nail blogger!

I hope you all have a very Merry Christmas!  I cannot believe it is tomorrow!  My next blog post will be a series of pictures showing exactly how to stamp your nails.  

Pinezoe's nail picture is here:  http://www.pinterest.com/pin/421368108857517435/  


Sunday, December 1, 2013

Winter Snowflake Nails

I was super excited to paint my nails for Thanksgiving, but, last minute, I worked all day on the day before Thanksgiving and then I went away on Thanksgiving day and didn't get back home until today.  So, there was no time to do a manicure.  I am really excited about today's mani, though.  I have been looking forward to using Bundle Monster's snowflake image for a long time:


My base color is two coats of Sally Hansen Thinking of Blue.  I used Bundle Monster plate BM323 to stamp with.  My stamping color is Sally Hansen White On.  That polish is actually pretty old, so it got very gloopy.  That's why it works so well to stamp with.  On my ring finger and thumb I used a couple 1.5 mm silver studs from Born Pretty Store.  I used two coats of Sally Hansen Dries Instantly as my top coat.   

Friday, November 22, 2013

Computer Chip Nails!

I got my 2013 Bundle Monster plates!!  I love them!  There are so many great designs!  The pattern I was most excited about is this one:


I am a bit geeky, so this pattern really got me excited!  It took me a while to decide on the colors that I'd use.  I used two coats of Rimmel Hard Metal as my base color and then used stamping plate BM415.  My stamping color is Essie Penny Talk again.  That is my best stamping polish.  I would love to get more of Essie's chrome colors but they are a little expensive for me, a lowly college student.  ; )  I used two coats of Sally Hansen Dries Instantly to finish off the manicure.  

Tuesday, November 19, 2013

Barbed Wire

I am still impatiently waiting for my 2013 Bundle Monster plates to come, so I felt like stamping my nails today:


I used two coats of Sally Hansen Black Out as my base color.  When that was dry I used Sally Hansen Penny Talk to stamp on the barbed wire.  This image is from Bundle Monster's plate BM-323.  The best polishes to stamp with are highly pigmented and of a thick consistency.  Chromes work very well, too.  If you have any old polishes that are a little too thick to paint your nails with, consider saving them and trying to stamp with them.  Thicker polishes stamp beautifully.  I applied a thick coat of Sally Hansen Dries Instantly to seal in the manicure.

Saturday, October 5, 2013

White Roses

Today I decided to stamp my nails.  They came out so well!


I first painted on two coats of Rimmel Black Satin.  I let that dry for a while and them I began stamping.  I used my Bundle Monster Plate BM323 and selected the rose pattern.  I have an old white polish, Sally Hansen White On, that got very thick.  That worked perfectly.  With stamping, thick polishes work better.

After I stamped all my nails I cleaned up around my cuticles with a Q-tip dipped in pure acetone.  I had never used pure acetone before, but it worked so much better than nail polish remover with acetone.  I didn't need to rub my skin to get the paint off.  The acetone took it off effortlessly.

I let the stamped images dry for a long time and then applied two coats of Sally Hansen Dries Instantly.  The trick to not smudging the images is letting them dry for a long time and using a top coat with a thick consistency.  Thin top coats do not provide a barrier between the nail and the brush.  If you use a thick top coat, though, and make sure you have a lot on the brush and apply it very lightly to your nails, the design will remain intact.  When I first buy Dries Instantly, it is pretty thin, but when it gets a little older it becomes thick enough to paint over designs.


Sunday, August 25, 2013

Stamping Again!

Hi!  Today I had a great time stamping my nails!  The colors that I used worked super well and the images came out very clear:


I used Sally Hansen White On as my base color, the blue that I stamped with is Milani Sail Away and the copper is Essie Penny Talk.  The plates that I used were Bundle Monster BM-314, BM-315, and BM-319.  In the pictures I do not have a top coat on yet because I wanted to let the polish dry for a while longer.  I used Sally Hansen Dries Instantly after, though.

I am very happy with how the images came out.  I would highly recommend these polishes for stamping with.  I really like paisley and I decided to do multicolored paisley.  If I had not accidentally overlapped the copper on the blue, it would look even better.

Stamping is loads of fun, but it takes a lot of practice.  I still haven't mastered it.  A really great blog that got me into nail stamping is The Nailasaurus.  You should check her out!  She is a pro at stamping and nail art in general!

Thursday, August 22, 2013

Subtle Stamping

I've really been on a nail art kick lately!  Today I decided to do some stamping.  I hadn't stamped in a really long time.  The final effect I achieved today wasn't as noticeable as I was hoping it would be, but it is nicely subtle:


The colors weren't coming out right inside, so I decided to take the picture outside on my worn picnic table.  Not the best backdrop, but whatever.
Anyway, the base color that I used is Essie Chinchilly, the stamping color that I used is Essie Haute as Hello and the stamping plate is Konad m64.  I used Sally Hansen Dries Instantly as my top coat.  When I took this picture I actually hadn't applied a top coat to my stamped nails because I wanted to allow it a little more time to dry.  If you have any questions about nail stamping, just leave a comment below and I'll get back to you.  =)