Showing posts with label sponging. Show all posts

Sunday, June 14, 2015

Spring Gradient

I actually did this manicure months and months ago.  It's about time to post it.

gradient manicure

My cuticles were not in tip top shape here!  Haha!  The great thing about humid weather (like the kind of weather we are having now in the almost summer of the north east of the USA) is that is allows your cuticles to stay much nicer.

I started out with a coat of Essie Protein Base Coat (which I will never go back to after OPT's base coat) and then applied two coats of a white polish.  I then applied a coat of Sally Hansen Dries Instantly to prevent my base color being pulled up by my sponge.

gradient manicure

To the makeup sponge, I applied a stripe of L'Oreal Now You Sea Me, Pure Ice Shore Bet (a tan), and then a stripe of Essie Da Bush (an earthy green).  I stippled this onto my nails so the blue (Now You Sea Me) was at the tips of my nails.  I finished off with a coat of Essie As Gold as It Gets, which is flakes of glitter.  It is really not as exciting as it sounds.  You can see that it is barely gold at all.  I finished off the whole manicure with two coats of Sally Hansen Dries Instantly.

gradient manicure

Monday, June 8, 2015

Tan to Rosy


This is one of my favorite manicures!  I loved how feminine and pretty it is!

tan to rose gradient manicure

I started out with a coat of OPI Natural Nail Base Coat.  Then I applied two coats of Rimmel Caramel Cupcake, a tan polish.  I painted on one coat of Sally Hansen Dries Instantly after this so the sponge I planned on doing the gradient with wouldn't pull up my base color.

tan to rose gradient manicure

I then took a triangular makeup sponge and applied a stripe of Caramel Cupcake and a stripe of Sally Hansen Rockin' Hard onto the sponge.  I made the colors overlap a bit.  I then stippled that onto my nails.  I made sure to stipple quite a lot so the colors would blend.  I applied more polish to the sponge whenever I needed to.  

I immediately applied a coat of Salon perfect Cosmic Dust , a very fine holographic glitter which is absolutely mesmerizing in the sunlight, once I was done with all the sponging.  I finished off with two coats of Sally Hansen Dries Instantly.

tan to rose gradient manicure

I got Instagram today!  You can follow me!  My username is popstermargie
https://instagram.com/popstermargie/

Sunday, February 22, 2015

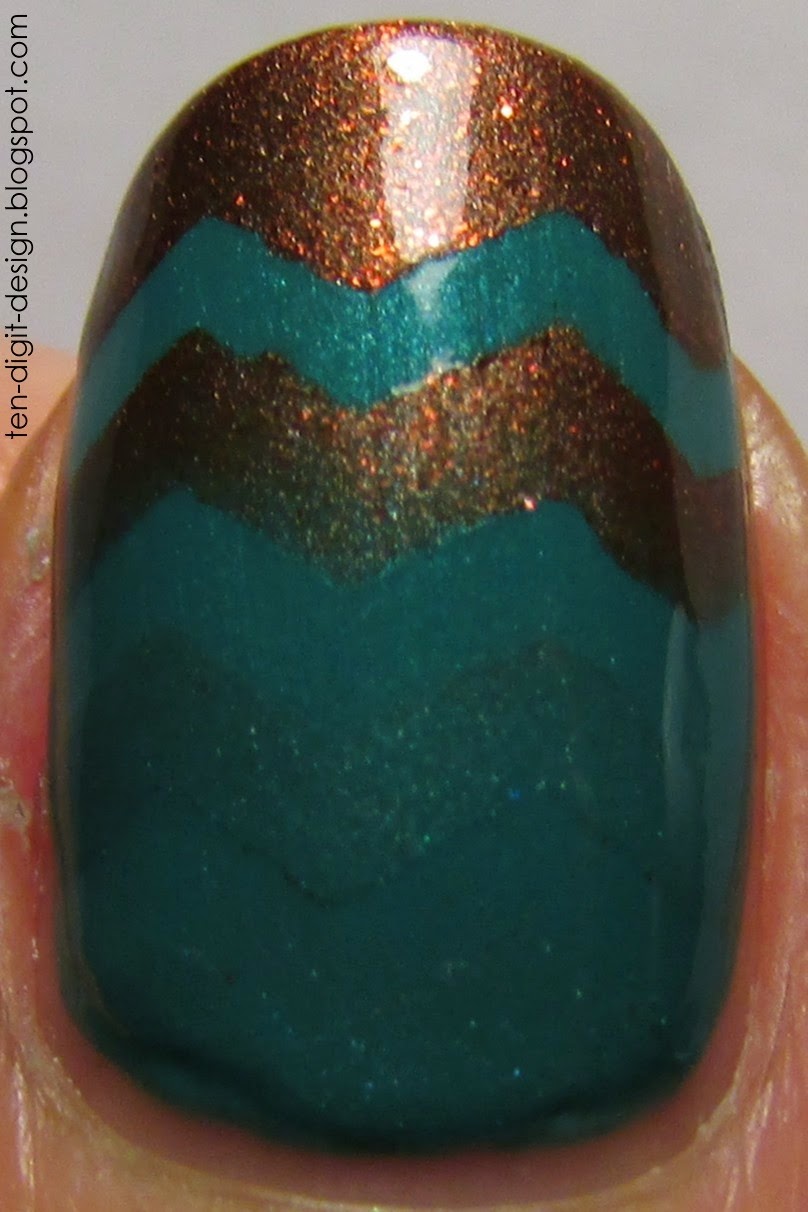
Gradient Zigzags

Color combinations can really make a manicure.  Even if your nails are painted just a couple basic colors, it can look SUPER cool if the colors go well together.  I am not too great at finding interesting color combinations, but this manicure's colors made me really happy.

gradient nails with zigzags

I started out with a base coat of Sally Hansen Double Duty.  I then painted on two coats of Sally Hansen Jazzy Jade (the teal color.)  After that, I painted a coat of Sally Hansen Dries Instantly over everything to get them ready for tape and sponging.  I took a makeup sponge and applied Sally Hansen Jazzy Jade and Sally Hansen Kinetic Copper (which is a magnetic polish that is also super pretty without the magnetic effect) and painted them onto the sponge so they overlapped in the middle.  

zigzag gradient nails

I then rolled the sponge over all of my nails, except for my ring fingers and thumbs.  For those nails, I took some zigzag tape (which I got from Amazon) and applied three strips across each nail.  I stuck the tape on the back of my hand before applying it to my nails so that it would be gentler on the polish.  I always try to minimize the chance of tape removing my base color.  That is THE WORST!  I then used the same sponge and rolled it over these nails until I got my desired gradient.  I removed the tape after doing each nail.  I always reapply a good amount of polish to the sponge in between each nail.

gradient zigzag nails

I decided to stick a holographic, mirrored star sticker on my ring finger.  The points were sharp, so I trimmed them a teeny bit with small scissors.  I then applied two coats of Dries Instantly over everything.  Gradients dry super fast, so you don't really need to wait to apply your top coat.  I applied three coats of top coat on my ring finger to make the star not stick out as much.

Follow me on Snapchat!

Saturday, January 24, 2015

Night Sky


I have started another semester of college.  I graduate with my associate's degree in childhood education at the end of this one, so I am pretty excited.  The other night I went to my school for a night class and looked up at the sky.  It was a deep blue which faded into a light yellow at the horizon.  The moon was a crescent.  I was inspired to create a manicure based on how pretty it was.

night sky nails

I started out with a coat of Essie Protein Base Coat.  I then painted on two coats of Sinful Colors Unicorn, a very light yellow.  I applied a coat of Sally Hansen Dries Instantly after that so the sponge wouldn't take off my base color.  

I put four colors on my sponge.  I painted on a stripe of Sinful Colors Black on Black, Sinful Colors Into the Blue, Rimmel Blue Eyed Girl, and a very thin stripe of Sinful Colors Unicorn.  I then stippled that over my nails with the black at the cuticle.  

night sky manicure

If I were to do this again, I would have immediately applied another coat of Sally Hansen Dries Instantly to make the gradient blend better.  Since I waited, I was left with a slightly grainy effect.  It's not bad, but it could have looked smoother.  I am really happy with it anyway, though.

I eventually applied a coat of Sally Hansen Dries Instantly over everything but my ring finger.  I used a dotting tool and white acrylic paint to dot on the moon.  I then put a drop of my black polish and my darkest blue touching each other on a piece of paper and I dipped in a dotting tool so I could match the dot which created the crescent moon to the background a little bit better.  In person, it doesn't stand out quite as much as it does in the pictures.


After applying Dries Instantly over all the nails, I applied two coats of NYC Matte Me Crazy, a matte top coat.  I wanted to make my night skies look a little more realistic by taking out the shine.

night sky manicure

Monday, October 27, 2014

Cotton Candy Gradient


Whoa.  I cannot believe I haven't posted in almost a month.  School's been busy.  Tonight I, maybe, could be studying a bit more, but I was suddenly overwhelmed with the overwhelming desire to blog.  So, you see what won.  I haven't done much nail art recently.  This art is from weeks ago.  I am looking forward to trying out one thing for Halloween, though.  I'll need to get on that soon!  Anyway, here's what I came up with a while ago:

cotton candy gradient nails

I started out with a coat of Essie Protein Base Coat.  I then painted on two coats of Sinful Colors Snow Me White.  After that, I painted on a coat of Sally Hansen Dries Instantly to avoid pulling up my base color with my sponge.  

cotton candy gradient nails

When that was all dry, I took a makeup sponge and painted on a stripe of three different colors.  I made sure they all overlapped a bit to help the color transition to be smooth.  The purple is Rimmel Wild Orchid; the blue is Essie Blue Rhapsody; and the pink is Sally Hansen Pink Blink.  I stippled the color over my nails with the makeup sponge until the color was as opaque as I wanted it.  I flipped the sponge over so that the order of the colors alternated on my nails.  On my pointer and ring fingers I wanted the purple to be at my cuticles, and I wanted the pink to be at my cuticles on my other three nails.

 I then applied two coats of Sally Hansen Dries Instantly.  It's super fun to do gradients because the thin layer of polish dries really fast and a top coat will only help the colors to blend in more.  You don't really need to wait to apply the top coat!

cotton candy gradient nails

This rounded nail shape has been working out for me so well!  I can grow my nails longer and I don't have any more sharp corners that catch clothing and/or break off!  My manicures last for so long because no part of my nails bend!  They're way stronger like this!  The corners of my nails used to always bend and then the polish would chip off.  Also, my actual nails have not been flaking!  Certain nail shapes work better on different people.  Experiment until you find out what's best for you!

I will try to post more often.  I really do enjoy blogging.  The wisest thing I have read on a blog is that you should not blog when you don't feel like it.  A blog is supposed to be fun, and if I don't feel like writing a post, the post will not be of high quality.  It can't be forced.  So, anyway, I haven't forgotten about the blog and I hope to do some more manicures!  I am super excited to do a Halloween manicure!  I hope you have all been doing well!  

Remember to check me out on Pinterest and Facebook!  I am on Pinterest all the time!  My Facebook and Pinterest are linked on the right side of my blog!

Thursday, August 7, 2014

Summery Hearts

I have finally had some inspiration for nail art. I was in a bit of a rut when it came to thinking of ideas for nail art, but today I was really in the mood and ideas were coming to me! Yay! Before I show you what I have done, I want to tell you a teeny bit about nail files again. A few posts ago I told you about my nail care routine and I showed you that "Ruby Stone" crystal nail file. Well, that thing turned out to not be so great. It was so "gentle" on my nails that it didn't really do anything and the texture just gave me chills. So, I got a super nice crystal nail file from Amazon! It is by OPI and it was only a little over $5. It works wonderfully! All the nail art girls online rave about these types of crystal or glass files and I really know why now! It is gentle on the nails, but it also files very quickly! It doesn't leave other layers of nail sticking out where you just filed and it leaves your nails nice and smooth at the edges, instead of sharp.
Okay! On with the manicure!
I started with a coat of Essie Protein Base Coat and then painted on two coats of Sinful Colors Snow Me White, which is the best white polish I have used. I then applied one coat of Sally Hansen Dries Instantly to all my nails because I was going to be taping and sponging. Before I even started the manicure, I took masking tape and cut out hearts to stick to my nails. Here is what I used to create the hearts:
So, when the top coat had dried, I applied two small hearts made out of masking tape to my ring fingers and one large heart to my thumbs. I chose to use masking tape because it is thick and I figured it would be easy to grab with tweezers when I needed to remove it from my nails. I used a square of tape with a heart shape cut out of it on both my pointers so I could achieve a small colorful heart on those nails. Here is what my gradient sponge looked like:
The teal is Sally Hansen Jazzy Jade; the tan is Rimmel Caramel Cupcake; and the coral is Sally Hansen Coral Reef. On my middles and pinkies I did plain gradients. After I sponged over the other nails, though, I used my tweezers to remove the masking tape hearts. This was very easy because they didn't completely adhere to my nails, so the edges were easy to grip with tweezers. It didn't matter that they were not totally stuck to my nails because you do not use a sweeping motion when sponging; you use a stippling, dabbing motion. Also, the paint is contained in the sponge and is not runny, so nothing could seep underneath the tape. After removing all the tape, I applied two coats of Dries Instantly to finish off the manicure.

Thursday, July 24, 2014

Rainbow Gradient

For this rainbow gradient look I decided to start at orange on my thumbs and go to purple on my pinkies. I did not include red or indigo. I achieved this look by sponging. I picked out one light and one dark shade for each color on my nails. I decided not to use red because I didn't feel like having any pink.
I started out with a coat of Essie Protein Base Coat and then painted on 2-3 coats of all my pastel base colors. I started with pastel bases because I didn't want to be sponging light colors over dark colors. On my thumbs I used three coats of Essie Haute as Hello; on my pointers, three coats of Sinful Colors Unicorn; middles--two coats of NYC High Line Green; rings--two coats of Essie Borrowed & Blue; and two coats of Rimmel Wild Orchid on my pinkies. After that had all dried I applied one coat of Sally Hansen Dries Instantly so that the sponge wouldn't remove my base color. I then got to sponging. For all of the colors, I put a stripe of my base color and a stripe of my darker gradient color slightly overlapping on the sponge. I then stippled that on my nails and applied more polish to the sponge as needed. I used a couple pieces of sponge and used different sides of them for the different colors. You can get many uses out of one sponge.
Here are the darker shades I used: orange--NYC Spring Street; yellow--Avon Sunshine; green--Revlon Rain Forest (which is actually glittery, but you can't notice it that much with the glitter over top of all my nails); blue--Rimmel Blue Eyed Girl; and purple--Revlon Impulsive. I decided to put some fine, iridescent glitter over top of the gradient (Sally Hansen Diamonds). I finished off with two coats of Dries Instantly.

Sunday, July 6, 2014

Summer Cabin Moonrise

Yesterday I just felt like doing my nails. I had been wanting to try making crescent moons, but after making one on my ring finger, I thought the manicure looked a bit plain. I have so many nail art brushes, but none of them are super fine, so I had decided to cut some bristles off of one to make it a really nice detail brush:
Since I had this "new" detail brush, I decided to put it to good use:
So, here's how I did this: I first applied a coat of Essie Protein Base Coat and then painted two coats of Rimmel Burgundy Flirt on all of my nails. Then I applied a coat of Sally Hansen Dries Instantly because I was going to sponge on a gradient. For my gradient I used Rimmel Burgundy Flirt and Milani Rapid Orchid. I put a stripe of each next to each other on a makeup sponge and stippled it onto my nails so that the darker color (Milani Rapid Orchid) would be toward the tips of my nails. I then took a dotting tool and made a large white dot on my ring finger. After I let that dry for a while I took the dotting tool again and put a drip of each of the red colors side by side on a piece of paper. I mixed them together a bit in the center with the dotting tool and then put a dot of the color to the right side of the white circle to create a crescent moon. I made sure the bit of the dot with more light red was toward the cuticle side of my nail so it would be able to blend in with the gradient base better.
After making the crescent moon, I thought the rest of the manicure looked too plain, so the idea of painting some silhouettes came to me. I took my small detail brush and some Sally Hansen Black Out and painted a house on my middle finger and a spruce tree on my pinkie. The black silhouettes were hard to see, so I took the same detail brush and Sally Hansen Golden-I and outlined the silhouettes. I am extremely pleased with the result. The gradient looks like a late evening summer sky. The moon has just come up and the tree and cabin are lit from behind by the dying sun. I finished off the manicure with two coats of Dries Instantly. OH! If you didn't know, I also have a Facebook page for Ten Digit Design! Just search Ten Digit Design on Facebook and it should come up! =)

Thursday, July 3, 2014

"Three Cheers...

...for the red, white, and blue!" =) I am desperately trying to make my titles a little more interesting instead of complete labels! Haha! I have been planning my Independence Day manicure. Here it is!
I love manicures that don't just have the same thing on every nail! I am trying to get better at mixing it up a bit! I started out with a coat of Essie Protein Base Coat and then applied two coats of each color. On my middles and pinkies, I applied Sally Hansen Thinking of Blue; on my thumbs, pointers, and rings I applied Sally Hansen Hard to Get (a white.) When the polish was still wet, I immediately applied two holographic star sequins to both my middle fingers. I applied a coat of Sally Hansen Dries Instantly to my thumbs to get them ready to sponge, and to my pointers and rings to get them ready for striping tape. I then took some silver and light blue glitter polish and did a slight glitter gradient on my pinkies. I have never done that before, so it didn't come out great, but I am happy with it. Next, I painted stripes of red (Rimmel Stiletto Red), white, and blue on a makeup sponge and stippled that on my thumbs. I then cut twenty pieces of striping tape and applied five to both of my pointer and ring fingers. I made sure the tape was pressed down at the sides of my fingers so the red polish wouldn't go underneath the tape. I then painted on a coat of Rimmel Stiletto Red on all four of those fingers. Before painting the next finger I would remove the striping tape from the one that I just painted. To finish off the manicure, I painted two coats of Dries Instantly on all of my nails, except for my middles on which I applied three coats so the corners of the stars would not stick out as much. Happy Independence Day to the Americans!

Wednesday, June 18, 2014

Techie Nails!

I am excited about this manicure! I knew I would get back into the mode soon enough! I have been wanting to use the binary code image from one of my stamping plates since I got them a while ago!
I used so many polishes for this manicure! I started out with a base coat of Essie Protein Base Coat. I used two coats of all of my base colors. On my thumbs I painted NYC High Line Green; on my pointers I did a gradient, but my base color was Revlon Dreamer; on my middle and ring fingers I painted Sally Hansen Black Out; and on my pinkies I painted Sally Hansen Celeb City. After that, I got ready to do a gradient on my pointers by applying a coat of Sally Hansen Dries Instantly so I could avoid removing my base color with the sponge. I then got down to stamping on my other nails. On my pinkies I used Bundle Monster plate BM-422. The polish I stamped with was Sally Hansen Black Out. On my ring and middle fingers I used Bundle Monster plate BM-415. I stamped with Sally Hansen White On. On my thumbs I used plate BM415 again and used Essie Penny Talk. On those nails I then applied two coats of Dries Instantly.
For the pointers I created a gradient. I wanted it to be light in the centers and fade into darker blue at the tips and near my cuticles. So, I applied a stripe of Revlon Dreamer in the center of a makeup sponge, and then put stripes of Sinful Colors Rain Storm on either side of that line, and then put stripes of Sally Hansen Thinking of Blue on either sides of those lines. I then used a stippling motion to apply it to my pointer nails. When that was dry, I used Essie Borrowed & Blue and the same image I used on my pinkies (from BM-422). I finished those nails off with two coats of Dries Instantly, as well.

Saturday, May 31, 2014

Tropical Gradient

I couldn't wait to do my nails any longer. I am also really in the mood to blog, so I couldn't even put this post off any longer (I did it yesterday)! Haha!
I started out with a coat of Essie Protein Base Coat. I then applied two coats of Sally Hansen Hard to Get, a white polish. After that was dry, I applied a coat of Sally Hansen Dries Instantly so the stippling motion of the sponge wouldn't pick up my base color. I then took a makeup sponge and painted on five different colors. I overlapped each one slightly so they would blend into each other. I had to reapply the polish to the sponge multiple times. Starting at the cuticle, the colors I used were Revlon Dreamer, Essie Borrowed & Blue, Avon Sunshine, NYC Spring Street, and Rimmel Stiletto Red.
I stippled on the color until I was happy with how vibrant it was. I then applied a coat of Sally Hansen Diamonds, a very fine, iridescent glitter, over top so I could have a subtle sparkly effect. (I LOVE this polish! It isn't even hard to get off because the glitter is so fine!) After sponging, I didn't wait very long to apply it because if it smudged the manicure, it would just blend the gradient together even more. I then took a while to clean up my fingers with a Q-tip dipped in acetone and then a nail art brush dipped in acetone to clean up closer to my nails. Then I applied two coats of Dries Instantly. I cut off the painted end of the makeup sponge with a large pair of scissors so I can get many uses out of the same sponge.

Saturday, April 12, 2014

Beach Nails

Yesterday I had such a hard time figuring out what I wanted to paint.  I considered not painting my nails at all, but I wanted them to look nice, so I chose a color I had never used and went with it.  I ended up with this:


I started out with a base of Sally Hansen Double Duty.  Then I painted on two coats of an L.A. Colors polish (the sheer, sparkly, tannish color).  When that was dry I applied a coat of Seche Vite so the sponge wouldn't pick up my base color.  I took three small chunks of a makeup sponge and, with tweezers, dabbed on the color of the waves.  I made sure I dabbed off the excess polish from the sponge on a piece of paper before applying it to my nails.

First I dabbed on Sally Hansen Hard To Get (the white).  I applied it near to the top of my nails and all the way down to the tips.  I made sure not to make it perfectly even on the top because waves don't go on to a beach in a perfectly straight line.  When that was dry I dabbed on some L'Oreal Now You Sea Me a teeny bit lower down than the white.  At times I made it go completely over the white so that it didn't look perfectly straight.  I didn't bother bringing that all the way to the tips of my nails on all of my nails because I was going to go over it with a darker blue.  When the middle color was dry I took my third piece of sponge and dabbed on Essie Go Overboard.  I tried to make it a little more opaque towards the tips of my nails.

To bring the design to life a little more I painted on a star fish with Avon Blossom and a scallop shell with Revlon Impulsive.  I used a small nail art brush for both of these.  I did not like how my scallop shell came out, but I made it a teeny bit better my adding three small lines of Rimmel Wild Orchid to detail it.  I finished off with two coats of Seche Vite, which has already chipped a lot, even though I have only been wearing this design for one day.  Not impressed.  I am a little hard on my hands and I did work today (I did some cleaning at my job), but I would do those same kinds of things with Dries Instantly and that would not chip.  I actually am really happy with the finished product, though.  Having pictures of my manicures makes me feel slightly better when they get ruined.  At least I will be able to look at them when they were first done and still looking perfect.

Sunday, March 23, 2014

Galaxy and Earth Nails

I have always LOVED the galaxy nails that The Nailasaurus has created.  She has created multiple galaxy manicures, and I decided to try it out on my best friend.  I loosely followed The Nailasaurus's tutorial (http://www.thenailasaurus.com/2013/07/galaxy-nail-art-tutorial.html).  I also loved a picture I saw on Pinterest of an amazing earth manicure (http://media2.onsugar.com/files/2013/03/12/6/1844/18445232/9f3f8c9ce83394b9_DSCN8471ala.jpg).  So, here is what I created on my friend's nails:


My friend started out by painting two coats of Sally Hansen Black Out on all of her nails.  Then she applied a coat of Sally Hansen Dries Instantly.  After that, I did the detailing.  I painted a blue partial earth shape on the tips of her ring fingernails using a flat nail art brush with Essie Borrowed & Blue.  (The trick to putting paint on another brush is to make sure the new brush is saturated in the paint, just like the brush that comes in the bottle is.  This will help you to avoid smudging the polish underneath and will help you to get a smooth, non-streaky covering of polish.)   Then I began the galaxies on all her other nails.  To create the galaxies, I used many colors and sponged them on using tiny pieces of sponge that I held in tweezers:

 Above are all of the polishes I used for this manicure.
I used a different piece of sponge for each color and I made sure I dabbed the sponge on a paper before applying it to her nails to avoid sponging on too much paint.  After making all of the galaxies, I used a dotting tool to dot on differently shaped stars with Sally Hansen Celeb City.  After the blue earths were dry, I mixed together a little green and white polish to make an even lighter green.  I then applied light blotches using a small nail art brush.  I just winged the shapes of the continents and it came out fine.  At the end, my friend suggested that I put some glitter over the black above the earths, so I carefully applied Sally Hansen Diamonds.  To finish off the manicure, I applied two coats of Sally Hansen Dries Instantly.

Monday, February 17, 2014

Tricolor Gradient

Last night I was looking at my Olay Fresh Effects facial cleanser and I realized how much I liked the colors on the bottle.  So, I decided to recreate those colors on my nails by sponging on a gradient:


I started out with a base coat of Sally Hansen Double Duty.  I then applied two coats of Sally Hansen Hard To Get, a white polish (which I would not recommend, by the way.)  When that was dry, I applied one coat of Sally Hansen Dries Instantly so the sponge wouldn't pick up my base color as I stippled on the gradient.  When that was all dry, I took a triangular makeup sponge and put three lines of polish of different colors on the end.  I put a stripe of Avon Sunshine (a yellow), NYC High Line Green, and Essie Go Overboard (the teal) slightly overlapping each other on the sponge.  Then I started stippling that on to all of my nails, placing the yellow side at the base of my nails.  After every couple nails I applied more polish to the sponge.  After doing all of this, I cleaned up around my nails with a Q-tip dipped in acetone.  This was a challenge to clean up and it took a while.  To finish off the manicure, I applied two coats of Dries Instantly.

Thursday, December 26, 2013

Sponging, Stamping, and NEW CAMERA!

I am super excited to be using a better camera now!  I'm still not an expert hand photographer, but I will continue to get better with practice.  I am super excited about sponging, so I decided to do another sponging manicure today:


My base color is two coats of Rimmel English Rose.  When that was dry, I applied a coat of Sally Hansen Dries Instantly to my nails so that my sponge wouldn't pick up my base polish.  I put a line of Rimmel English Rose and a line of Milani Rapid Orchid on a cosmetic sponge.  I put on the lighter color first and then slightly overlapped it with the darker color.  Then I sponged the two colors on to my nails.  I had to reapply polish on the sponge after every couple of nails that I sponged.  When I was happy with the gradient and opaqueness of the new color, I allowed that to dry.  (Oh!  By the way, you can reuse a triangular makeup sponge many times.  I simply cut off the end that I use after I am done sponging all of my nails.)

I wanted to do some stamping too.  I used Bundle Monster Plate BM404.  The white polish is Sally Hansen White On, a polish that I use exclusively for stamping because it is old and very thick.  I applied two coats of Dries Instantly to finish off my manicure.

Tuesday, December 24, 2013

Trees in the Snow

I saw this really cool picture on Pinterest and decided to try to recreate the manicure because I realized that I had the same stamping plate that the girl had used in the design:


For my recreation, I just put the trees on my ring fingers and thumbs to cut down on the time it would take to complete the manicure.  I started out with two coats of Sinful Colors Cool Gray on all of my nails.  On the fingers that I wouldn't be sponging and stamping, I applied a coat of Sally Hansen Diamonds, a fine glitter.  Then I put on one coat of Sally Hansen Dries Instantly.  I also put a coat of Dries Instantly on the nails that I would be sponging so avoid taking off the gray polish with the sponge.
When that was all dry I put some gray and white polish on my makeup sponge like this:


There is actually a line of white polish underneath the gray polish (Sally Hansen Hard to Get.)  It is touching the gray polish.  I found out how to successfully sponge nails!  You need some of your base color on the sponge too, so the new color you are sponging on seems to blend with the base color.  I used a stippling motion to sponge on the polish.  I was so excited to see that it actually worked for me this time!  A few months ago I attempted to sponge my nails, but it did not turn out very well.

When the sponged polish was dry, I stamped on trees from Bundle Monster's plate BM407.  I used Sally Hansen Black Out as my stamping color.  On my left hand, which is the hand I post on my blog most of the time, I accidentally stamped the trees crooked.  I just pretend that they are blowing in the wind.  Haha!  I stamped better on my right hand:


I applied two coats of Dries Instantly over the stamped nails.  After the manicure was complete, I used acetone to clean up all the polish around my nails.  I am very excited by this manicure.  Pinezoe.com is where the picture on Pinterest came from.  She is a very talented nail blogger!

I hope you all have a very Merry Christmas!  I cannot believe it is tomorrow!  My next blog post will be a series of pictures showing exactly how to stamp your nails.  

Pinezoe's nail picture is here:  http://www.pinterest.com/pin/421368108857517435/