Showing posts with label Avon Sunshine. Show all posts

Friday, May 1, 2015

eos!


I have been loving eos lip balms for years.  I remember I was in my local grocery store, which I also used to be a cashier at, the first time I saw them.  The first one I bought was honeysuckle honeydew, the light green one.  I now have all of them (counting limited editions, there are 17).  So, I use them just about every day.  When I was half asleep this morning, an idea popped into my head: eos manicure!  So, here it is:

eos inspired nails

I started out with a coat of OPI Natural Nail Base Coat.  I then applied two coats of different colored polishes to each nail.  I matched the colors as closely as I could:

eos

Yellow--Avon Sunshine; Pink--Sally Hansen Pink Blink; Teal--Rimmel Mintilicious; Blue--Essie Borrowed & Blue; Purple--Pure Ice Lacquered Lilacs

eos inspired nails

When that was dry I mixed some gray and white acrylic paint to make light gray and used a toothpick to stipple on the eos logo.  I then applied two coats of Sally Hansen Dries Instantly and then a coat of NYC Matte Me Crazy.  This made the texture look more similar to the rubbery packaging of eos lip balms.

eos inspired nails

eos inspired nails

eos inspired nails

eos inspired nails

Tuesday, March 3, 2015

International Women's Day Nails!!

Well, I had been doing well with blogging.  Oh, well.  I am super excited about this manicure today!!  March 8th is International Women's Day!  I will be away this weekend with my two best women (my sister and my best friend), so I won't have time to do a mani then.  I decided to do it a little early!

My inspiration:  Rosie the Riveter


rosie the riveter nails

I started out with a coat of Sally Hansen Double Duty.  The I painted two coats of polish on all my nails.  On my thumbs I used Sally Hansen Pink Blink; on my ring fingers I used Sinful Colors Gogo Girl; and on the rest of my nails I used Avon Sunshine.  I then applied a coat of Sally Hansen Dries Instantly on the yellow nails to get them ready for tape.  

On my thumbs I took a bunch of earthy polishes to represent skin tones and then dotted those on to form a female sign.  I used a couple different sized dotting tools to do this.

female sign nails

Then I moved on to my ring fingers.  I used white acrylic paint and a dotting tool to make my polka dots, like on Rosie's bandanna.  

rosie the riveter nails

I then applied corners of squares of masking tape near my cuticles on the yellow nails and then painted over that with Sally Hansen Thinking of Blue.  These are supposed to be Rosie's blue shirt.  I used yellow because it matches the background of the Rosie the Riveter poster.  

rosie the riveter nails

Anyway, after the blue dried, I mixed gray and white acrylic paint together to make a lighter gray.  I then took a small detail brush and outlined the collars of the shirt and painted on the lapels and buttons and line showing where the shirt comes together.  I used gray acrylic paint and a dotting tool to add Rosie's lapel pin.

I finished off with two coats of Sally Hansen Dries Instantly.  

HAPPY INTERNATIONAL WOMEN'S DAY!  BE PROUD TO BE A WOMAN!!

You can follow me on Snapchat if you want!


Friday, August 29, 2014

"Sherlock" Nails

Hi!  I have been wanting to do this for a long time and I finally just went for it!  I love the BBC show "Sherlock" because it is super clever and fun!  So, the design I attempted didn't come out as nicely as I was hoping, but from a distance it looks better.  Anyway, here's what I was going for:


This is what my final product was:


Obviously, I had issues creating the design from the wallpaper.  I needed to make it simpler, but it looks messy up close.  I did get a compliment on the nails, though, so I guess I am just scrutinizing them too closely and thinking like a perfectionist.  From a distance they look a bit better.  So, anyway, on to how I created these:

I started out with a coat of Essie Protein Base Coat.  I then painted on two coats of Revlon Pale Cashmere.  This is a GORGEOUS polish!  It is a semi-sheer, light beige polish and it looks so elegant, feminine, and clean.  I would love to wear it alone.  After that dried I took a small detail brush and attempted the wallpaper design with Sally Hansen Black Out.  I used a toothpick to make the little details inside the curved lines.  After all that (which took a maddeningly long time) I used the same detail brush in Avon Sunshine to draw on the spray paint smiley face.  I finished off with two coats of Sally Hansen Dries Instantly.  

If you ever want to create a Sherlock wallpaper design, it would be cool to put a matte top coat on top of everything!  To be honest, I was planning on that, but I really wanted to be done with this manicure, especially since it was not coming out the way I wanted it to.  In the end, though, I am happy with it because it does remind me of "Sherlock" and it looks better when I am not scrutinizing all the details.  


Saturday, May 31, 2014

Tropical Gradient

I couldn't wait to do my nails any longer. I am also really in the mood to blog, so I couldn't even put this post off any longer (I did it yesterday)! Haha!
I started out with a coat of Essie Protein Base Coat. I then applied two coats of Sally Hansen Hard to Get, a white polish. After that was dry, I applied a coat of Sally Hansen Dries Instantly so the stippling motion of the sponge wouldn't pick up my base color. I then took a makeup sponge and painted on five different colors. I overlapped each one slightly so they would blend into each other. I had to reapply the polish to the sponge multiple times. Starting at the cuticle, the colors I used were Revlon Dreamer, Essie Borrowed & Blue, Avon Sunshine, NYC Spring Street, and Rimmel Stiletto Red.
I stippled on the color until I was happy with how vibrant it was. I then applied a coat of Sally Hansen Diamonds, a very fine, iridescent glitter, over top so I could have a subtle sparkly effect. (I LOVE this polish! It isn't even hard to get off because the glitter is so fine!) After sponging, I didn't wait very long to apply it because if it smudged the manicure, it would just blend the gradient together even more. I then took a while to clean up my fingers with a Q-tip dipped in acetone and then a nail art brush dipped in acetone to clean up closer to my nails. Then I applied two coats of Dries Instantly. I cut off the painted end of the makeup sponge with a large pair of scissors so I can get many uses out of the same sponge.

Sunday, April 6, 2014

Negative Space Star Trek

So, once again, I have let my inner Trekkie out.  I have been wanting to do another Star Trek manicure and have been meaning to try negative space nails.  So, I decided to combine these two ideas.


I started out with a base coat of Sally Hansen Double Duty.  Then I painted two coats of each color on my nails.  On my ring fingers and thumbs I used Sally Hansen Black Out; on my pointers, Covergirl Out of the Blue; my middle fingers, Rimmel Stiletto Red; and Avon Sunshine on my pinkies. 

Once that was dry, I took a small, flat nail art brush and dipped it in acetone and dabbed and stroked off the black polish to create the Star Trek insignia.  (That is what a negative space design is.  Part of your nail will not have color on it.)  This took a while because I had to go over the same spots over and over, but it wasn't as hard as I thought it would be.  I don't know how well nail polish remover works for this.  Acetone works wonderfully.  I had to repeatedly dip my brush in acetone and wipe it off on a paper towel every few strokes to avoid the build up of too much black polish on it.  I created the insignia the same way I would have drawn it with polish.  I made an upside down "V" shape and then drew a diagonal line from the left side to the middle of the right side and then dabbed off the center.


When all that was done, I took some hexagonal, holographic gold glitter (I got a set of 12 colors from Amazon for $7.  The pieces are a little less than one millimeter in diameter.) and applied a line of it around two thirds down each colored nail.  I used Sally Hansen Double Duty to do this because it doesn't dry as fast as a fast drying top coat, allowing you more time to place the glitter.  I applied the dots of Double Duty and picked up the glitter with a small dotting tool.  I also applied a piece of glitter in the center of each insignia.  The lines of glitter remind me of Kirk's uniform in the Original Series.  He has a stripe of gold at his cuffs.  
To finish off the manicure, I applied two coats of Seche Vite.  I am really not happy with this top coat.  It dries super fast and is really shiny, but it does shrink my manicures and the second day I had this manicure, it chipped a little.  Dries Instantly doesn't chip for days!  (I have run out, though.)  Lots of girls say this is a great top coat, so maybe I really do have a bad bottle.  Have any of you tried it?  What do you think of it?      

Monday, February 17, 2014

Tricolor Gradient

Last night I was looking at my Olay Fresh Effects facial cleanser and I realized how much I liked the colors on the bottle.  So, I decided to recreate those colors on my nails by sponging on a gradient:


I started out with a base coat of Sally Hansen Double Duty.  I then applied two coats of Sally Hansen Hard To Get, a white polish (which I would not recommend, by the way.)  When that was dry, I applied one coat of Sally Hansen Dries Instantly so the sponge wouldn't pick up my base color as I stippled on the gradient.  When that was all dry, I took a triangular makeup sponge and put three lines of polish of different colors on the end.  I put a stripe of Avon Sunshine (a yellow), NYC High Line Green, and Essie Go Overboard (the teal) slightly overlapping each other on the sponge.  Then I started stippling that on to all of my nails, placing the yellow side at the base of my nails.  After every couple nails I applied more polish to the sponge.  After doing all of this, I cleaned up around my nails with a Q-tip dipped in acetone.  This was a challenge to clean up and it took a while.  To finish off the manicure, I applied two coats of Dries Instantly.

Tuesday, January 7, 2014

Horizontal Stripes

I felt like using striping tape the other day, so I created very stripey nails.  This was fun to do, but it did take a long time because of all the coats of polish I needed and because I had to cut 50 pieces of striping tape, put all that on, and take it all off.  So, without further ado, here is the final product:


 I started out with two coats of Avon Sunshine (the yellow.)  I then applied a coat of Sally Hansen Dries Instantly (to prevent the tape from ripping up my base color) and, when that was dry, put on striping tape where I wanted the yellow to show.  Then I painted on a coat of Covergirl Out of the Blue.  I immediately removed the striping tape with tweezers.  There were a couple spots where my tape was not pushed down enough and some of the blue got onto the yellow lines.  To fix that, I used a dotting tool dipped in the yellow to cover up the mistakes.  Nobody will be able to notice if you do that.  I finished off the manicure with two coats of Sally Hansen Dries Instantly.

I made a Youtube channel and a Facebook page for Ten Digit Design.  I have only uploaded one video on Youtube and it is not that good, but it is a small tutorial on how to stamp your nails.  My channel is just called TenDigitDesign and I have a link to it on the upper right hand corner of this blog.  My Facebook page is linked there too, if you are interested.

Also, I got a new stamper!  It is a real Konad one.  I will stamp my nails in a few days and then tell you how that stamper compares to the Salon Express one I have always used.

Tuesday, October 22, 2013

Candy Corn & Black+White

I decided to do my nails very festively today:


I will start with the black and white nails.  My inspiration for these is black and white movies.  I know, they don't look like movies...but they are black, white, and grey.  ; )  I guess it sort of looks like static.  I used Essie Chinchilly as my base color and put a coat of Claire's splatter effect glitter on top.  I then applied a coat of Sally Hansen Dries Instantly.

For the candy corn nails I first painted on two coats of Avon Sunshine (the yellow) by my cuticles.  I didn't even bother painting that to the tips of my nails because I was going to cover them with other colors.  When the yellow was dry I took a small nail art brush and painted on the orange stripe in the center with NYC Spring Street.  I then used the same nail art brush and painted on the white tips with Sally Hansen Hard to Get.  Then, when that was all dry, I applied two coats of Sally Hansen Dries Instantly.

I cleaned up the small bit of polish that got on my skin with a nail art brush dipped in pure acetone.


Saturday, October 12, 2013

Star Trek Uniform Shirts

I am a bit of a Trekkie, so I really enjoy creating Star Trek nail art.  I saw a picture on Pinterest and really liked the design, so I recreated it on my nails:


I painted 2 coats of base color on all my nails.  On my thumbs I painted Sally Hansen Black Out; on my index fingers I painted Avon Sunshine; on my middle fingers I painted Covergirl Out of the Blue; and on my ring fingers and pinkies I painted Rimmel Stiletto Red.  After all that was dry I painted on a coat of Sally Hansen Dries Instantly and then put strips of masking tape a little away from the tips of my nails so that I could achieve a clean black tip.

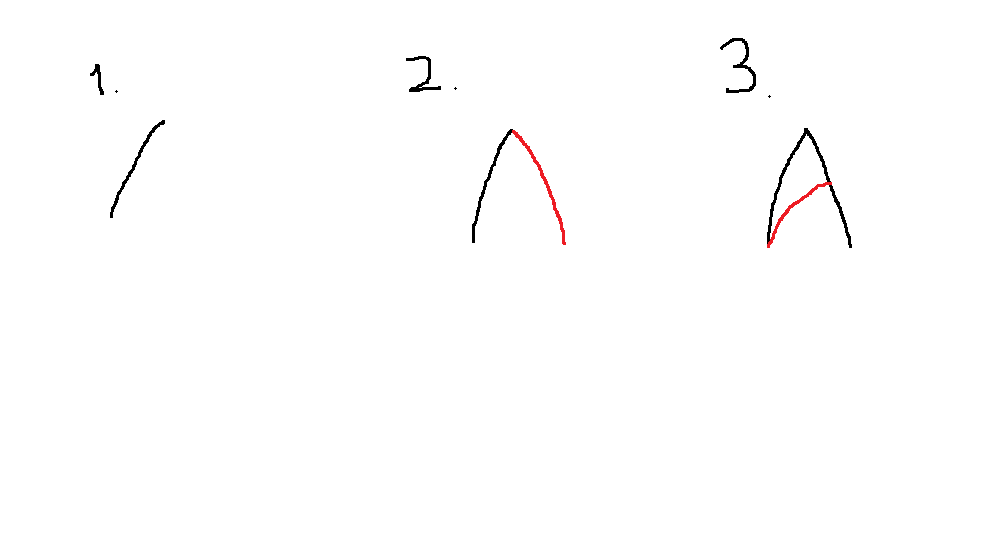
As soon as I painted on the black, I removed the tape.  Then I used a small nail art brush and painted on the black at my cuticles, which is supposed to look like the collars of the Star Trek uniform shirts.  (I used Black Out for all black details.)  After painting on the black details I cleaned up around my nails with a nail art brush dipped in acetone.  Then I used a nail art brush dipped in Sally Hansen Pumping Iron to add the Star Trek insignias.  Here's the easiest way to draw these:


After step 3, fill in the center with your color.  I have made Star Trek insignias on my nails multiple times now and this is the easiest way, in my opinion, to go about it.  I finished off this manicure with two coats of Sally Hansen Dries Instantly, which is my favorite top coat, as you have probably noticed.  I have been through many bottles of it.  "Live long and prosper."  ; )