Showing posts with label Essie Borrowed & Blue. Show all posts

Friday, May 1, 2015

eos!


I have been loving eos lip balms for years.  I remember I was in my local grocery store, which I also used to be a cashier at, the first time I saw them.  The first one I bought was honeysuckle honeydew, the light green one.  I now have all of them (counting limited editions, there are 17).  So, I use them just about every day.  When I was half asleep this morning, an idea popped into my head: eos manicure!  So, here it is:

eos inspired nails

I started out with a coat of OPI Natural Nail Base Coat.  I then applied two coats of different colored polishes to each nail.  I matched the colors as closely as I could:

eos

Yellow--Avon Sunshine; Pink--Sally Hansen Pink Blink; Teal--Rimmel Mintilicious; Blue--Essie Borrowed & Blue; Purple--Pure Ice Lacquered Lilacs

eos inspired nails

When that was dry I mixed some gray and white acrylic paint to make light gray and used a toothpick to stipple on the eos logo.  I then applied two coats of Sally Hansen Dries Instantly and then a coat of NYC Matte Me Crazy.  This made the texture look more similar to the rubbery packaging of eos lip balms.

eos inspired nails

eos inspired nails

eos inspired nails

eos inspired nails

Tuesday, December 23, 2014

Glitter Snowflakes

Here is another snowflake manicure.  Sadly, it is raining at my house today.

glitter snowflake nails

I started out with a coat of Essie Protein Base Coat and then I applied two coats of Essie Borrowed & Blue to all my nails.  When that was dry, I used a dotting tool to put clear polish where I wanted to stick my small glitter pieces, and I used the same dotting tool to pick up the pieces of glitter to apply on my nails.  I got the glitter from Amazon.  It came in a pack of twelve colors.  All of them are holographic.  I used pink, light blue, and silver for this manicure:

nail art glitter

It took quite a while to place all the glitter.  I made snowflake shapes on all my nails except for my pinkies, which were too small.  I decided to apply three clusters of three pieces of glitter to both my pinkies.  

To make the snowflakes, I put three pieces of glitter in a triangular shape in the center of each nail and then I put three to four pieces in a line radiating out from the center.  I made six of these, since all snowflakes have six points.  I then added a piece of glitter on each side of the radiating lines, near the tips, to give them the crystalline, feathered-out points.  

I actually did not know how I was going to make the flakes, so I winged it.  This is not a science.  If you try this, make the snowflakes however you want to!

After I completed placing the glitter on each nail, I applied a coat of Salon Perfect Cosmic Dust, a very fine, holographic glitter.  These nails are SPARKLY!

glitter snowflake nails

I finished off with two coats of Sally Hansen Dries Instantly.

glitter snowflake nails

Wednesday, July 9, 2014

Fish Scales

I got a few new polishes recently, so I tried out two of them today!
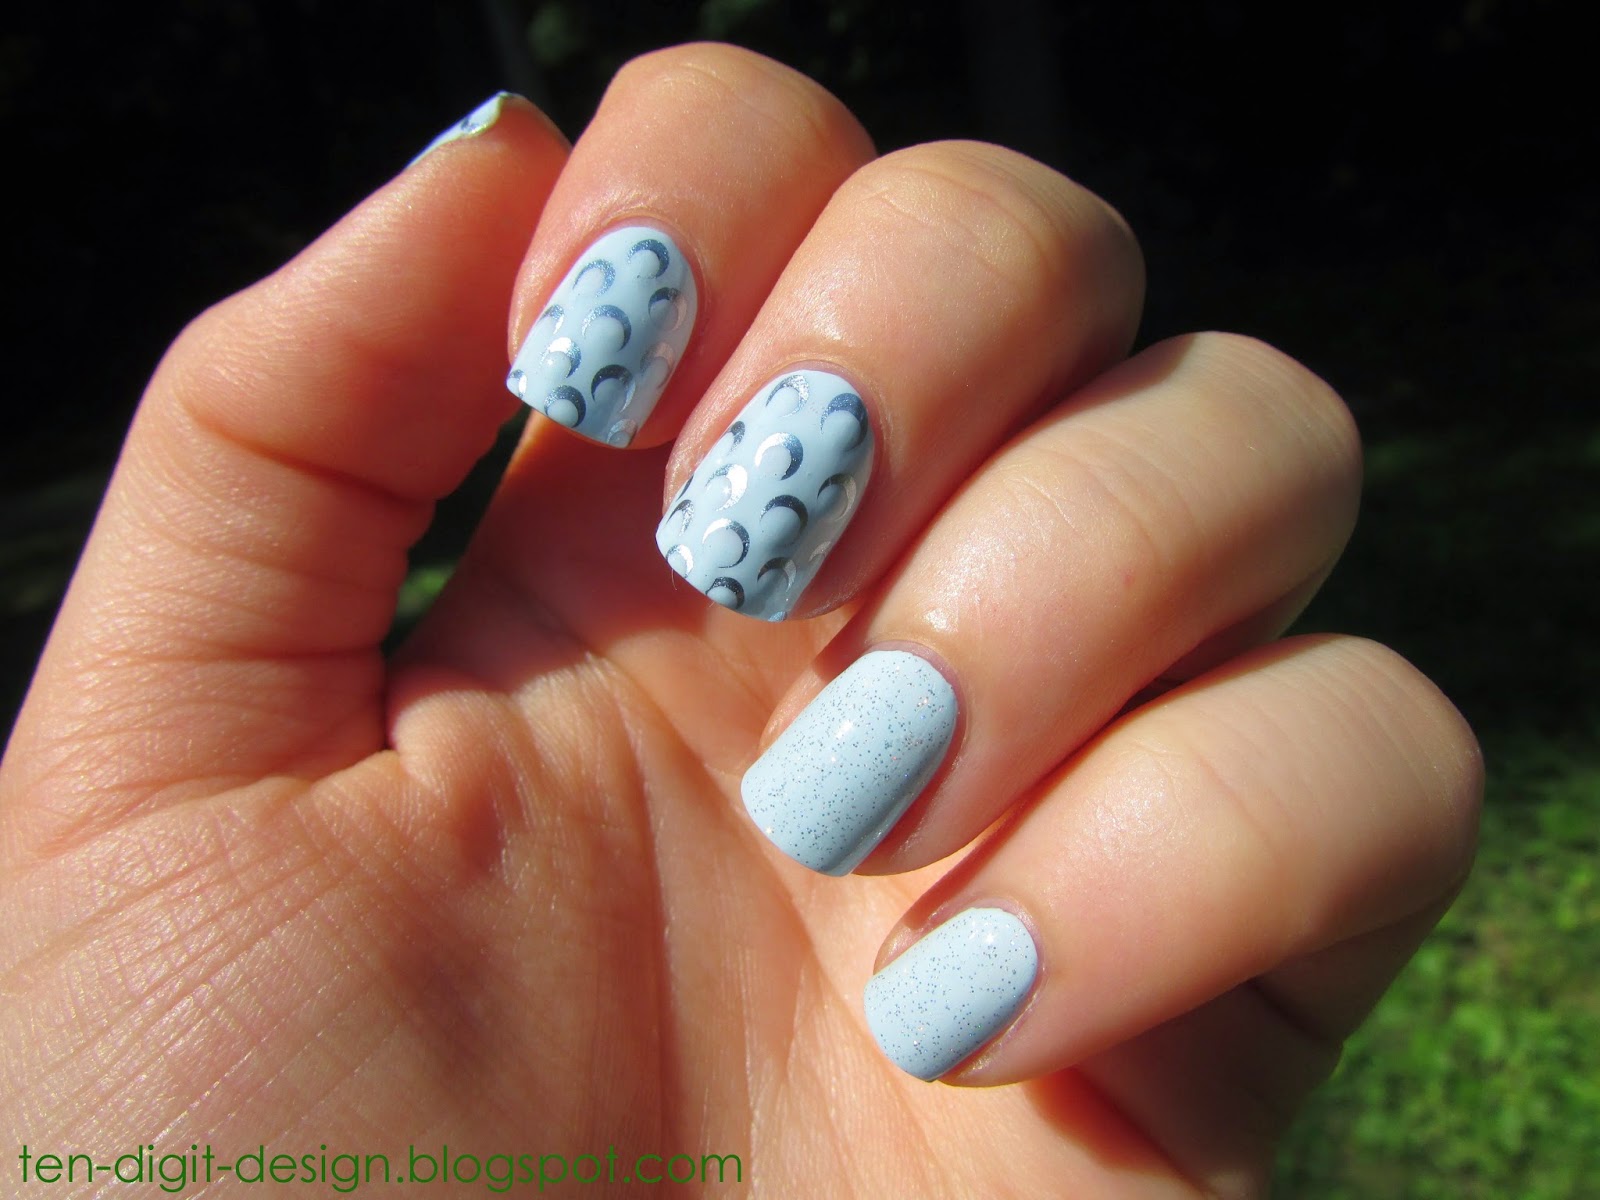
I started out with a coat of Essie Protein Base Coat. I then applied two coats of Essie Borrowed & Blue to all of my nails. After that, I applied a coat of Salon Perfect Cosmic Dust on my ring fingers and pinkies. This polish is a very fine holographic glitter. I LOVE it!! It is so pretty! I got it at Walmart for $3.98. It looks amazing in the sunlight:
On my thumbs, pointers, and middles I wanted to create a bunch of crescents. My goal was to make them look somewhat like fish scales. They turned out better than I expected! I started by creating rows of large, alternating dots with a dotting tool. The polish I used is Essie Blue Rhapsody, which I picked up at T.J. Maxx yesterday for only $4.99, which is a really great price for Essie. (This polish looks like it will be great for stamping because it is very opaque like Essie Penny Talk, my best stamping polish.) After the larger dots had dried, I took a smaller dotting tool and my base polish (Essie Borrowed & Blue) and made a dot towards one side of each larger dot. This created my crescents. I wanted mine to be facing the tips of my nails, but they'd look good facing toward the cuticles, or in any other direction. I finished off with two coats of Sally Hansen Dries Instantly. This last picture shows the manicure in the sunlight, as you have probably extrapolated since you can see the grass. ; )

Wednesday, June 18, 2014

Techie Nails!

I am excited about this manicure! I knew I would get back into the mode soon enough! I have been wanting to use the binary code image from one of my stamping plates since I got them a while ago!
I used so many polishes for this manicure! I started out with a base coat of Essie Protein Base Coat. I used two coats of all of my base colors. On my thumbs I painted NYC High Line Green; on my pointers I did a gradient, but my base color was Revlon Dreamer; on my middle and ring fingers I painted Sally Hansen Black Out; and on my pinkies I painted Sally Hansen Celeb City. After that, I got ready to do a gradient on my pointers by applying a coat of Sally Hansen Dries Instantly so I could avoid removing my base color with the sponge. I then got down to stamping on my other nails. On my pinkies I used Bundle Monster plate BM-422. The polish I stamped with was Sally Hansen Black Out. On my ring and middle fingers I used Bundle Monster plate BM-415. I stamped with Sally Hansen White On. On my thumbs I used plate BM415 again and used Essie Penny Talk. On those nails I then applied two coats of Dries Instantly.
For the pointers I created a gradient. I wanted it to be light in the centers and fade into darker blue at the tips and near my cuticles. So, I applied a stripe of Revlon Dreamer in the center of a makeup sponge, and then put stripes of Sinful Colors Rain Storm on either side of that line, and then put stripes of Sally Hansen Thinking of Blue on either sides of those lines. I then used a stippling motion to apply it to my pointer nails. When that was dry, I used Essie Borrowed & Blue and the same image I used on my pinkies (from BM-422). I finished those nails off with two coats of Dries Instantly, as well.

Wednesday, June 4, 2014

Interspecies Romance

I wanted to use some nail stickers to create a super cute manicure! I sort of just made this manicure up as I went along and I am extremely happy with the result. Sorry about the state of my cuticles. They are very dry for some reason:
I started out with a coat of Essie Protein Base Coat. I then painted on two coats of Essie Borrowed & Blue. After that had dried for a while, I applied strips of striping tape a few millimeters away from the tips of my nails. I used these so I could create perfectly straight french tips. On my thumb, pointer, and middle fingernails I used Sally Hansen Rockin' Hard, and on my ring and pinkie fingernails I used Rimmel Wild Orchid. (I just used the brushes in the bottles.) I really like the asymmetrical result. I would usually paint my nails with alternating colors, but I wanted to try something different. After painting on each french tip, I immediately took a pair of tweezers and removed the striping tape. Then, using the tweezers again, I applied a poodle nail sticker to my ring fingernail and made it appear as if it was standing on the french tip. I also took a cat nail sticker and made it stand on the french tip on my pointer fingernail. I was going to leave it at that, but then I was looking at the nearly finished product and I imagined a heart on my middle fingernail. I HAD to add that heart, and luckily I did have a heart nail sticker! (If I hadn't, I would have used polish.)
I finished off with two coats of Sally Hansen Dries Instantly.

Saturday, May 31, 2014

Tropical Gradient

I couldn't wait to do my nails any longer. I am also really in the mood to blog, so I couldn't even put this post off any longer (I did it yesterday)! Haha!
I started out with a coat of Essie Protein Base Coat. I then applied two coats of Sally Hansen Hard to Get, a white polish. After that was dry, I applied a coat of Sally Hansen Dries Instantly so the stippling motion of the sponge wouldn't pick up my base color. I then took a makeup sponge and painted on five different colors. I overlapped each one slightly so they would blend into each other. I had to reapply the polish to the sponge multiple times. Starting at the cuticle, the colors I used were Revlon Dreamer, Essie Borrowed & Blue, Avon Sunshine, NYC Spring Street, and Rimmel Stiletto Red.
I stippled on the color until I was happy with how vibrant it was. I then applied a coat of Sally Hansen Diamonds, a very fine, iridescent glitter, over top so I could have a subtle sparkly effect. (I LOVE this polish! It isn't even hard to get off because the glitter is so fine!) After sponging, I didn't wait very long to apply it because if it smudged the manicure, it would just blend the gradient together even more. I then took a while to clean up my fingers with a Q-tip dipped in acetone and then a nail art brush dipped in acetone to clean up closer to my nails. Then I applied two coats of Dries Instantly. I cut off the painted end of the makeup sponge with a large pair of scissors so I can get many uses out of the same sponge.

Monday, March 31, 2014

Earthy with Triangles

Okay guys, I am sure you can notice that I am not the most creative person when it comes to titles.  I am the same way with college essays.  Haha!  So, I actually have a few manicures piled up so I can blog even when I am too busy to paint my nails, which hasn't really been happening lately. =)  I was planning on posting this one later, but I love it so much and am super excited about it.  I currently have this on my nails:


I started out with a base coat of Sally Hansen Double Duty.  I then painted two coats of each color onto my nails.  On my ring fingers and thumbs I used Essie Mink Muffs; on my pointers I used Sally Hansen Espresso; Essie Da Bush (I LOVE that name!) on my middle fingers; and Essie Borrowed & Blue on my pinkies.  I love earthy color combinations.  Color combinations can really make a manicure interesting, even if the designs aren't too complicated.  I really like simple, striking manicures.

After putting on all of my colors, I applied a coat of Seche Vite so the tape wouldn't pull up my color.  For the little triangles at my cuticles, I used Essie Wicked (one of my favorite polishes.)  To create the triangles, I took two thin strips of scotch tape and overlapped the ends so they formed a narrow "V" shape.  I then put the hollow of the "V" where I wanted the dark red triangles to be.  Once I painted on my color, I quickly removed the tape.  To finish off the manicure, I applied two coats of Sally Hansen Dries Instantly.  There are a lot of bubbles in the manicure because I need a new bottle of Dries Instantly.  Mine is really thick and gloopy.  It is too bad that you can only use half of the bottle before throwing it out.  I am loving the length of my nails at the moment.  I can't have them too long because then they drive me crazy.  I have been putting up with them well this time, though.  =)   I hope you like this manicure!  


Sunday, March 23, 2014

Galaxy and Earth Nails

I have always LOVED the galaxy nails that The Nailasaurus has created.  She has created multiple galaxy manicures, and I decided to try it out on my best friend.  I loosely followed The Nailasaurus's tutorial (http://www.thenailasaurus.com/2013/07/galaxy-nail-art-tutorial.html).  I also loved a picture I saw on Pinterest of an amazing earth manicure (http://media2.onsugar.com/files/2013/03/12/6/1844/18445232/9f3f8c9ce83394b9_DSCN8471ala.jpg).  So, here is what I created on my friend's nails:


My friend started out by painting two coats of Sally Hansen Black Out on all of her nails.  Then she applied a coat of Sally Hansen Dries Instantly.  After that, I did the detailing.  I painted a blue partial earth shape on the tips of her ring fingernails using a flat nail art brush with Essie Borrowed & Blue.  (The trick to putting paint on another brush is to make sure the new brush is saturated in the paint, just like the brush that comes in the bottle is.  This will help you to avoid smudging the polish underneath and will help you to get a smooth, non-streaky covering of polish.)   Then I began the galaxies on all her other nails.  To create the galaxies, I used many colors and sponged them on using tiny pieces of sponge that I held in tweezers:

 Above are all of the polishes I used for this manicure.
I used a different piece of sponge for each color and I made sure I dabbed the sponge on a paper before applying it to her nails to avoid sponging on too much paint.  After making all of the galaxies, I used a dotting tool to dot on differently shaped stars with Sally Hansen Celeb City.  After the blue earths were dry, I mixed together a little green and white polish to make an even lighter green.  I then applied light blotches using a small nail art brush.  I just winged the shapes of the continents and it came out fine.  At the end, my friend suggested that I put some glitter over the black above the earths, so I carefully applied Sally Hansen Diamonds.  To finish off the manicure, I applied two coats of Sally Hansen Dries Instantly.

Sunday, March 9, 2014

Splattered Nails

I LOVE this splatter effect glitter I got one time!


I started out with a coat of Sally Hansen Double Duty.  Then I pained on two coats of Essie Borrowed & Blue.  After that was dry, I painted on a coat of Claire's Splatter (the glitter.)  The best way to apply a glitter polish is to dab it on and then spread it out.  This allows you to apply more pieces of glitter without accidentally streaking the paint underneath from going over with the brush repeatedly.  I finished off with two coats of Seche Vite.
I did this manicure two days ago and have not done anything too rough with my hands, but it has already chipped in a few spots.  I did not notice any shrinking this time, but Dries Instantly holds up better for me, chipping wise.  Maybe I got a bad bottle of Seche Vite.  I don't know.  I am just very happy with how inexpensive Dries Instantly is!  That remains my favorite top coat.

Tuesday, October 29, 2013

Oceany

Here's a manicure that I created a few months before I started my blog:


From my thumb to my ring finger, I used Essie Borrowed & Blue (I also used that on my pinkie), Essie Chinchilly, Essie Mink Muffs, and Essie Da Bush.  I used a dotting tool to make the starfish.  The purple ones are Revlon Impulsive and the coral ones are Essie Haute as Hello.

I have so many pictures of old manicures that I did, but, sadly, the majority of them were taken with my phone.  The camera on that only has 2 mega pixels, so the quality is not very good.

Sunday, August 18, 2013

Five Shades of Blue

Hi!  Work has been busy for me for this past week, but I finally got around to painting my nails again.  I had seen many pictures of this nail art style on the internet and I finally painted it on my own nails.  I used a bunch of my blue polishes and painted a different shade of blue on each nail:


In the top photo I used my camera flash.  The second photo was taken under my fluorescent desk lamp.
On my thumb I used Sally Hansen Complete Salon Manicure in Thinking of Blue; on my index finger I used Avon Mega Watt in Shock; on my middle finger I used Rimmel London 60 Seconds in Blue Eyed Girl; on my ring finger I used Covergirl Outlast Stay Brilliant in Out of the Blue; lastly, on my pinky I used Essie in Borrowed & Blue.  The 2 mm silver studs are from Born Pretty Store and I used two coats of Sally Hansen Dries Instantly as my top coat.

I can't wait to use different shades of pink to do this style!

Monday, August 12, 2013

Nail Stickers

Today I took off my Sally Hansen nail polish strips.  They were hard to get off, so I decided to remove them using the tin foil method.  I soaked cotton balls in polish remover and secured them to my nails with squares of tin foil.  I let them soak for ten minutes and I made sure to pinch my nails while pulling off the tin foil covered cotton balls.  That took the polish off very easily.

I decided to use some nail stickers today:


Nail stickers are extremely easy to use and they look great.  I do not know the brands of the ones I used. The peacock feather on my thumbnail came from a set that I got from Walmart.  The light blue polish that I used is Essie in Borrowed & Blue.  The lavender Is Rimmel London Lasting Finish Pro in Wild Orchid.  I put two coats of my Sally Hansen Dries Instantly top coat on top of my completed design.