Showing posts with label dotting. Show all posts

Tuesday, March 3, 2015

International Women's Day Nails!!

Well, I had been doing well with blogging.  Oh, well.  I am super excited about this manicure today!!  March 8th is International Women's Day!  I will be away this weekend with my two best women (my sister and my best friend), so I won't have time to do a mani then.  I decided to do it a little early!

My inspiration:  Rosie the Riveter


rosie the riveter nails

I started out with a coat of Sally Hansen Double Duty.  The I painted two coats of polish on all my nails.  On my thumbs I used Sally Hansen Pink Blink; on my ring fingers I used Sinful Colors Gogo Girl; and on the rest of my nails I used Avon Sunshine.  I then applied a coat of Sally Hansen Dries Instantly on the yellow nails to get them ready for tape.  

On my thumbs I took a bunch of earthy polishes to represent skin tones and then dotted those on to form a female sign.  I used a couple different sized dotting tools to do this.

female sign nails

Then I moved on to my ring fingers.  I used white acrylic paint and a dotting tool to make my polka dots, like on Rosie's bandanna.  

rosie the riveter nails

I then applied corners of squares of masking tape near my cuticles on the yellow nails and then painted over that with Sally Hansen Thinking of Blue.  These are supposed to be Rosie's blue shirt.  I used yellow because it matches the background of the Rosie the Riveter poster.  

rosie the riveter nails

Anyway, after the blue dried, I mixed gray and white acrylic paint together to make a lighter gray.  I then took a small detail brush and outlined the collars of the shirt and painted on the lapels and buttons and line showing where the shirt comes together.  I used gray acrylic paint and a dotting tool to add Rosie's lapel pin.

I finished off with two coats of Sally Hansen Dries Instantly.  

HAPPY INTERNATIONAL WOMEN'S DAY!  BE PROUD TO BE A WOMAN!!

You can follow me on Snapchat if you want!


Saturday, January 24, 2015

Night Sky


I have started another semester of college.  I graduate with my associate's degree in childhood education at the end of this one, so I am pretty excited.  The other night I went to my school for a night class and looked up at the sky.  It was a deep blue which faded into a light yellow at the horizon.  The moon was a crescent.  I was inspired to create a manicure based on how pretty it was.

night sky nails

I started out with a coat of Essie Protein Base Coat.  I then painted on two coats of Sinful Colors Unicorn, a very light yellow.  I applied a coat of Sally Hansen Dries Instantly after that so the sponge wouldn't take off my base color.  

I put four colors on my sponge.  I painted on a stripe of Sinful Colors Black on Black, Sinful Colors Into the Blue, Rimmel Blue Eyed Girl, and a very thin stripe of Sinful Colors Unicorn.  I then stippled that over my nails with the black at the cuticle.  

night sky manicure

If I were to do this again, I would have immediately applied another coat of Sally Hansen Dries Instantly to make the gradient blend better.  Since I waited, I was left with a slightly grainy effect.  It's not bad, but it could have looked smoother.  I am really happy with it anyway, though.

I eventually applied a coat of Sally Hansen Dries Instantly over everything but my ring finger.  I used a dotting tool and white acrylic paint to dot on the moon.  I then put a drop of my black polish and my darkest blue touching each other on a piece of paper and I dipped in a dotting tool so I could match the dot which created the crescent moon to the background a little bit better.  In person, it doesn't stand out quite as much as it does in the pictures.


After applying Dries Instantly over all the nails, I applied two coats of NYC Matte Me Crazy, a matte top coat.  I wanted to make my night skies look a little more realistic by taking out the shine.

night sky manicure

Wednesday, January 14, 2015

Green With Purple Polka Dots

I have been doing my nails, but have just not been feeling like blogging.  I took pictures of all of my manicures for future posts, though.  Here's the manicure that I have on my nails now:

green with purple polka dots nails

I started out with a coat of Essie Protein Base Coat.  I then painted on two coats of Essie Mojito Madness.  When that was dry, I took a small dotting tool and created my polka dot pattern.  The purple is Pure Ice Lacquered Lilacs.  

green with purple polka dots nails

The way I did this was to make a dot in the center of every nail and then make a line of dots down the center on each nail.  I then created alternating lines of polka dots on either side on the center line.  If you follow these directions for creating polka dots, you can achieve perfect polka dots.  This trick really helped me.  

green with purple polka dots nails

I finished off with two coats of Sally Hansen Dries Instantly.

Saturday, September 27, 2014

Perfect Polka Dots and Chevrons!

Hello!  Once again, it took me forever to blog!  I am now around 1/4 of the way through this semester! It has been crazy!  Happy fall!  Fall is my favorite season!

Before starting this manicure I searched "how to polka dot nails" on Google and found this picture:


I have always struggled with getting even polka dots on my nails, but following these steps made it super easy!  My other trick is to make sure you use a small dotting tool instead of a larger one.  I used one that was smaller than I thought I wanted, but the dots turned out much better this way!


I started out applying a coat of Essie Protein Base Coat to all of my nails.  I then painted on two coats of Sinful Colors Snow Me White.  Once that was dry, I took my small dotting tool and Sinful Colors Black on Black and followed that picture tutorial to create perfect polka dots on my pointer, pinkie, and thumb nails (and all of my nails on the other hand.)


I then waited for that to dry and put one coat of Sally Hansen Dries Instantly on my middle and ring fingernails so the chevron tape I was going to use wouldn't pull up my base color.  I then applied three strips of chevron tape to those nails and painted a coat of Sinful Colors Black on Black over top.  I then immediately removed the tape and was left with perfect chevron stripes.  I painted a coat of Salon Perfect Cosmic Dust (a fine, holographic glitter which I LOVE) over all of my nails once everything was dry.  I finished off with two coats of Sally Hansen Dries Instantly.

  
Something I am really loving about having rounded nail tips is that my manicures last longer!  When I had squared tips, the polish would chip off of the corners in a couple days.  My nails are weak, so the corners of my nails would also often break off.  The rounded shape is really working out for me!  Don't be afraid to experiment with different lengths and shapes!  You can always trim your nails shorter, grow them out again, or reshape them!!  The change you make to them will not be permanent!

Wednesday, July 9, 2014

Fish Scales

I got a few new polishes recently, so I tried out two of them today!
I started out with a coat of Essie Protein Base Coat. I then applied two coats of Essie Borrowed & Blue to all of my nails. After that, I applied a coat of Salon Perfect Cosmic Dust on my ring fingers and pinkies. This polish is a very fine holographic glitter. I LOVE it!! It is so pretty! I got it at Walmart for $3.98. It looks amazing in the sunlight:
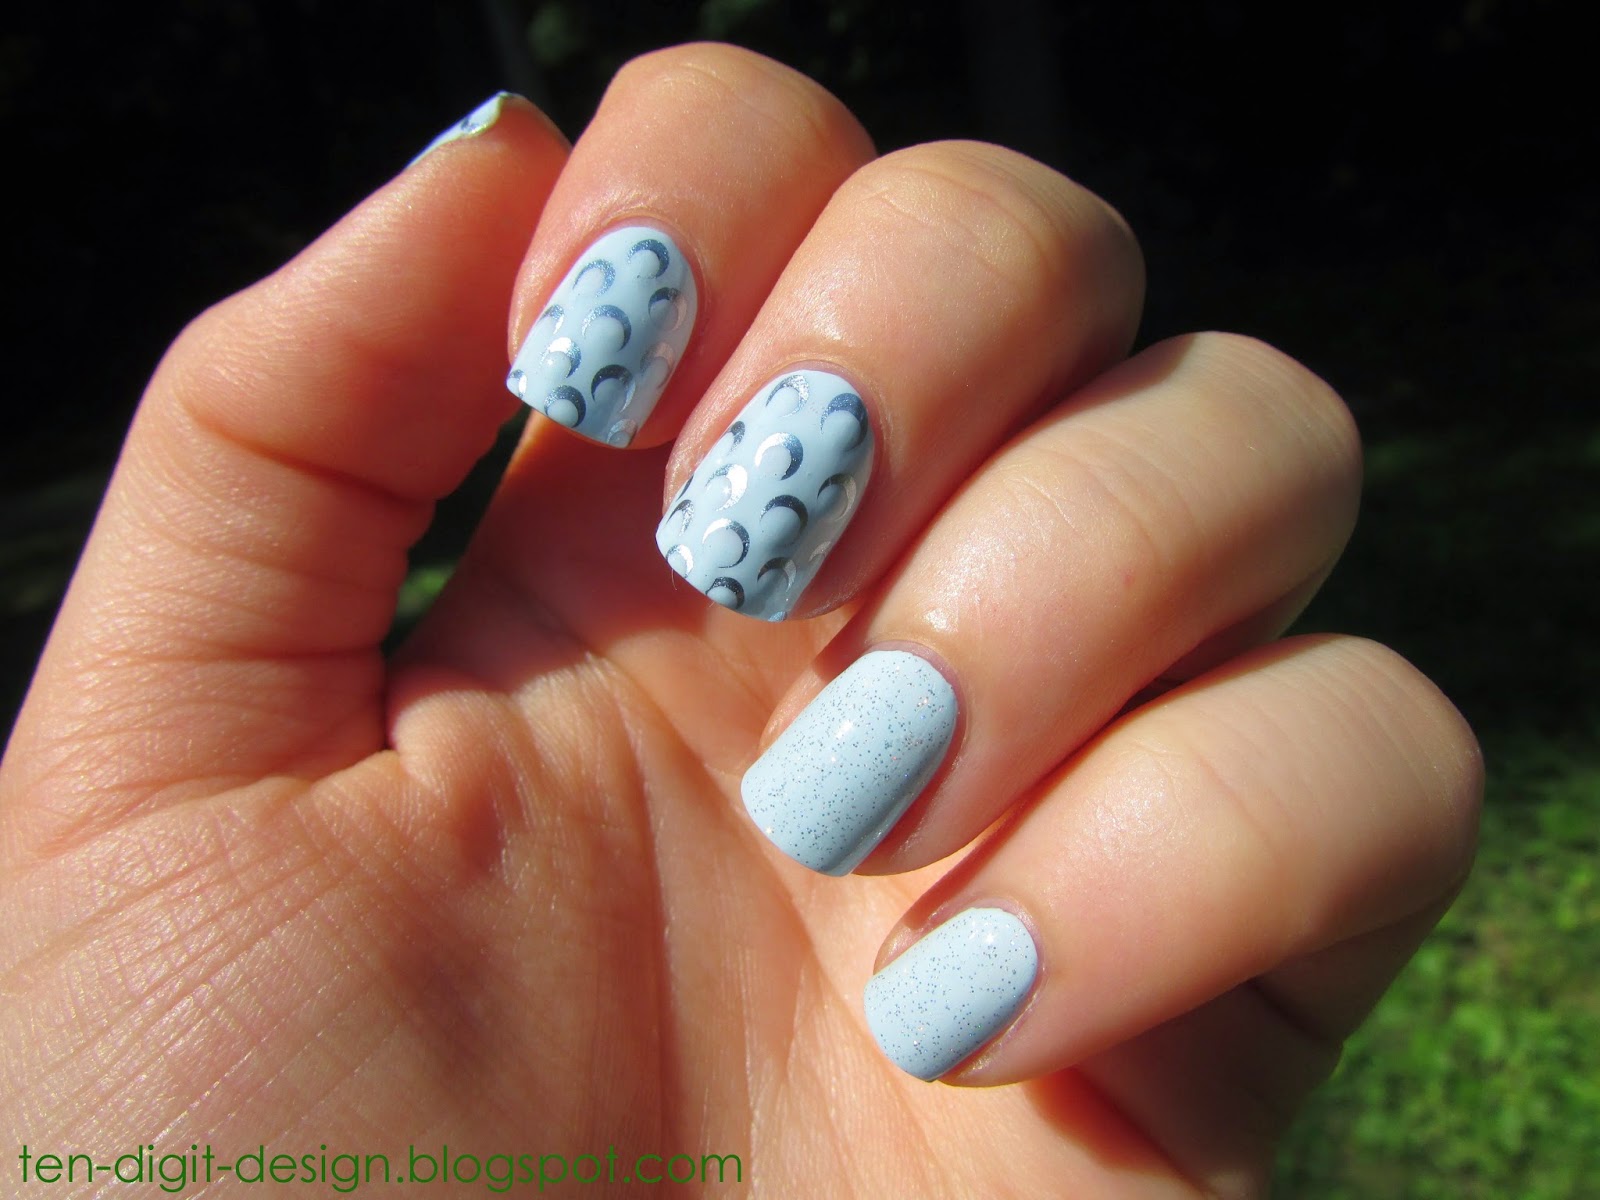
On my thumbs, pointers, and middles I wanted to create a bunch of crescents. My goal was to make them look somewhat like fish scales. They turned out better than I expected! I started by creating rows of large, alternating dots with a dotting tool. The polish I used is Essie Blue Rhapsody, which I picked up at T.J. Maxx yesterday for only $4.99, which is a really great price for Essie. (This polish looks like it will be great for stamping because it is very opaque like Essie Penny Talk, my best stamping polish.) After the larger dots had dried, I took a smaller dotting tool and my base polish (Essie Borrowed & Blue) and made a dot towards one side of each larger dot. This created my crescents. I wanted mine to be facing the tips of my nails, but they'd look good facing toward the cuticles, or in any other direction. I finished off with two coats of Sally Hansen Dries Instantly. This last picture shows the manicure in the sunlight, as you have probably extrapolated since you can see the grass. ; )

Thursday, May 29, 2014

Doily Nails

I actually did this manicure months ago. I remember the day I did this I had been wanting to do something super feminine. I wanted pink, but I must have been in strange lighting, because this orangy polish looked a lot more pink than it came out:
I started out with two coats of Sally Hansen Hard to Get and then applied a coat of Sally Hansen Dries Instantly. Next, I applied half a hole reinforcement to each nail so I could achieve a half moon effect. I then painted over them with Essie Haute as Hello and immediately removed the hole reinforcements. After all that was dry, I took a dotting tool dipped in Hard to Get and made a row of dots along the edge where the two colors meet. After that was dry, I took a smaller dotting tool dipped in Haute as Hello and made a dot in the center of each white dot. I wanted a lacy effect. This manicure was not as great looking as I had hoped it would be. It was fun to do, though! I have not painted my nails for a while because my nails keep peeling a little on the tips. I don't know what is causing it, but I thought I'd experiment with letting them stay natural for a while (I don't think I can go much longer, though. Haha!) I will paint my nails again soon, hopefully!

Thursday, May 8, 2014

Outer Space Nails

A while ago I did my mom's nails for her.  It was "space week" at the preschool/daycare she works at, so we thought it would be great for her to have space themed nails.  Kids really do notice nails.  I know they always notice and appreciate mine, especially if they have studs or gems on them.


I started out with two coats of Sally Hansen Black Out.  I then used a dotting tool dipped in Sally Hansen Hard to Get to make random dots and star-shaped things for the stars.  If I was to do this again, I would put a few less stars on.  You really can put them on sparingly.  After that was dry, I applied a coat of Sally Hansen Diamonds, which is a super fine, iridescent glitter.  It is so pretty and I really like it!  The glitter is so fine that it is no problem taking it off!  I finished off with two coats of Sally Hansen Dries Instantly.

Sunday, February 2, 2014

Zigzag and Dots

A couple nights ago I was watching TV when a nail art idea suddenly came to me.  The idea turned into this:


Before I even started painting my nails, I took scotch tape and cut strips of it down the middle with a pair of zigzag scissors.
Then I applied two coats of Rimmel Caramel Cupcake to my nails.  (No, I did not apply a base coat.
Mostly because I didn't feel like spending even more time waiting for stuff to dry and also because this nude color doesn't stain.)  When that was dry, I applied a coat of Seche Vite so the tape wouldn't lift up my base color.  I then applied the tape where I wanted the tan to stay.
I used Milani Sail Away as my second color and I removed each piece of tape immediately after painting on the blue.  The Seche Vite was GREAT for taping over!  The base color did not lift up anywhere!  This top coat is living up to my expectations!
After all the taping, painting, and removing tape, I took a dotting tool and put a dot of the opposite color paint in between zigzags, if that makes any sense (look at the pictures and you'll get it.)  I love this because it looks like the two halves are stuck together like puzzle pieces!  I didn't need to dot on any white because the polishes I used are very opaque.
When everything was dry, I painted on two coats of Seche Vite.

Thursday, January 30, 2014

Dotted Design

Sorry I haven't posted for a while!  School has been busy.  At least the wait allowed my new base and top coats to come in the mail!  My top coat just arrived today...just in time for this new manicure!


I started out with one coat of Essie Protein base coat.  I don't usually apply base coats, but that is because I did not have one until yesterday!  Haha!  Also, my nails are getting a bit stained, so I will apply a base coat when I have time.

After the base coat was dry, I applied two coats of Revlon Impulsive.  This polish looks awful after the first coat, so you definitely need at least two coats.  Two coats looks okay, but three would probably be better.  I don't usually have time to put on three coats of a polish , though.  Once all that was dry, I used a dotting tool to dot on white dots (I used Sally Hansen Hard To Get).  The way I kept these "S" shapes about even was by first putting a dot in the center of my nail and then dotting a curve going one way and then one going the opposite way, if that makes sense.  When the white was dry, I dotted on L'Oreal Now You Sea Me over top of the white dots.

Today I used a Seche Vite top coat for my first time!  I have seen so many nail art girls using it and I finally ordered some through Amazon.  I am very happy with it!  It dried about as fast as Sally Hansen Dries Instantly dries.  I think it is shinier than Dries Instantly, though.  I only applied one coat of Seche Vite and it looks great!

The weather is very dry, which always takes a toll on my cuticles.  They are suitably pushed back, but some are peeling around the sides of my nails.  Burt's Bees Lemon Butter Cuticle Cream works wonders, though.  I use it every night.

Tuesday, January 14, 2014

Slipper Pattern Nails

I got new slippers last week and I immediately thought of turning their pattern into nail art:


I started out with two coats of Pure Ice Scandal.  Then I stuck on some 2 mm pink studs from Born Pretty Store using Sally Hansen Dries Instantly.  I only put them on my ring fingers and thumbs because I like to add some 3-D on those nails.  After that, I used a dotting tool to make white dots where I wanted to dot on color after.  (That makes the color really stand out against a dark background.)  The white I used is Sally Hansen Hard To Get.  When that was dry I used different colors to go over the white dots.  The red is Rimmel Burgundy Flirt, the green in NYC High Line Green, the orange is NYC Spring Street, the pink is an L.A. Colors polish, and the blue is Avon Shock.  After that was all done, I put on a coat of Sally Hansen Dries Instantly and then a coat of NYC Matte Me Crazy.  I wanted a matte finish so the effect was more similar to how the slippers look.

Thursday, January 2, 2014

Pearl Necklaces

A couple weeks ago while I was at church I noticed a couple elderly ladies sitting together.  They both had on bright sweaters and long necklaces.  That made me think of nail art that I could do:


On my ring fingers and thumbs I used two coats of Rimmel Mintilicious.  On my other nails I used two coats of Sally Hansen Coral Reef.  When that was dry, I used a dotting tool dipped in Sally Hansen Hard To Get to make the necklaces on my coral nails.  Then I used a dotting tool dipped in Sally Hansen Dries Instantly to dot on spots to stick the 1.5 mm half pearls on my ring fingers and thumbs to add more texture to the manicure.  I like to add a 3-D touch to a mainly 2-D manicure to make it look more interesting.  
The way I pick up the pearls (or studs) is by dipping a dotting tool in top coat to make it sticky and then I just touch the pearls with it to pick them up.  
When the manicure was done, I put two coats of Sally Hansen Dries Instantly on top of everything.  

Thursday, November 7, 2013

Dot Gradient

I saw this super cool picture tutorial for this design on my Facebook news feed this morning and NEEDED to try it out.  The tutorial is by Quite Polished.  I just went to her blog and it is great!  You'll have to check it out!  http://quitepolished.blogspot.com/


The green color is Essie Da Bush; the white is Sally Hansen Hard to Get; and the blue is Sinful Colors Rain Storm.  I painted on two coats of each color.  (To be honest, I would not recommend this white polish to anybody.  Two coats is just barely enough.  If my nails were only white, I would need three coats.)  After that was dry, I used a small dotting tool to create the dots.  (I got a very inexpensive pack of dotting tools from Amazon, but if you don't have a dotting tool, a toothpick works.  The colored end of a straight pin works, as well.)

I put lots of dots at the tips-- some overlapping to make them look crowded.  I then put them sort of close together in the middle regions.  Near the cuticles I tried to space them more.  I have not got the gradient effect perfect, but that will get easier with practice.  I will finish this manicure off with a coat of Sally Hansen Dries Instantly.  To tell you the truth, I do not always have a top coat on in these pictures.  A lot of times I take the photos right after finishing the design because I do not want something to happen to them in between finishing them and taking a picture.  Also, if you apply a top coat too soon, the design will smudge.  Sally Hansen Dries Instantly works great when the design is all dry, though.

I used pure acetone on a flat nail art brush to create a clean line around the edges of my nails.  To clean my nail art brushes, I swish them around in acetone and then rinse them in water.  The bristles get very stiff if acetone is left in them.  

Saturday, September 14, 2013

Silver and Gold

I love incorporating tape into my manicures.  You can do super cool things with such a common item.  Today I used masking tape instead of scotch tape for my first time:


This manicure is based on a manicure that Bubzbeauty did one time.  The first picture was taken under fluorescent lighting and the second was under sunlight.  The silver is Sally Hansen Pumping Iron, the gold is Sally Hansen Golden-I, and the copper dots are Essie Penny Talk.  I used Sally Hansen Dries Instantly as my top coat.

I actually liked using masking tape better than scotch tape.  Masking tape is more flexible and can stick close to your cuticles, avoiding paint going under the tape and you having to clean up with polish remover to create a sharp line.  Scotch tape is just not flexible enough.  I will probably use masking tape from now on.

So, I cut squares of tape and applied a corner to the base of my nail.  my silver polish wasn't opaque enough with just one coat, so I waited around 30 seconds and applied a second coat before immediately removing the tape.  That worked really well and the lines still came out sharp.  I applied another layer of the gold after removing the tape.  One coat looked pretty good, though.  I used a toothpick to make the copper dots around the edges of the silver and gold polish at my cuticle.

Here's just a quick fact about my chevron manicure:  I applied at least 2 coats of topcoat to all my nails.  Some had 3 coats.  The day after I did the manicure, though, edges of the tape were sticking out and were very scratchy.  I had to take it off on the third day that I wore it.  It was a lot of fun to do and very cute, but mine didn't last long.  It was easy to remove, though.  The tape pretty much dissolved when I used nail polish remover.

Tuesday, August 20, 2013

I'm Feeling Dotty!

Yes, I know the title is corny, but I am not too great at naming my posts.  Haha!
Today I painted my nails one of my favorite colors.  After a few hours I decided to make them a little more fun by adding white polka dots:


I used Avon Nailwear Pro in Blossom for my base color and the white dots are Sally Hansen Hard as Nails Xtreme Wear in White On.  I used Sally Hansen Dries Instantly (which really does dry super fast and never lets your sheets leave marks on your nails at night, even in humid weather) as my top coat.

I used a dotting tool to make the big and medium dots and a toothpick to make the small dots.  The small and medium dots actually look about the same on my left hand.  They came out better on my right because I made sure that the toothpick that I used didn't have dried nail polish on the tip before I started dotting.  If you don't have a dotting tool you can always use the colored end of a straight pin, a straightened bobby pin, or a toothpick to make all different sized dots.  Dotting tools are fairly inexpensive on websites like eBay and Amazon, though.

It is fun to make a manicure just a little more fun and cute by doing such simple techniques!