Showing posts with label striping. Show all posts

Wednesday, July 1, 2015

The Land of the Free Because of the Brave


Hi guys!  I haven't blogged in a while.  I started a new summer job co-leading a summer activities program for kids on Monday.  I am pretty busy with it.  But I really wanted to do a good ol' patriotic manicure.  It is the Fourth of July in only three days.  I am an American, so I am going to be seeing fireworks.

My family used to always take 3-4 week camping trips in Canada every summer.  So, I was rarely in the USA during the Fourth of July.  It is cool to be here during the most American holiday.

Okay!  Here's what you came here to see:

fourth of july nails

I started out with a coat of OPI Natural Nail Base Coat.  I then painted two coats of Sinful Colors Snow Me White on my ring fingers, and two coats of Pure Ice Short Bet (a tan) on the rest of my nails.  I applied a coat of Sally Hansen Dries Instantly on the ring fingers to prep for striping tape.

I looked at pictures of camouflage print on Google.  I also watched some tutorials for camo nails.  I used the technique that Demelza's World used to create this effect.  Here's the link to her video: https://www.youtube.com/watch?v=v4K3Q9TCAXU

fourth of july nails

So, I started with my lightest colors and then went on from there.  I took a medium sized dotting tool and stippled on the blotches of colors.  I first used Essie Da Bush, a light earthy green.  I then moved on to Essie Fall in Line, the military green polish which inspired me to create this mani.  After that, I stippled on my black, Sinful Colors Black on Black.  I did the black before the brown because I wasn't sure if I was going to use brown at first.  I decided it needed it.  So, I stippled on the brown, Essie Mink Muffs, last.  I just did 3-4 blotches of each color on each nail.  Don't be afraid to overlap colors!  This creates a better effect!  It was quite easy and I am very happy and surprised with how well it came out!

fourth of july nails

I got plenty of polish on my cuticles.  That is totally fine, though!  Just clean it up at the end!  I used to avoid a mess like that at all costs, but your manicures really will turn out better if you concentrate on the art and then clean up after.

fourth of july nails


For the flag nails, I applied striping tape with my trusty curved tweezers and then painted on a generous coat of Sinful Colors Gogo Girl.  I immediately removed the tape.  When that was dry, I used navy blue acrylic paint to create the blue portion of the flag.  I used a small detail brush to do this.  When that was all dry (if you use matte acrylics, it is easy to tell when the paint's dry.  It will turn matte.) I used a detail brush to paint on some silver glitter polish (Sinful Colors Queen of Beauty) on the blue to represent the stars.

fourth of july nails

I finished off with two coats of Dries Instantly over everything.

fourth of july nails

The reason I am patriotic is not because of the government of anything like that.  No country is perfect.  I am patriotic because I respect all of the brave men and women who have fought for my freedom, died for my freedom, or sacrificed (health, family, ambitions, etc.) for my freedom.  America is a beautiful country.  There is such a diverse landscape.  In 2009 My family and I drove cross country for four weeks.  We camped at Yellowstone and Glacier National Parks.  We saw Mount Rushmore, Bighorn Canyon, and tons of other things.  It was amazing.

America would be nothing if not for the brave people who have defended and protected, and continue to defend and protect it.  I am truly grateful to them.

America is the Land of the Free BECAUSE of the Brave.

Thursday, June 11, 2015

Negative Space Stripes Re-Creation


Before anything else, I want to tell you that this manicure is inspired by a picture I saw online.  This is not original.  I saw a picture by So Nailicious and loved how her mani looked!  Check her out at sonailicious.com!  Here is the link so you can go right to her tutorial on how she achieved the look:
http://sonailicious.com/negative-space-nautical-nails-tutorial/

Okay!  On to my version of it!

negative space manicure

I started out with a coat of OPI Natural Nail Base Coat.  I then applied a coat of Sally Hansen Dries Instantly because I planned on sticking striping tape on next.  I didn't want the tape to lift up my base coat, and you cannot use Sally Hansen Dries Instantly as a base coat.  The formula does not stay put on your nails.  I learned from experience when I used it as a base coat and then my entire manicure peeled off in only a day.

negative space manicure

I applied striping tape where I wanted my natural nails to be visible.  I then dripped small puddles of nail polish onto a piece of scrap paper and took small nail art brushes to fill in the stripes between pieces of tape.  I worked as fast as I could so the polish wouldn't dry too much before I removed the tape.  I used the brush from the bottle of polish to paint on the tips.  It was easier that way.

negative space manicure

The colors I used are as follows:

Peach:  Essie Haute as Hello
Gray:  Sinful Colors Cool Gray
Teal:  L'Oreal Now You Sea Me

After finishing a nail, I removed the tape as soon as possible.  I finished everything off with two coats of Dries Instantly.  I got bored of doing this, so I painted my right hand with solid colors (the same I used for the stripes.)  I actually like how it looks to have both my hands a bit different, but still color coordinated!  Oh!  One last thing:  If you get any polish where it is not supposed to be, just use a small brush and acetone to neaten it up.  I had to do a lot of neatening up before taking these pictures!

Follow me on Instagram at popstermargie! 

Monday, June 1, 2015

Checkers and Microbeads


Hi!  It's been so long since I have blogged!  Since I blogged last I have graduated with an associate's degree in childhood education.  I have been really busy with stuff.  I finally got around to doing my nails yesterday!  I am happy with how they turned out!  
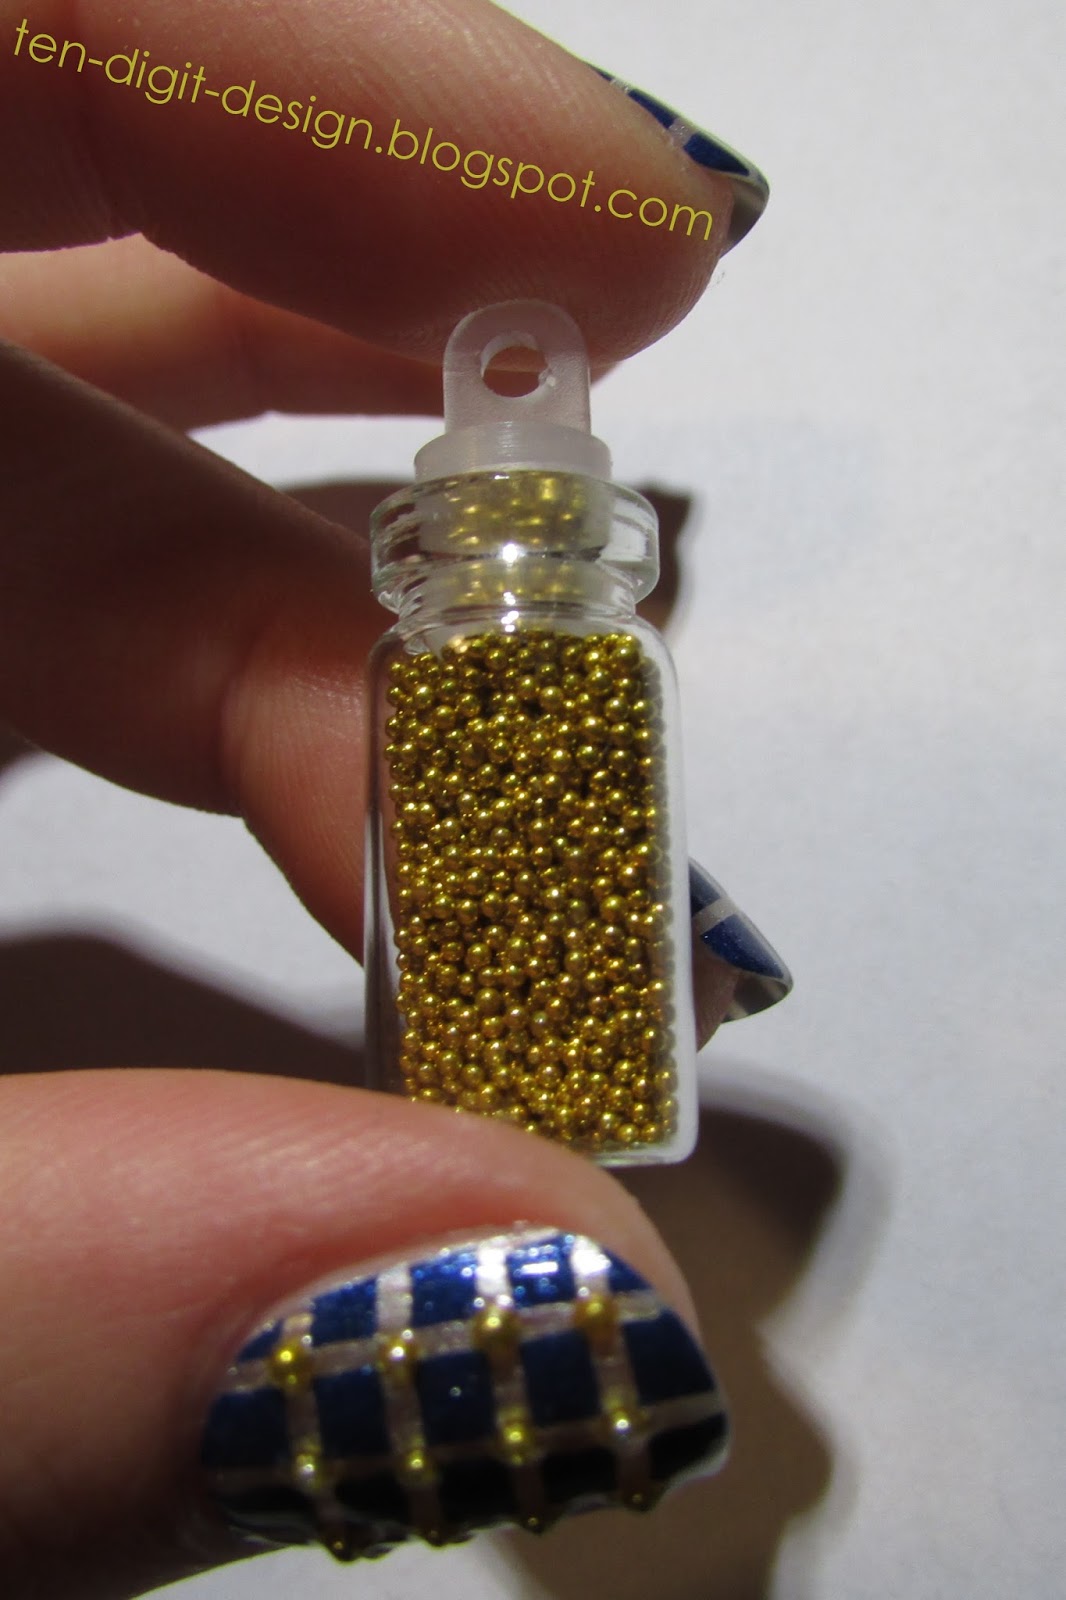
Before I go in to the manicure, I just want to show you a couple cool things!  I got a great pair of tweezers from Amazon that are great for manicures!  I also got microbeads, tiny metallic balls that can be used for caviar nails and other nail looks:

nail art tweezers

microbeads

Okay, on to the manicure!

checker and microbead manicure

I started out with a coat of OPI Natural Nail Base Coat.  (This base coat is GREAT!  It keeps staining to a minimum.  This is definitely the best base coat I have ever tried!)  I then started cutting pieces of striping tape.  I used 62 pieces in all.  

I then applied two coats of Essie Oui Madame and then a coat of Sally Hansen Dries Instantly to avoid the tape pulling up my base color.  I then began applying the striping tape.  I used my curved tweezers to do that.  It is best to not touch your nails when you are doing them as the oil from your skin can shorten the life of your mani.  I made sure I remembered the order in which I applied the striping tape.  I applied the horizontal stripes first, so when I removed the tape I made sure I removed the vertical tape first.  You remove striping tape in the opposite order from how you applied it

checker and microbead manicure

So, anyway, I applied all the tape and then painted over top of it.  I used Milani Sail Away.  I immediately removed the tape with tweezers after painting each nail.  I then took gold microbeads and applied them at the intersections of the criss-crosses on my thumbs and ring fingers.  I used clear nail polish and a dotting tool to do this.  

checker and microbead manicure

I finished off with two coats of Sally Hansen Dries Instantly.  The top coat made the color on the microbeads bleed off a bit, as you can probably notice.  The microbeads feel quite scratchy!  

checker and microbead manicure


Saturday, May 9, 2015

Monochrome Nautical

I am super excited about this manicure!  I did it yesterday and couldn't wait any longer to show it to you!

nautical manicure

I started out with a coat of OPI Natural Nail Base Coat.  (This base coat is working out really well for me!  My nails have not been staining at all and it dries sooo fast!)  I then painted all of my nails with two coats of Sinful Colors Snow Me White.

nautical manicure

I waited for that to dry and then applied a coat of Sally Hansen Dries Instantly to my pointers, middles, and pinkies in preparation for the striping tape.  I then took white and black acrylic paints and used a dotting tool to dot on the top of the anchor near my cuticle on my ring finger.  I took a small detail brush and painted on the anchor (first the vertical line, then the curved lines, one by one, then the horizontal bar.)  A couple spots were messy, so I took my white acrylic paint and neatened up the edges.  Then I dotted on a smaller white dot in the center of the black one to make the hoop at the top of the anchor.

nautical nails

I then moved on to the thumb.  I decided to stamp on an image from Bundle Monster's BM-401 image plate.  I chose the tentacles.  I used Sinful Colors Black on Black to stamp with.  

nautical nails

I cut a ton of strips of striping tape when I waited for various stages of the manicure to be dry.  I applied them to my pointers, middles, and pinkies with tweezers and then painted over those nails with Sinful Colors Black on Black.  I immediately removed the tape after painting each nail, waited for the black to dry, and then applied two coats of Sally Hansen Dries Instantly to all of my nails. 

Friday, May 8, 2015

Mint and Gold Stripes


I did this manicure back in January and just had it saved up for a future blog post. 

mint and gold manicure

I started out with a coat of Essie Protein Base Coat.  Then I applied two coats of Rimmel Mintilicious.  When that was dry, I applied two coats of Sally Hansen Dries Instantly to my pointers, middles, and pinkies because I was done working on these nails.  

mint and gold manicure


I applied one coat of Dries Instantly to my thumbs and ring fingers so the striping tape wouldn't lift up my base color.  I then put pieces of striping tape on vertically in preparation for the gold polish and painted a coat of Sally Hansen Golden-I on top.  I immediately removed the tape.

mint and gold manicure

I finished off those nails with two coats of Dries Instantly.

mint and gold mani

It was super fun because my sister and I visited our friend when I had this mani on.  It was winter break from college.  We took a subway to Boston and had a great day going to the New England Aquarium.  It was so cold.  We are such small town girls.  We couldn't even figure out how to get T-tickets out of the machine at first.  Haha!  Once we got into Boston, we walked around in the freezing cold for 45 minutes because we couldn't find the aquarium.  On our way back, we rode a subway to the end of the line because we got on the wrong one.  At least we have some funny memories from that trip!!  Anything's fun when you're with your best friends!


Monday, August 25, 2014

Peachy Triangles

I am back!  I got home from Florida yesterday.  I had a great time!  So, I have been planning this manicure since I was still in Florida and have been super excited to get to do my nails again.  I finally got the chance and I am super happy that my bare nails grew out nicely while I was in Florida.

I started out with a coat of Essie Protein Base Coat and then painted on two coats of Essie Haute as Hello.  That polish takes a long time to dry, for some reason.  I then applied one coat of Sally Hansen Dries Instantly so the tape wouldn't pull up my base color.  

Before starting the manicure I had cut ten squares of scotch tape.  I applied a corner of one to each of my nails so I would be left with peach triangles at the tips after applying my next color.  The polish that I painted over top of everything is Sinful Colors Cool Gray.  This is a very opaque color, so it completely hid the peach.  After painting the gray on each nail I removed the tape.  

After that was all dry I used a silver striper (Salon Perfect Silver Plated) to line the place where the two colors met.  I was planning on doing that all along, but after taping I actually needed to do that to make the manicure look cleaner.  Not all the lines were completely clean, but the silver polish over that hid the messy bits perfectly.  
I finished off with two coats of Dries Instantly.