Showing posts with label Sinful Colors Black on Black. Show all posts

Tuesday, June 23, 2015

Asia Inspired


So, I had nail stickers and a stamping plate that were Asian themed, so I decided to put them to good use and do an Asian themed mani!  I am really liking how it turned out!

asian themed nail art

I started out with a coat of OPI Natural Nail Base Coat.  I then applied two coats of each base color.  I used Sinful Colors Snow Me White on my thumbs and ring fingers; Sinful Colors Black on Black on my pointers and pinkies; and Sinful Colors Gogo Girl on my middle fingers.

asian inspired manicure

I then applied nail stickers to my thumb and middle fingernails.  I stamped my pointer and ring fingers with Bundle Monster's plate BM-405.  I used an old black and an old white polish to do this.  The thicker the polish, the better it will be for stamping.  So, don't throw out your gloopy polishes!  They may be good for stamping!

asian inspired manicure

I finished off with two coats of Sally Hansen Dries Instantly.

Friday, June 12, 2015

Captain Janeway Nails!!!

I literally JUST did this manicure!  I am so so so excited and I couldn't wait to show you guys!  I've been thinking about doing a manicure like this for over a year.  Today I was suddenly inspired to just do it.  Here it is:

captain janeway manicure

I have been a Trekkie since I was 16 years old.  I started out by watching all of The Original Series, and then I watched all of Voyager.  I have watched almost all of Deep Space Nine, and I have watched some of The Next Generation.  I don't like Enterprise.  Sorry.  I have also seen all of TOS movies.  So, I love Star Trek.  Out of all the captains, I have to say Captain Janeway is my favorite.  She is such a great feminist role model!  She is so strong, and she is very compassionate.  I just love her.  Okay.  Anyway, here's how I did this:

I started out with a coat of OPI Natural Nail Base Coat, and then applied two coats of Revlon Forbidden on all my nails.  This is a beautiful blood red.  I only did art on my left hand's thumb and ring finger, so after the red was dry, I applied two coats of Sally Hansen Dries Instantly on all my nails, except for the thumb and ring finger of my left hand.  I applied only one coat to the ring finger because I was going to use striping tape.  I did not apply any to the thumb.  

captain janeway manicure

I used gold and silver metallic Sharpie markers to draw on the Star Trek communicator badge on my left thumb.  I drew the gold part first, and then drew the silver part over top.  This was my first time using metallic Sharpies on my nails.  I have seen a lot of other people do this.  It worked really well.  Just make sure your base color is completely dry so you don't put dents in it.  I made the mistake of being impatient, but the top coat smoothed everything out a bit.  Also, be careful when applying top coat.  Mine smudged and then I had to use a small nail art brush dipped in the red to clean up the edges.

captain janeway manicure

So, all about the ring finger:

After my one coat of Sally Hansen Dries Instantly was all dry, I applied a piece of striping tape half way down the nail and then filled in the lower half (near the tip) with Sinful Colors Black on Black.  When that was dry, I took acrylic paint (I mixed the color.  I used a gray and a teeny bit of navy blue to make the slate gray color) and a tiny detail brush and painted on the shape of the undershirt.  I then took my Sharpies and drew on the communicator badge.  

When the gray acrylic was dry, I mixed up some tan (also acrylic) for Janeway's skin.  I mixed an ivory color with a teeny bit of reddish brown.  I then painted it over top of the gray in the shape of a half moon.  

captain janeway manicure

Lastly, I applied four bronze microbeads on the "collar" for Janeway's rank insignia.  I finished those two nails off with two coats of Dries Instantly.

captain janeway manicure

I had a bit of a catastrophe while applying my top coat.  I accidentally smudged the communicator badge and the acrylic paints with the top coat.  I remained calm.  I just waited for the top coat to dry and then used my teeny nail art brush to paint over the smudges.  You can't really tell anything happened.  JUST KEEP CALM!  YOU CAN SALVAGE ALMOST ANY MANICURE!  Haha! 

I hope you liked this post!  Remember to follow me on Instagram at popstermargie and Snapchat at margie-jane.  You can also like Ten Digit Design on Facebook and follow my Ten Digit Design Pinterest board from my Maggie Victoria profile.

Saturday, May 9, 2015

Monochrome Nautical

I am super excited about this manicure!  I did it yesterday and couldn't wait any longer to show it to you!

nautical manicure

I started out with a coat of OPI Natural Nail Base Coat.  (This base coat is working out really well for me!  My nails have not been staining at all and it dries sooo fast!)  I then painted all of my nails with two coats of Sinful Colors Snow Me White.

nautical manicure

I waited for that to dry and then applied a coat of Sally Hansen Dries Instantly to my pointers, middles, and pinkies in preparation for the striping tape.  I then took white and black acrylic paints and used a dotting tool to dot on the top of the anchor near my cuticle on my ring finger.  I took a small detail brush and painted on the anchor (first the vertical line, then the curved lines, one by one, then the horizontal bar.)  A couple spots were messy, so I took my white acrylic paint and neatened up the edges.  Then I dotted on a smaller white dot in the center of the black one to make the hoop at the top of the anchor.

nautical nails

I then moved on to the thumb.  I decided to stamp on an image from Bundle Monster's BM-401 image plate.  I chose the tentacles.  I used Sinful Colors Black on Black to stamp with.  

nautical nails

I cut a ton of strips of striping tape when I waited for various stages of the manicure to be dry.  I applied them to my pointers, middles, and pinkies with tweezers and then painted over those nails with Sinful Colors Black on Black.  I immediately removed the tape after painting each nail, waited for the black to dry, and then applied two coats of Sally Hansen Dries Instantly to all of my nails. 

Tuesday, March 24, 2015

Looks Like Gunmetal


I'm back!  I was away with my best friend for almost a week.  I did this manicure right after my pink pearl one, but didn't feel like posting it right away.  I had said in that post that I couldn't wait to use Essie Oui Madame over a black polish.  Well, I tried that soon after.  I was hoping that the final effect would be a darker black pearly color, but I ended up liking it because it did make a really neat color. It turned out to look like gunmetal.

gunmetal nails

I started out with a base coat of Sally Hansen Double Duty.  I am really excited because I ordered OPI Natural Nail Base Coat yesterday!  I can't wait to try it!  I've only ever tried two base coats before.  Sally Hansen Double Duty is okay, but does not prevent staining at all.  That is why I really wanted a new one.

gunmetal nails

Anyway, I then applied two coats of Sinful Colors Black on Black.  I waited until that was dry, and then I applied one coat of Essie Oui Madame.  I was surprised with the final product.  It was actually really pretty.  Just unexpected.  I finished off with two coats of Sally Hansen Dries Instantly.

gunmetal nails

I am also excited because I ordered some triangular silver studs and a new nail polish from Amazon.  Ever since I saw a picture of it on Hannah Rox It's Facebook page, I was on the lookout for Essie Just Stitched, a light pink matte polish from the new Cashmere Mattes collection.  I will definitely be swatching that one!

Follow me on Snapchat!


Monday, February 9, 2015

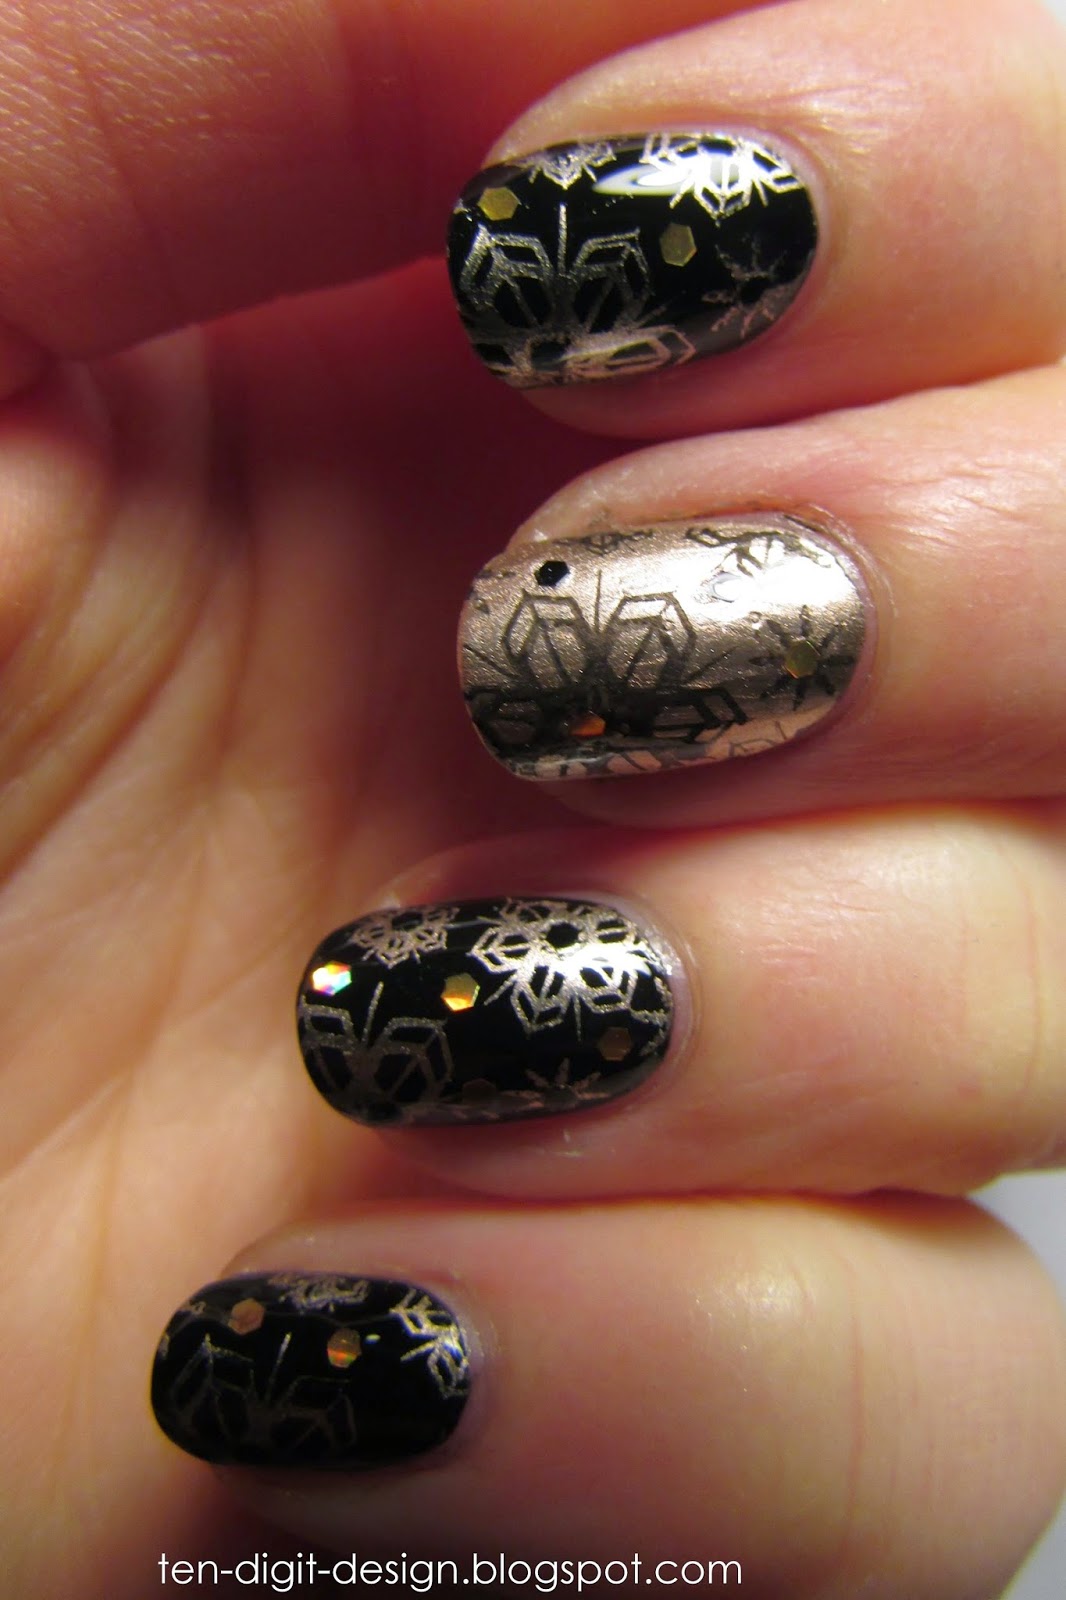
Golden Snowflakes

Hello!  I know, I have been very slow with blogging lately.  I was inspired to do these snowflake nails because I have been getting so much snow at my house.  I had my third snow day of this college semester today.

gold snowflake nails BM-323

I started out with a base coat of Sally Hansen Double Duty.  I then painted two coats of Sinful Colors Black on Black on all of my nails (the middle finger had some accidents, so I painted gold over top.  I had originally wanted everything to be uniform.)

I waited for my base to dry and then I took my Bundle Monster BM-323 stamping plate and stamped the snowflake image on all of my nails with Essie Good as Gold.  I accidentally double stamped my middle nail, so I painted a coat of the gold on it and then stamped it with the black.  

gold snowflake nails BM-323

I wanted to add a little extra sparkle, so I took my holographic black and gold loose glitters and applied it with a dotting tool dipped in Sally Hansen Double Duty.  I applied black glitter in the centers of all the gold snowflakes and gold glitter in the centers of the black snowflakes.  I also put a few random contrasting pieces of glitter on each nail (so, the nails with the black base had gold glitter placed randomly on them, and vise versa.)

I finished off with two coats of Sally Hansen Dries Instantly.

gold snowflake nails BM-323

I have a Snapchat!  I have had it for months, but I want to get in to using it more for posting random things and my nail art to my story.  Follow me if you like!  My username is margie-jane.  (My sister calls me that as a silly nickname.)  I have written the username under my social media to the right of this page and here is my personal ghost that you can point your camera at to immediately add me (without having to write in my username!!!)


Sunday, November 16, 2014

Sequin Heart


Last night I watched the "Supernatural" episode "Death Takes a Holiday" and I loved Pamela's black nails.  I hadn't given myself a plain black manicure in a long time, so I really wanted to.  I decided to make it a little fancier by adding a heart made out of small hexagonal sequins:

black nails with heart

I started out with a base coat of Essie Protein Base Coat.  I then painted on two coats of Sinful Colors Black on Black.  I used a dotting tool and Sally Hansen Dries Instantly to place the sequins on my middle fingernail.  I first placed the center top sequin so I would be able to make the heart mostly symmetrical on my nail.  I eventually placed the bottom middle sequin and joined up the lines to make a neat heart.

black nails with heart
Whole hand shot!
I finished off with two coats of Sally Hansen Dries Instantly.  

black nails with heart

I accidentally cut my nails a bit too short for my liking, but it is actually nice to have such out of the way nails.  It feels good to take a break from longer nails.  I am still loving the rounded shape!

black nails with heart


Thursday, November 6, 2014

"Supernatural" Nails!


I am really excited about how most of this manicure turned out!  I thought it would look much worse, so this was a pleasant surprise.  So, in my last post I mentioned that I am loving the show "Supernatural" and that I wanted to do a "Supernatural" inspired manicure.  Well, here it is:

supernatural nails
"Supernatural" inspired designs

I started out with a coat of Essie Protein Base Coat and then painted two coats of Sinful Colors Snow Me White on all my nails except for my ring fingernail, which I painted with two coats of Sinful Colors Black on Black.  (On my right hand I painted the white on all my nails.)

This was fun nail art to do because there were so many details that, when I waited for one thing to dry, I could work on something else.  I was never waiting around!  The first thing I did was make the blood spatters on my pointer and pinky on my left hand and on all five nails on my right hand.  I took a straw and would dab polish right from my bottle's brush onto the end and then blow through it with it positioned a couple inches above my nail.  I went over some nails a few times until I got the effect I wanted.  I bought a new blood-red polish that was thin enough to blow on to my nails.  I got Revlon Forbidden.

blood spatter nail art
right thumb nail blood spatters

After I had done that and done a bit of cleanup, I painted a large silver (Sally Hansen Celeb City) circle with a small, flat nail art brush onto my ring fingernail.  I had meant to make the outside ring gold, but I forgot.  So, after the silver ring was dry, I took a large dotting tool dipped in Sally Hansen Golden-I and filled in the edges in with gold and left the center silver.  I then took a small nail art bush and some black acrylic paint and painted the small circle around the silver part and put a small dot in the center of the silver circle.  This is supposed to be the base of a bullet casing.  When the gold was dry, I took a toothpick dipped in the acrylic paint and stippled on the words "45 COLT" on the gold part of the circle.  

the colt supernatural nail art
"The Colt" bullet casing base

the colt supernatural nail art

the colt supernatural nail art

I finally got around to buying some acrylic paint and I DO NOT regret it!  I got mine for $.50 each from Walmart!  (The brand is Apple Barrel.)  Lots of nail art people have said that it is so much easier to work with than nail polish and they are 100% correct!  It is easier to use because it isn't as sticky, so it glides on easily;  it washes off with water, so if you mess up you can wipe it right off and start again; it is very opaque; and it dries really fast.  I would definitely recommend anybody getting it for details and such!

I painted on the "Supernatural" star symbol on my middle finger with a small nail art brush.  I used black acrylic paint to do this.  I messed it up a bit.  I am not that happy with the final look of it either, but I was able to clean up the edges of it and add the white spaces inside the star with some white acrylic paint.  

supernatural nail art
"Supernatural" insignia
The last bit of nail art I did was the license plate on my thumb.  I first painted some yellow and blue (yellow--Sinful Colors Unicorn; blue--Revlon Dreamer) over the white base to create something that somewhat resembles the background of Dean's Kansas license plate.  When that was mostly dry I added a coat of Sally Hansen Dries Instantly to make a smooth, dry base for the rest of the art.  I then used a flat nail art brush dipped in my black acrylic paint to make the border of the license plate.  Then I took a toothpick dipped in the same acrylic paint to write on "Kansas" and the license plate number (KAZ 2Y5.)  

supernatural license plate nail art
Dean's Kansas license plate
I finished off everything with two coats of Sally Hansen Dries Instantly.

supernatural nail art

Guys, the best thing you can do with nail art is not be afraid to experiment and mess up a little!  It is okay to make a mess!  And I have discovered that you can usually save a ruined bit of art in one way or another.  I never take off all the art from a nail because I hate starting over.  I just salvage what is messed up.  Experiment!  And even if you are left with a messy nail, people do not notice.  The overall nail art is what people see!  Have fun with it!

Wednesday, October 29, 2014

Houndstooth Halloween


So, as promised, here is my Halloween post!  I actually did a manicure four days ago and then decided to add to it.  Here's what I applied four days ago:

sally hansen salon effects check it out

These are Sally Hansen Salon Effects Real Nail Polish Strips.  The pattern is "Check It Out," which is just a houndstooth pattern.  The strips have held up super well over the past few days.  The trick with these is to make absolutely certain that you do not put them too close to your cuticles and that you run the smooth side of the nail file thing that comes with them all over the surface of the strips to make sure they are secured to your nails.  If bits near your cuticles are sticking up, they will continue to stick up more when they dry.  Then they will start flaking off.  

This time I was super careful and they have not been peeling up!  I actually only used one set (instead of both sets that come in a package) because my nails are small and I can cut them in half and use the excess on my nails on my opposite hand.  You cannot save extra strips because they dry out and are then useless.  So, if your nails are small enough, you can get two manicures out of one package!  

sally hansen salon effects check it out


So, anyway, I applied these to my bare nails and then finished them off with two coats of Sally Hansen Dries Instantly.  I wrapped the tips to try to make them last longer.  ("Wrapping the tips" just means running the nail polish brush along the free edge of your nails to seal everything in.)

So, on to the Halloween part!  I decided to use two techniques that I had never used before.  I first used the dry brush technique to rough up the look of the houndstooth.  This means that I made sure that the nail polish brush had almost nothing on it before streaking it over my nails.  You can see what I mean here:

houndstooth halloween nails

I first used Sinful Colors Snow Me White and then applied some Sinful Colors Black on Black.  After this, I taped up my fingers (as you can see above) so I wouldn't make as much of a mess on my hands.  I used the blood spatter technique (which I have been wanting to do ever since The Nailasaurus did her "Dexter" nails: http://www.thenailasaurus.com/2013/09/31DC2013-dexter-splatter-nail-art.html)

I took a regular straw and two different shades of red.  Here is my straw before and after:


I put down a paper towel to make sure I didn't get paint anywhere and then took my first red polish (Rimmel Burgundy Flirt) and used the brush from it to paint a glob onto the end of half of a straw.  I then would position the straw a few inches above my nail and blow out hard.  It was quite difficult and I figured out why.  That polish was rather thick.  The thicker the polish, the harder it is to do this.   I ended up sticking the actual straw into the bottle of polish to make sure I got a lot in it.  I managed to get some spatters on my nails with this polish, but I then used another red (Essie Wicked--a very dark red) and the other section of my straw to add to the spatters.

This polish was thinner, so was much easier to blow.  I just used the nail polish brush to apply some polish to the end.  If you try this and are having a hard time, it could be because of the thickness of your polish.  

If I were to do this again, I would not have added any extra black on my base.  the black makes it harder to see the red.  Also, I would prefer to do it over a white base.  I want to try that some time.  White would make the red really stand out.  I removed the tape on my fingers and used acetone and Q-tips and a nail art brush to clean up everything.  Cleanup took a while.  I then applied two coats of Sally Hansen Dries Instantly.

 So, without further ado, here is my finished product:

houndstooth halloween nails

houndstooth halloween nails

grungy blood spatter nails

grungy blood spatter nails

grungy blood spatter nails


Happy Halloween!

Saturday, September 27, 2014

Perfect Polka Dots and Chevrons!

Hello!  Once again, it took me forever to blog!  I am now around 1/4 of the way through this semester! It has been crazy!  Happy fall!  Fall is my favorite season!

Before starting this manicure I searched "how to polka dot nails" on Google and found this picture:


I have always struggled with getting even polka dots on my nails, but following these steps made it super easy!  My other trick is to make sure you use a small dotting tool instead of a larger one.  I used one that was smaller than I thought I wanted, but the dots turned out much better this way!


I started out applying a coat of Essie Protein Base Coat to all of my nails.  I then painted on two coats of Sinful Colors Snow Me White.  Once that was dry, I took my small dotting tool and Sinful Colors Black on Black and followed that picture tutorial to create perfect polka dots on my pointer, pinkie, and thumb nails (and all of my nails on the other hand.)


I then waited for that to dry and put one coat of Sally Hansen Dries Instantly on my middle and ring fingernails so the chevron tape I was going to use wouldn't pull up my base color.  I then applied three strips of chevron tape to those nails and painted a coat of Sinful Colors Black on Black over top.  I then immediately removed the tape and was left with perfect chevron stripes.  I painted a coat of Salon Perfect Cosmic Dust (a fine, holographic glitter which I LOVE) over all of my nails once everything was dry.  I finished off with two coats of Sally Hansen Dries Instantly.

  
Something I am really loving about having rounded nail tips is that my manicures last longer!  When I had squared tips, the polish would chip off of the corners in a couple days.  My nails are weak, so the corners of my nails would also often break off.  The rounded shape is really working out for me!  Don't be afraid to experiment with different lengths and shapes!  You can always trim your nails shorter, grow them out again, or reshape them!!  The change you make to them will not be permanent!