Friday, March 27, 2015

Pink and Teal French Tip Mani

I did this manicure months ago at this point.  I am letting my nails have a little break while I wait for my new base coat to ship to me.  I, luckily, have three older manicures saved up for occasions such as this.  

colorful french tips

I started out with a coat of Essie Protein Base Coat.  I then applied two coats of Essie Go Overboard.  When that was dry, I applied a coat of Seche Vite top coat before applying pieces of striping tape for my french tip guides.  I then used Sally Hansen Rockin' Hard for the french tips and immediately removed the striping tape after painting each tip.

colorful french tips

I finished off with two coats of Seche Vite.  I then threw out my bottle of Seche Vite because it always shrunk my manicures.  I think I just had a bad bottle because everyone else who talks about Seche Vite says it is great and never shrinks their manicures.  Maybe my bottle was just old.  I ordered it online.  I might try a new bottle of it some day.

colorful french tips

Follow me on Snapchat!


Tuesday, March 24, 2015

Looks Like Gunmetal


I'm back!  I was away with my best friend for almost a week.  I did this manicure right after my pink pearl one, but didn't feel like posting it right away.  I had said in that post that I couldn't wait to use Essie Oui Madame over a black polish.  Well, I tried that soon after.  I was hoping that the final effect would be a darker black pearly color, but I ended up liking it because it did make a really neat color. It turned out to look like gunmetal.

gunmetal nails

I started out with a base coat of Sally Hansen Double Duty.  I am really excited because I ordered OPI Natural Nail Base Coat yesterday!  I can't wait to try it!  I've only ever tried two base coats before.  Sally Hansen Double Duty is okay, but does not prevent staining at all.  That is why I really wanted a new one.

gunmetal nails

Anyway, I then applied two coats of Sinful Colors Black on Black.  I waited until that was dry, and then I applied one coat of Essie Oui Madame.  I was surprised with the final product.  It was actually really pretty.  Just unexpected.  I finished off with two coats of Sally Hansen Dries Instantly.

gunmetal nails

I am also excited because I ordered some triangular silver studs and a new nail polish from Amazon.  Ever since I saw a picture of it on Hannah Rox It's Facebook page, I was on the lookout for Essie Just Stitched, a light pink matte polish from the new Cashmere Mattes collection.  I will definitely be swatching that one!

Follow me on Snapchat!


Friday, March 13, 2015

Luck o' the Irish

So, St. Patrick's Day is soon (Tuesday), and I wanted to be festive.  I think I may have gotten better at doing festive manis sooner, so you guys can see them BEFORE the actual holiday.  Haha!

st. patty's day nails

I started out with a base coat of Sally Hansen Double Duty.  This is not good at protecting against staining.  I really need to get a new base coat.  Any suggestions?  Anyway, after applying the base coat, I applied two coats of my polishes.  I used Sally Hansen Golden-I on my thumbs and ring fingers, and I used Essie Mojito Madness on my other nails.

st. patty's day nails

I waited for that to dry, then I used a tiny nail art brush dipped in Revlon Rain Forest to paint on the stems that would be part of the rhinestone shamrocks.  I then took Double Duty and a dotting tool to apply four dark green rhinestones to my thumbs and ring fingers.  After that, I moved on to my green nails.

I used green and gold  holographic loose glitter to line the free edges of the green nails.  I used Double Duty to apply the glitter, and to pick it up with a dotting tool.  When that was done, I applied a coat of Essie As Gold as it Gets (a fine, gold glitter.  I got it because it was on sale for really cheap.  Honestly, it is NOT as gold as it gets.  It is a little disappointing, but it can look pretty over certain colors.  It is just really subtle.) on the green nails.

st. patty's day nails

I finished off with two coats of Sally Hansen Dries Instantly.

st. patty's day nails


Happy Saint Patrick's Day!  Follow me on Snapchat!  I post a lot of random stuff on there.


Monday, March 9, 2015

Pink Pearl

I finally figured out the best use for one of my polishes!  Essie Oui Madame, a sheer pearly color (also, one of the first polishes I ever bought) is best for giving any polish a pearly finish.  It is soooo pretty! 

pink pearl nails

I started out with a base coat of Sally Hansen Double Duty.  I then applied two coats of Sally Hansen Pink Blink.  When that was dry, I applied a coat of Essie Oui Madame and finished off the manicure with two coats of Sally Hansen Dries Instantly.  Super easy!

pink pearl nails

I am now really excited to use this polish over other colors!  I really want to use it over black!  It is just SO SO pretty!  You can also use Oui Madame by itself, but I am really liking it over top of colors!

pink pearl nails

Follow me on Snapchat!


Tuesday, March 3, 2015

International Women's Day Nails!!

Well, I had been doing well with blogging.  Oh, well.  I am super excited about this manicure today!!  March 8th is International Women's Day!  I will be away this weekend with my two best women (my sister and my best friend), so I won't have time to do a mani then.  I decided to do it a little early!

My inspiration:  Rosie the Riveter


rosie the riveter nails

I started out with a coat of Sally Hansen Double Duty.  The I painted two coats of polish on all my nails.  On my thumbs I used Sally Hansen Pink Blink; on my ring fingers I used Sinful Colors Gogo Girl; and on the rest of my nails I used Avon Sunshine.  I then applied a coat of Sally Hansen Dries Instantly on the yellow nails to get them ready for tape.  

On my thumbs I took a bunch of earthy polishes to represent skin tones and then dotted those on to form a female sign.  I used a couple different sized dotting tools to do this.

female sign nails

Then I moved on to my ring fingers.  I used white acrylic paint and a dotting tool to make my polka dots, like on Rosie's bandanna.  

rosie the riveter nails

I then applied corners of squares of masking tape near my cuticles on the yellow nails and then painted over that with Sally Hansen Thinking of Blue.  These are supposed to be Rosie's blue shirt.  I used yellow because it matches the background of the Rosie the Riveter poster.  

rosie the riveter nails

Anyway, after the blue dried, I mixed gray and white acrylic paint together to make a lighter gray.  I then took a small detail brush and outlined the collars of the shirt and painted on the lapels and buttons and line showing where the shirt comes together.  I used gray acrylic paint and a dotting tool to add Rosie's lapel pin.

I finished off with two coats of Sally Hansen Dries Instantly.  

HAPPY INTERNATIONAL WOMEN'S DAY!  BE PROUD TO BE A WOMAN!!

You can follow me on Snapchat if you want!


Sunday, February 22, 2015

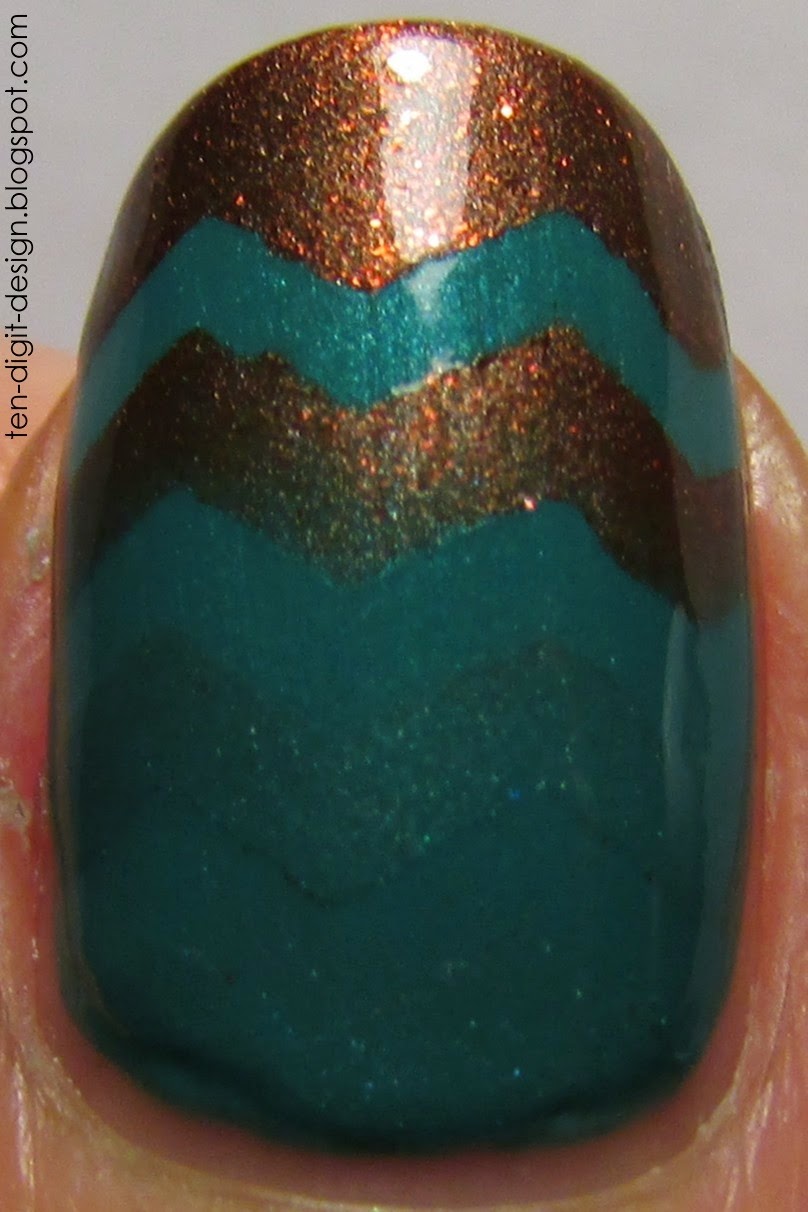
Gradient Zigzags

Color combinations can really make a manicure.  Even if your nails are painted just a couple basic colors, it can look SUPER cool if the colors go well together.  I am not too great at finding interesting color combinations, but this manicure's colors made me really happy.

gradient nails with zigzags

I started out with a base coat of Sally Hansen Double Duty.  I then painted on two coats of Sally Hansen Jazzy Jade (the teal color.)  After that, I painted a coat of Sally Hansen Dries Instantly over everything to get them ready for tape and sponging.  I took a makeup sponge and applied Sally Hansen Jazzy Jade and Sally Hansen Kinetic Copper (which is a magnetic polish that is also super pretty without the magnetic effect) and painted them onto the sponge so they overlapped in the middle.  

zigzag gradient nails

I then rolled the sponge over all of my nails, except for my ring fingers and thumbs.  For those nails, I took some zigzag tape (which I got from Amazon) and applied three strips across each nail.  I stuck the tape on the back of my hand before applying it to my nails so that it would be gentler on the polish.  I always try to minimize the chance of tape removing my base color.  That is THE WORST!  I then used the same sponge and rolled it over these nails until I got my desired gradient.  I removed the tape after doing each nail.  I always reapply a good amount of polish to the sponge in between each nail.

gradient zigzag nails

I decided to stick a holographic, mirrored star sticker on my ring finger.  The points were sharp, so I trimmed them a teeny bit with small scissors.  I then applied two coats of Dries Instantly over everything.  Gradients dry super fast, so you don't really need to wait to apply your top coat.  I applied three coats of top coat on my ring finger to make the star not stick out as much.

Follow me on Snapchat!

Friday, February 20, 2015

Water Decals Again!


I had only ever used nail tattoos (water decals) once before.  That was last fall.  I blogged about it.  I actually forgot exactly how to apply them, so I referred to that post before getting started today (http://ten-digit-design.blogspot.com/2014/09/nail-tattoos.html).  

nail tattoos

I started out with a base coat of Sally Hansen Double Duty.  I then painted two coats of polish on each nail.  On my thumbs and ring fingers (my accent nails) I used Sinful Colors Snow Me White.  I used Essie Loophole on the rest of the nails.  I then used tweezers to apply the tiny mirrored stickers on the silver nails.

nail tattoos

Before I even started painting my nails, I cut out pieces from the small sheets of nail tattoos I got from Walmart ("Heart 2 Art" brand).  I cut them so they were roughly the shape of my nails.  When I was ready to apply them, I filled a shot glass with water and then used tweezers to pick one up and dip it into the water for a couple seconds.  I then gently pressed the tattoo over my nail for ten seconds and then carefully slid off the paper backing.  

nail tattoos

There was a bit of excess tattoo at the end of some of the nails, so I took a nail buffing file and lightly filed the end of the nail with the non-abrasive side until I could easily pull off the excess.  I used my tweezers and gently pressed them along my cuticles to break off any excess there.  Acetone on a nail art brush can help you to remove the tiny bits that may be left over.  I'd suggest getting as much off as you can before resorting to the acetone because it melts the excess tattoo and creates a sticky residue. 

nail tattoos

To minimize cleanup, try to cut the tattoos as close to your nail shape as you can.  You can see on my ring finger that I accidentally wrinkled the tattoo while applying it.  You need to be very careful when sliding off the backing.  It isn't as noticeable in person, though.  Once you get the hang of these, they're actually a breeze to apply and clean up.  I would definitely recommend trying them out!  They are a lot of fun! 

I finished off with two coats of Sally Hansen Dries Instantly.
Follow me on Snapchat!